A tubeless tire won’t seat when the bead cannot climb into the rim’s bead seat and form an airtight seal. You may hear air escaping, see one section sitting low in the rim, or find that the tire will not inflate at all.
The safest fix is not to keep pumping harder. Start with compatibility, rim tape, the valve and bead position, then work through soapy water, a strap and finally a controlled high-volume burst of air.
Covers a new tubeless tire that will not seat or inflate during installation. Assumes basic wheel removal and tire handling. Does not cover puncture repair, routine sealant refresh or slow leaks after a successful install.
Why a Tubeless Tire Will Not Seat
First, separate two problems. If no air enters the tire, the valve may be blocked, the valve core may be stuck or the pump may not be delivering air quickly enough. If air enters but escapes around the bead, the tire is not sealing against the rim yet.
Check the basics before reaching for a compressor:
- The tire is marked tubeless-ready or otherwise approved for your intended system.
- The rim is tubeless-compatible and the tire and rim are the same nominal size.
- The bead is not torn, folded, stretched or visibly distorted.
- The rim tape covers every spoke hole and is firmly bonded to the rim bed.
- The tubeless valve is the correct length and its rubber base is sitting squarely against the tape.
A loose-fitting tire can be harder to inflate because the sidewalls do not push outward against the rim. An awkward bead position, an obstructed valve hole, narrow or badly fitted tape, or a valve core left in place can also restrict the initial rush of air.
Do not add sealant before the bead can hold air. Sealant can help close tiny pores once the system is assembled, but it will not fix a bead that is sitting outside its seat. It usually creates expensive soup on your workstand instead.
What You Need Before You Start
Gather the useful tools before removing the tire again:
- A floor pump with a large air chamber
- A tubeless inflator or compressor with a suitable nozzle
- Soapy water in a spray bottle
- Tubeless-safe tire levers, such as Schwalbe tire levers
- A strap or toe strap that can wrap around the tire
- A valve-core tool
- Eye protection
A normal mini pump is usually the wrong tool for initial seating. It moves air too slowly to push loose sidewalls outward and into the bead seat. It remains useful on the road once a tire is already seated, but that is a different job.
For stubborn installations, a high-volume device such as a Topeak TubiBooster or Bontrager TLR Flash Charger can deliver air much faster than an ordinary floor pump. Keep your fingers clear of the bead and rim while adding pressure, and use only the pressure limits stated by the tire and rim manufacturers.
Removing the valve core normally gives the air a faster route into the tire. That is helpful during initial seating, but the core must be refitted before you set normal riding pressure.
Step-by-Step: Seat the Bead and Inflate the Tire
1. Inspect the tape and valve
Deflate the tire fully and inspect the rim bed. The tape should cover all spoke holes without lifting at the edges. If you can see a spoke hole, a crease has opened or the tape is moving, stop and correct that first.
Check that the valve nut is snug by hand and that the rubber valve base sits flat against the inside of the rim. Remove the valve core and make sure it moves freely. A cheap or damaged core can restrict airflow, while a valve installed at an angle can leak before the bead has any chance to seat.
2. Put both beads in the center channel
Fit the tire carefully so both beads sit in the rim’s central channel wherever possible. The center channel is deeper than the bead seat, which creates slack and gives you enough room to fit the final section without levering against the rim tape.
Use tire levers only when necessary. Do not pinch the tape between the lever and rim, and do not force a bead over the rim if it is clearly the wrong size. A tire that is difficult to fit is not automatically unsafe, but damaged tape is a predictable way to turn a simple job into a leak.
Once the tire is fitted, push both beads toward the center channel except at the section that refuses to sit correctly. This leaves the bead with room to move outward when air enters.
3. Lubricate the bead
Spray a light film of soapy water around both bead edges. You do not need to soak the wheel. The lubrication helps the rubber slide into position, while bubbles reveal where air is escaping.
Use soapy water rather than oily lubricant. Oil or solvent can affect rubber, tape or sealant, and there is no advantage in adding an unknown chemical to a tire system that already has enough variables.
4. Add a strap if the sidewalls are too loose
If the sidewalls fall inward and leave a large gap at the rim, wrap a strap around the circumference of the tire. Tighten it enough to push the sidewalls outward toward the bead seats, but not so tightly that you crush the rim or distort the tire.
A toe strap works for many setups. The strap does not repair an incompatible tire or replace correct rim tape; it simply helps the bead catch long enough for the first air burst to do its job.
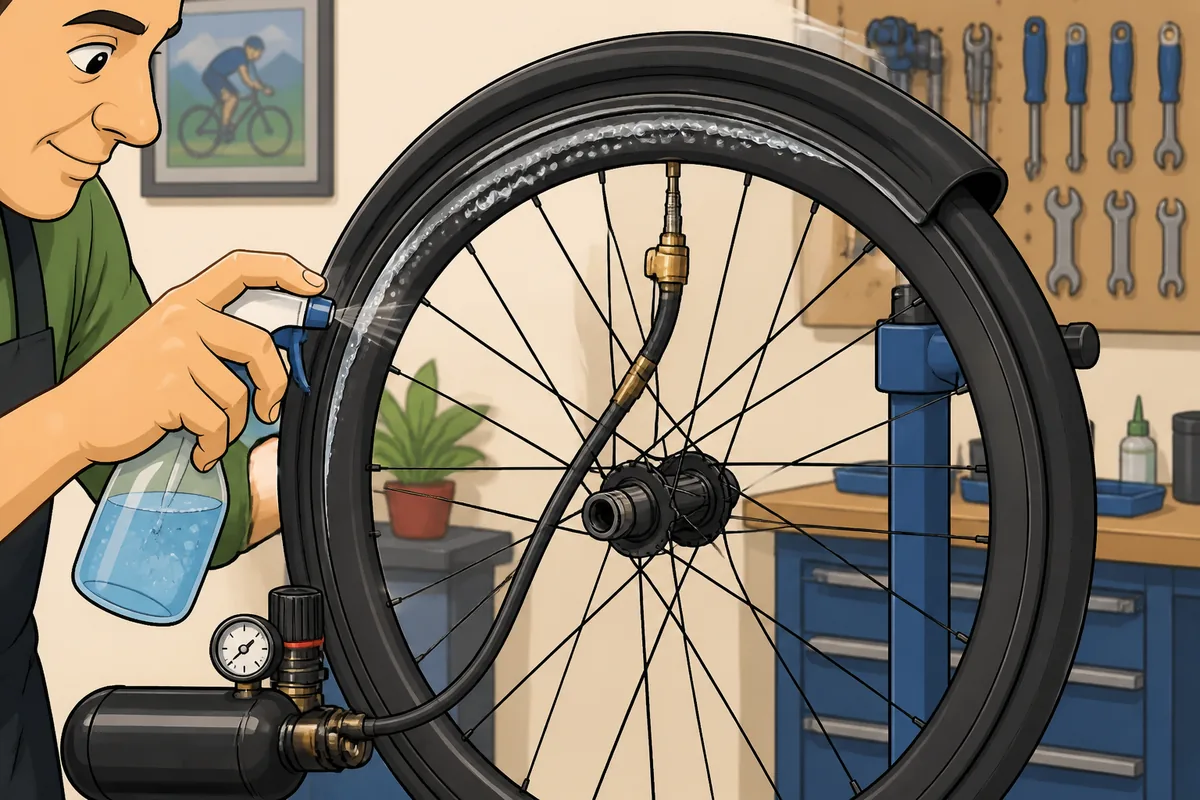
5. Use a controlled burst of high-volume air
With the valve core removed, connect the tubeless inflator or compressor. Keep the wheel stable and your hands away from the bead. Add air in short, controlled bursts rather than opening a high-pressure source indefinitely.
Listen and look for both beads moving into the rim’s bead seats. You may hear one or more pops as they engage. Stop once both sides are visibly seated. More pressure is not a substitute for the correct tire size, intact tape or an undamaged bead.
If you are using a compressor, its pressure can rise quickly. Use a regulator or the manufacturer’s recommended method, and never exceed the lower pressure limit stated for the tire or rim.
6. Refit the valve core and inspect the bead line
Once the bead has caught, reinstall the valve core and inflate to a sensible seating pressure within the tire and rim manufacturer’s limits. Do not keep increasing pressure simply because you have not yet added sealant.
Inspect the molded line near the bead on both sides of the tire. It should run at an even distance from the rim all the way around. If the line dips into the rim or rises sharply in one section, deflate and correct that area rather than riding on it.
Add sealant only after the tire is seated, unless the tire maker’s fitting instructions specifically require another method.
If It Still Will Not Inflate: Find the Leak Point
Stop repeatedly adding air and use soapy water to locate the escape route. The location tells you what to check next.
| What you see | What to check next |
|---|---|
| No air entering the tire | Remove the valve core, check that it is not blocked, and confirm the inflator nozzle is opening the valve. |
| Air leaking at the valve | Check the valve nut, rubber base, valve core and the tape seal around the valve hole. |
| Air leaking around one bead section | Push that section into the center channel, apply soapy water, use a strap and try another controlled air burst. |
| Bubbles around the whole bead | Recheck tire size, bead position, rim-tape width and whether the rim is genuinely tubeless-compatible. |
| Bead still will not seat after high-volume air | Stop increasing pressure. Inspect for damage or incompatible parts, then replace the suspect component or use a bike shop. |
Bargain valve cores, thin tape and generic tape that is too narrow can waste more time than they save. The tape must cover the spoke holes without climbing so far up the sidewall that it prevents the tire bead from sitting correctly. A valve can also be tight while its base is still crooked, so judge the seal by its position inside the rim, not just by the outer nut.
When to Stop and Use a Different Setup
Do not keep increasing pressure to force a visibly damaged, distorted or incompatible setup into place. Stop if the bead is torn, the rim is cracked or dented, the tape is lifting, or the tire is not the correct size for the rim.
If a known-compatible tire still refuses to seat after you have checked the valve and tape, positioned the beads correctly, used soapy water, tried a strap and delivered controlled high-volume air, escalation is the sensible choice. A bike shop can identify mismatched components or replace a damaged valve and tape without turning the wheel into a pressure experiment.
A compressor or dedicated tubeless inflator is a sensible purchase if you fit tubeless tires regularly. For most riders, though, a floor pump is the better default for topping up a tire that is already seated. Buying a bigger pump will not correct a poor rim-tape job.
Check the Installation Before You Ride
Confirm that the bead line is even on both sides and that the valve is secure. Add the correct amount of sealant, then rotate and shake the wheel as appropriate for the tire maker’s instructions. Check for bubbles or persistent leaks around the bead, valve and sidewall.
Before riding, inspect the wheel again for bead movement or visible leaks and recheck the pressure after the sealant has had time to spread through the system. A successful bead pop proves that the tire engaged with the rim; it does not, by itself, prove that the complete system is airtight.
If the tire later loses air after a successful installation, use the separate guide to tubeless bike tire losing air. For sealant quantity, see how much tubeless sealant to use. If you are choosing an inflator, the guide to an electric bicycle pump covers that equipment separately.
Frequently Asked Questions
Should I remove the valve core when seating a tubeless tire?
Usually, yes. Removing the core lets a compressor or tubeless inflator deliver air faster, which can help the bead catch. Refit the core before setting normal pressure and check that it is tightened correctly.
Can I use a tire strap to seat a tubeless tire?
Yes. A strap can push loose sidewalls outward so the bead catches, but it should support a controlled air burst rather than replace compatibility, valve and tape checks.
How much pressure should I use to seat a tubeless tire?
Use only the tire and rim manufacturer’s stated limits. Stop once the bead seats. Do not keep increasing pressure to compensate for a damaged bead, poor tape installation or incompatible tire and rim.
The practical sequence is simple: check the parts, create slack in the center channel, lubricate the bead, use a strap if needed, remove the valve core and apply controlled high-volume air. If that still fails, stop and replace or escalate the suspect component rather than betting your wheel on more pressure.

I’ve spent way more time in the bike trade than anyone should reasonably want to. In that time I’ve wanted to make cycling jargon and marketing easier to cut through to help people get the bike of their dreams.
When I’m not writing about bikes, I can be seen out bikepacking on single speed bikes or teaching kids how to ride.