A tubeless tire losing air overnight is not automatically worn out. A little pressure loss can come from casing porosity or temperature changes, but a tire that is noticeably soft or flat by morning has a leak worth finding.
Use the cheapest-and-most-likely-first order: inflate the tire, check the valve, use soapy water to locate bubbles, then inspect the tape, bead, casing, and sealant. Do not simply add more sealant before finding the fault. Sealant will not tighten a loose valve core or repair damaged rim tape.
This assumes your tubeless-ready wheel and tire are already assembled. If the tire will not seat safely, the rim is damaged, or the casing has structural damage, stop and ask a shop to inspect it.
Start by finding where the air escapes
Inflate the tire to a sensible inspection pressure without exceeding the marked limit for the tire or rim. If it goes flat immediately, keep your hands and face clear while checking it; an unseated bead can release air suddenly.
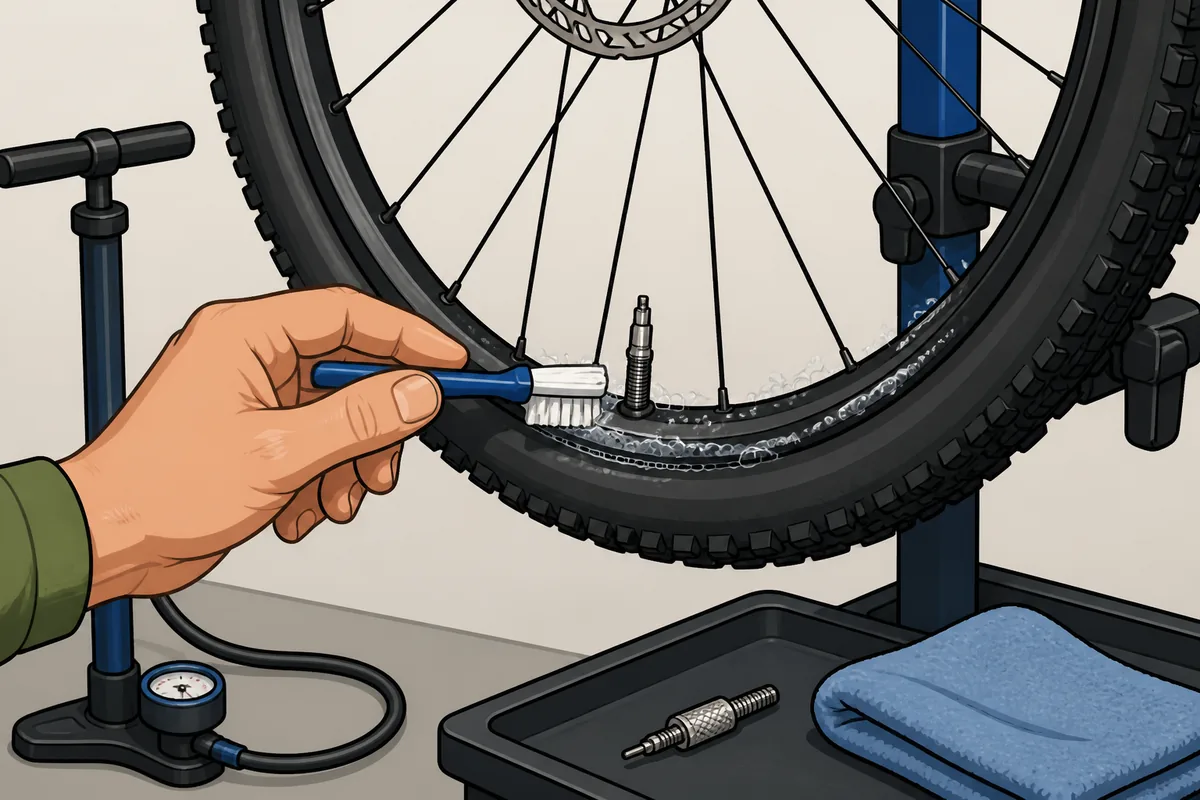
Brush soapy water around the removable valve core, valve base, bead lines, tread, and sidewalls. Growing bubbles show where air is escaping. Rotate the wheel slowly so you check the complete circumference. A water bath can reveal tiny leaks, but soapy water is the cleaner first test. Do not submerge a wheel with electronic equipment attached, and wipe sealant off after testing.
Bubbles at the valve point to the valve. Bubbles around the bead suggest seating, contamination, or compatibility trouble. Sealant appearing at the tread or sidewall suggests a puncture or porous casing. Bubbles around spoke holes or air escaping from the rim bed usually mean the tire must come off so you can inspect the tape.
| Symptom | Likely cause and first check |
|---|---|
| Bubbles at the valve | Loose valve core, damaged core, poor rubber base seal, or loose locknut. Tighten and inspect the valve. |
| Bubbles around the rim or spoke holes | Pinhole, wrinkle, lifted edge, or incorrect-width rim tape. Remove the tire and inspect the full tape run. |
| Bubbling around the bead | Incomplete seating, dirt, dried sealant, an incompatible tire and rim, or a previous burp. |
| Sealant weeping from tread or sidewall | Small puncture, porous casing, cut, or casing damage. Rotate the wheel and check whether fresh sealant closes it. |
| Immediate flat after inflation | Large cut, failed tape, open valve leak, unseated bead, or serious rim or tire damage. Do not ride until identified. |
The likely causes of overnight air loss
Leaking valve core or valve stem
The removable valve core is the quickest failure to check. It can loosen during inflation, or its internal seal can become damaged. If bubbles form around the core, tighten it gently with a valve-core tool. Pliers are a poor substitute and can crush the core.
If bubbles form where the valve meets the rim, check the rubber base, locknut, valve-hole area, and tape around the hole. The valve must suit the rim profile and hole. Replace the valve if its rubber base is cracked, distorted, or still leaks when correctly tightened. For more valve-specific checks, see our guide to tubeless valve stem leaking.
Damaged or badly fitted rim tape
Rim tape seals the spoke holes from the tire’s air chamber. A pinhole, wrinkle, lifted edge, gap at the join, or tire-lever nick can cause a slow leak. Tape that is too narrow may not cover the rim bed; tape that is too wide can interfere with bead seating.
If the tape looks questionable, replace it rather than patching one small section indefinitely. Remove the tire, clean and dry the rim, inspect the entire tape run, and fit tape of the correct width. Bad tape is usually a more sensible repair than repeatedly adding sealant.
Bead leak or burp
The bead seals the tire against the rim. Dirt, dried sealant, incomplete seating, an incompatible tire and rim, or a damaged bead can leave a path for air. Low pressure, hard cornering, or a rim strike can also briefly unseat the bead, known as a burp.
This explains a tire that looks fine in the stand but becomes soft after a rough ride. Lower pressure can improve comfort and grip, but it gives the bead and rim less support. Rider weight, tire width, rim width, and route surface all matter.
Casing, tread, or sidewall damage
Thorns, glass, pinch damage, cuts, and worn casings can all cause overnight air loss. A small tread puncture may seal with fresh sealant or a tubeless plug where the tire maker permits that repair. A large cut, damaged sidewall, bulge, exposed casing threads, or damaged bead is not a sealant problem. Replace the tire.
Low or dried sealant
Sealant needs to remain liquid so it can coat the casing and reach small punctures. Once most of it has dried into clumps, the tire may stop sealing new holes. Check whether liquid remains rather than relying only on a calendar interval, then follow the sealant maker’s recommended quantity for that tire volume.
Stan’s Stan’s NoTubes resources cover valve, tape, bead, and sealant troubleshooting. Do not use extra sealant as a substitute for checking the valve, tape, and tire.
Fix the fault in the right order
- Valve: Tighten the valve core, check the locknut by hand, and clean the rubber base and valve-hole area. Replace a damaged tubeless valve.
- Rim tape: If air is escaping through the rim bed, remove the tire and sealant, inspect the whole tape run, and replace doubtful tape. Clean and dry the rim first.
- Bead: Deflate fully, clean the bead and rim sealing surfaces, and check for cuts or deformation. Reinflate with a floor pump or compressor until the bead seats evenly all around. Rotate and shake the wheel so sealant reaches the casing and bead.
- Casing: Use fresh sealant or a suitable plug only for a small tread puncture. Replace the tire for a large cut, sidewall damage, bulge, exposed casing, or damaged bead.
- Sealant: Remove old residue where practical and add the recommended amount of fresh sealant. If the tire still loses pressure with a sound valve, intact tape, and properly seated bead, the casing may be worn out.
A compressor can help seat a bead, but it cannot fix the wrong tape width, an incompatible tire, a damaged rim, or an unsafe casing. Do not ride a tire that will not hold pressure, repeatedly burps off the rim, or shows structural damage.
Prevent the leak returning
Check pressure before every ride. A floor pump with a dependable gauge is more useful than squeezing the tire and guessing. Keep a valve-core tool and a spare tubeless valve at home; add rim tape, sealant, tire levers, and a plug kit if you regularly ride away from support.
Inspect sealant periodically and refresh it when little liquid remains. Rotate the wheel occasionally during long storage, and avoid leaving a tubeless tire completely flat for weeks. Fit tape and valves that match the rim, and take care not to lever against the rim bed during tire installation.
If you ride rocky routes, review pressure and rim support instead of simply adding sealant. Lower pressure has comfort and grip benefits, but too little support increases the chance of rim strikes and bead burps.
When replacing the tire or asking a shop makes sense
Replace the tire for recurring sidewall leaks, visible bead damage, bulges, structural casing damage, or persistent pressure loss after the valve, tape, bead, and sealant checks are sound. Repeatedly topping up a tired casing is usually false economy.
Ask a shop to inspect the setup if the tire will not seat safely, the rim appears dented or cracked, the tape is difficult to access, or the system loses air immediately after every repair. A shop can also check tire-and-rim compatibility.
Frequently asked questions
Why is my tubeless bike tire losing air overnight?
The usual causes are a leaking valve, damaged rim tape, an unseated bead, a punctured casing, or sealant that is low or dried out. Find the leak before replacing parts.
How do I find a tubeless tire leak?
Inflate the tire and apply soapy water around the valve, bead, tread, and sidewalls. Look for growing bubbles and rotate the wheel to check the whole tire. Tape leaks usually require removing the tire for confirmation.
Can dried tubeless sealant cause air loss?
Yes. Dried sealant may no longer coat the casing or seal small punctures. Remove old residue where practical and add the correct amount of fresh sealant.
Should I replace a tubeless tire that loses air overnight?
Not immediately. Locate the leak first, but replace the tire if the casing, bead, or sidewall is damaged, or if it still loses pressure after the valve, tape, bead, and sealant checks.
How much overnight air loss is normal for a tubeless tire?
Some gradual pressure loss is normal, and casing porosity and temperature affect it. A tire that becomes noticeably soft or flat overnight needs diagnosis rather than a precise percentage to excuse it.

I’ve spent way more time in the bike trade than anyone should reasonably want to. In that time I’ve wanted to make cycling jargon and marketing easier to cut through to help people get the bike of their dreams.
When I’m not writing about bikes, I can be seen out bikepacking on single speed bikes or teaching kids how to ride.