
Getting the right bike size starts with a useful inseam measurement, but it does not end there. If you are learning how to measure inseam for a bike, the aim is a repeatable floor-to-pubic-bone measurement that you can enter into a manufacturer’s sizing chart.
It is not your trouser inseam, and it is not a magic number that determines every part of your fit. Use it to narrow the choice, then check the actual bike’s geometry, clearance and riding position.
This guide assumes you can stand comfortably and are measuring for a bike fit or sizing chart. It does not replace a professional fit for persistent pain, major leg-length differences, injury recovery or complex positioning needs.
Why your inseam measurement matters for bike sizing
Your cycling inseam is the distance from the floor to the point where the top of the inside leg meets the pubic bone. In practical terms, it helps indicate how much room you need inside the bike’s frame and how high the saddle may need to sit.
That makes it useful for checking:
- Standover clearance: whether you can stand over the top tube without an uncomfortable encounter.
- Saddle height: a starting reference for the distance from the saddle to the pedals.
- Manufacturer sizing charts: many brands use height and inseam together to suggest a frame size.
However, inseam cannot determine your complete bike fit. Torso length, arm reach, flexibility, crank length, saddle shape, bike type and intended riding position all matter. A rider with a long torso and short legs may need a different frame setup from someone with the same height and a shorter torso.
The safest default is to use inseam as one sizing input, not as a verdict. Do not choose between a road bike, gravel bike, hybrid, mountain bike or step-through frame from one inseam number without checking that specific manufacturer’s chart.
What you need before measuring
You do not need cycling-specific equipment. Set up on a hard, level floor against a wall and gather:
- A hardcover book or spirit level.
- A tape measure.
- A pencil or removable marker if you are marking the wall.
- A helper, if available.
Measure barefoot or in thin, consistent socks unless the bike manufacturer’s chart specifically gives different instructions. Close-fitting cycling shorts or similarly thin clothing are preferable. Thick trousers introduce another variable and can make it harder to position the book correctly.
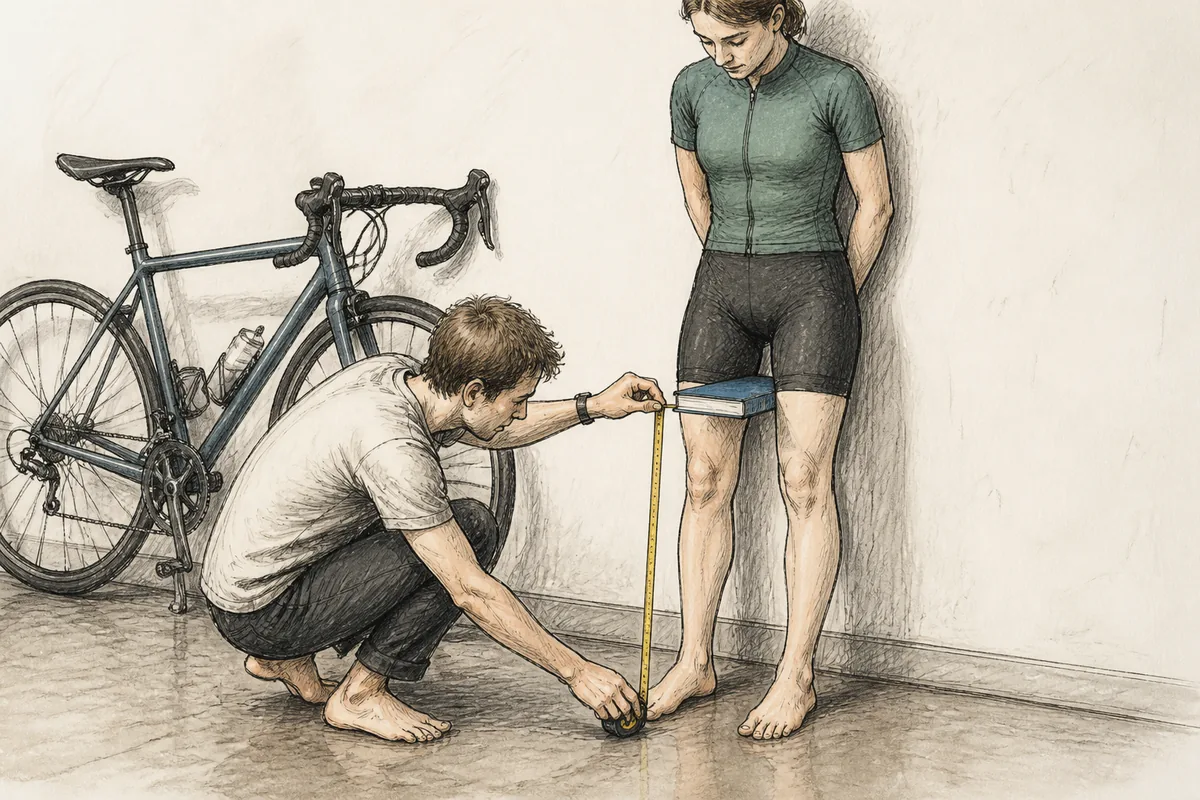
A hardcover book is better than a soft tape measure placed between your legs because it creates a firm, level reference point. Raise it until it makes firm but comfortable contact with the pubic bone. Do not force it upward, and do not balance on an unstable surface while measuring. This is bike sizing, not an audition for a circus act.
How to measure your inseam step by step
- Choose the surface. Stand on a hard, level floor with your back against a wall. Avoid thick carpet, which can compress differently under your feet.
- Set your feet. Place your feet approximately 15-20 cm apart. Keep your weight evenly distributed.
- Keep your posture neutral. Leave your heels on the floor, stand upright and look straight ahead. Do not lift your chin, crouch, lean to one side or push your hips forward.
- Position the book. Slide the hardcover book between your legs. Keep its long edge level and raise it until it makes firm, comfortable contact with the pubic bone, similar to the contact point of a bicycle saddle.
- Mark the height. Keep the book level while a helper marks the wall at its top edge. If you are measuring alone, hold the book steady and mark the wall carefully, or measure from the floor to the top edge of the book.
- Take the measurement. Measure from the floor straight up to the mark or book edge. Keep the tape vertical rather than following the curve of your body.
- Record the result. Write it down in centimetres and inches. Include the unit when entering it into a sizing chart; 84 cm and 84 inches are very different bike-buying problems.
- Repeat it. Reset your stance and measure at least twice more. If the results differ materially, check your foot position, posture and whether the book is tilted.
The final figure is the distance from the floor to the pubic-bone contact point. It is not the length of your leg seam and should not be taken from the crotch of your clothing.
| Check | What to do |
|---|---|
| Floor | Use a hard, level surface rather than thick carpet. |
| Feet | Stand barefoot or use consistent thin socks; keep feet about 15-20 cm apart. |
| Reference | Use a level hardcover book or spirit level. |
| Contact | Raise it to firm, comfortable contact with the pubic bone. |
| Repeat | Take two or three sensible measurements and compare them. |
| Record | Write down the result in both centimetres and inches. |
Common inseam-measuring mistakes
The most common weak method is using your trouser size. Trouser inseam is affected by the cut of the garment, where it sits on your waist and how much fabric is gathered at the crotch. It is not a reliable substitute for a floor-to-pubic-bone measurement.
Other mistakes are easy to make:
- Measuring through loose clothing: fabric can change the contact point and make the result inconsistent.
- Wearing shoes: footwear increases the floor height and may make you stand differently.
- Spreading your feet too far: this lowers the contact point and can produce a misleadingly short measurement.
- Pressing the book too high: you may create an artificially long measurement and an uncomfortable reference point.
- Tilting the book: one corner being higher than the other changes the mark on the wall.
- Leaning or lifting your heels: this alters the relationship between your body and the floor.
A helper usually improves the process because they can keep the book level and read the tape. It does not make the measurement automatically correct, though. You can still get a poor result if the rider leans, the book is angled or the feet keep moving.
A repeatable average of two or three sensible measurements is better than one highly precise-looking number. If you record 83.8 cm, 84.1 cm and 84.0 cm, use about 84 cm. If you get 82 cm, 85 cm and 87 cm, start again rather than calculating a heroic average.
How to use your inseam measurement with a bike sizing chart
First, check what the chart is actually asking for. It may use total height, inseam, frame size, standover height or a recommended saddle height. These are related measurements, but they are not interchangeable.
Enter your inseam exactly as the brand requests, including the unit. Brand sizing charts are not standardized. A 54 cm road frame from one manufacturer is not automatically equivalent to a 54 cm frame from another because frame angles, stack, reach and the way the frame is measured can differ.
Use this practical rule:
- If your height and inseam place you clearly within one size, start with that recommendation.
- If you fall between sizes, compare the geometry rather than automatically sizing up or down.
- Check stack, reach, standover height and the riding position the bike is designed to provide.
Stack describes the height of the front of the frame relative to the bottom bracket. It affects how high your handlebars can sit without relying on a large number of spacers. Reach describes the frame’s horizontal length toward the handlebars. It matters for torso length, arm length and how stretched or upright you will feel.
Mountain bikes and gravel bikes often need particular attention to standover and reach because their geometry and intended movement on the bike differ from a road bike. Road-bike charts commonly combine height and inseam, but that still does not account for every rider’s proportions or preferred position.
For the rest of the selection process, see our guide to how to measure bike frame size. It covers the frame measurements and geometry checks without treating inseam as the entire answer.
When an inseam measurement is not enough
One measurement deserves extra caution if you have unusual proportions, a noticeable leg-length difference, limited hip mobility, a history of injury or persistent knee, hip, neck or back discomfort. In those cases, a sizing chart can narrow the options but cannot diagnose the right position.
Saddle height is also not simply your inseam multiplied by one universal formula. Crank length, cleat position, saddle shape, riding style and how you move on the bike all affect the final setup. Formulas can provide a starting estimate, but they are not a substitute for checking how the complete bike fits.
Start with the manufacturer’s guidance, then ask a qualified bike fitter or knowledgeable shop to check the bike when the size is borderline, the purchase is expensive or you cannot find a comfortable position. That expense is usually easier to justify than trying to fix the wrong frame with a parade of stems, seatposts and spacers.
Frequently asked questions
Should I measure my inseam with shoes on?
Usually no. Measure barefoot or in consistent thin socks, then follow the bike brand’s instructions if its chart specifies a different method. The important point is to use the same method the chart expects and not mix a barefoot measurement with a shoe-based recommendation.
What should I do if my inseam falls between two bike sizes?
Compare the two frames using reach, stack, standover and intended use rather than automatically sizing up or down. A shop fit check is sensible for an expensive purchase, particularly if your proportions are unusual or you already struggle to find a comfortable position.
Measure carefully, repeat the result and use it to narrow the sizing choice. Then confirm the actual bike’s clearance and contact points before you buy.

I’ve spent way more time in the bike trade than anyone should reasonably want to. In that time I’ve wanted to make cycling jargon and marketing easier to cut through to help people get the bike of their dreams.
When I’m not writing about bikes, I can be seen out bikepacking on single speed bikes or teaching kids how to ride.
![How To Convert From Quill To Modern Threadless Stem [With A Quill Stem Adapter]](/wp/wp-content/uploads/jch-optimize/ng/wp_wp-content_uploads_2023_05_Fitting-A-Quill-Stem-Adapter-min-500x300.webp "How To Convert From Quill To Modern Threadless Stem [With A Quill Stem Adapter]")

