
Knowing when to replace bicycle disc brake pads is less straightforward than many quick online rules suggest. A generic “2 mm” or “3 mm” figure may be useful for car brakes, but it does not automatically apply to bike disc pads. Shimano, SRAM and Magura measure different parts of the pad, so the number only makes sense when you know what it includes.
This brake pad thickness chart covers bicycle disc pads and supporting rotor thickness. It does not cover car brakes, complete brake adjustment or a full brake-maintenance procedure. If you cannot inspect the brake safely, use a qualified mechanic; stopping is a poor place to conduct ambitious guesswork.
Brake pad thickness chart for bike disc brakes
The first job is identifying the measurement convention. Shimano’s wear limit refers to the remaining friction material only. SRAM’s figure includes the friction material and backing plate, while Magura’s includes the pad and carrier plate. Those are not interchangeable measurements.
| Component and manufacturer | Published minimum / replacement threshold |
|---|---|
| Shimano disc brake pad | Replace when friction material is 0.5 mm or less. |
| SRAM disc brake pad | Replace when total pad thickness, including backing plate and friction material, is 3 mm or less. |
| Magura disc brake pad | Replace when total pad and carrier plate thickness is 2.5 mm or less at any point. |
| Shimano rotor | Replace at 1.5 mm minimum thickness. |
| SRAM 1.85 mm rotor | Approximately 1.55 mm minimum thickness. |
| SRAM 2.0 mm rotor | Approximately 1.7 mm minimum thickness. |
| Magura rotor | 1.8 mm minimum thickness. |
These figures are practical brand-level references, not permission to ignore the manual for your exact brake. Model-specific documentation takes priority where it gives a different limit. Shimano’s technical documentation is available through its technical documents hub, with pad wear guidance from SRAM and Magura’s manuals and service instructions.
The safest default is to replace pads at, or slightly before, the published limit. Pads are inexpensive compared with the consequences of running a pad down to its metalwork, especially on a wet, muddy or downhill bike. If your brake model gives a different figure, use that figure rather than treating this table as a universal law. Bike brakes are already quite fond of exceptions.
Rotor thickness limits to check at the same time
Do not inspect the pads in isolation. A worn rotor can remain in service simply because the pads still appear to have plenty of material left. As the rotor becomes thinner, it has less material to manage heat and may no longer provide the braking performance intended by the manufacturer.
The rotor figures in the chart are minimum service thicknesses, not the thickness you should expect from a new rotor. Check the marking stamped on the rotor or the exact specification for that model. Rotor construction varies, and SRAM’s limit changes depending on whether the rotor began at 1.85 mm or 2.0 mm.
Measure away from a deep wear lip and at more than one point around the braking track. If the rotor is at or below its limit, replace it even if the pads are nearly new. Fresh pads cannot make an undersize rotor safe. That is why checking the rotor during a serious pad inspection is a better default than waiting for a new set of pads to expose the problem.
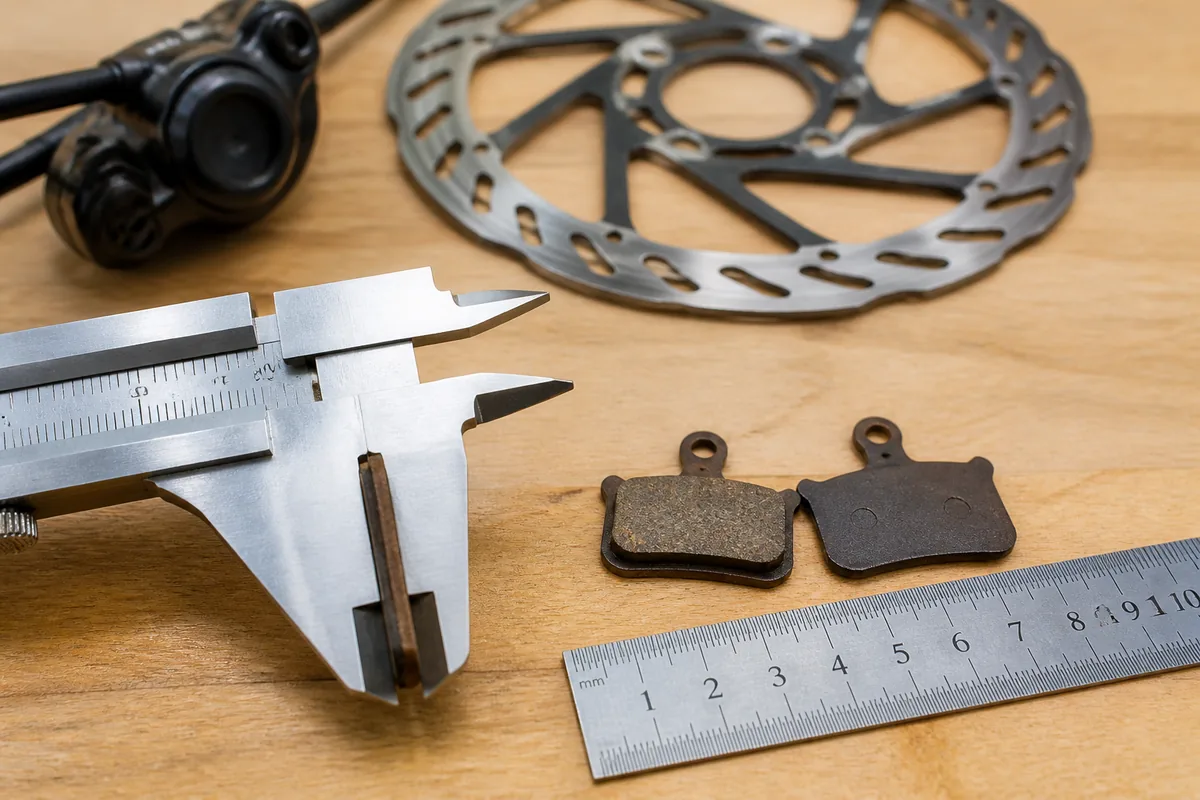
How to measure bicycle disc brake pads correctly
A disc pad has three useful areas to distinguish:
- Friction material: the material that contacts the rotor.
- Backing plate: the metal plate behind the friction material, included in the measurement used by SRAM.
- Carrier plate: hardware included in Magura’s total thickness measurement.
For the most reliable inspection, remove the pad according to the brake design, or remove the wheel if that gives you a clear view without disturbing the hydraulic system. Keep the caliper and rotor clean. A floor or workshop stand helps you see the pad squarely rather than trying to measure underneath a bike that is determined to fall over.
Use a metric ruler for a quick check or a metric vernier caliper for a more precise measurement. Measure the thinnest point, not the thickest visible edge. Hold the tool against the pad hardware or the sides of the friction material as appropriate, and do not press the jaws into the friction surface. Avoid touching the pad or rotor with greasy fingers.
Measuring in place is useful as a rough inspection, but it has limitations. Pad springs, backing plates and the caliper body can hide the friction material. Uneven wear may also be visible on one side but not the other. Check both pads individually; do not average their readings. A large difference between the two is a fault clue, not a mathematical problem.
Look for tapered wear, cracks, crumbling edges, delamination, glazing or contamination. A pad can be above the numerical wear limit and still need replacing if its structure or friction surface is compromised. Park Tool’s disc brake pad removal and installation guide provides useful general removal context, but your brake manufacturer’s instructions remain the authority.
When to replace disc brake pads before the wear limit
Replace pads contaminated with chain lubricant, oil or hydraulic fluid. Light sanding is not a dependable rescue for a contaminated pad, particularly when the contaminant has soaked into the material. Replacement is usually cheaper than trying to restore uncertain braking performance.
Also replace pads that are cracked, crumbling, delaminated, badly glazed or unevenly worn. A retaining spring or backing plate touching the rotor is an immediate inspection prompt, not a noise you should simply add to the bike’s personality.
Sudden loss of braking or persistent rubbing deserves a broader check. The cause may be air in the hydraulic system, a contaminated rotor, caliper misalignment, sticky pistons or a worn rotor. New pads will not cure all of those problems. If one pad is much thinner than the other, investigate the caliper and alignment before fitting replacements.
Usually replace both pads in the same caliper as a pair. The safest practical choice is a fresh pair when one pad is questionable, rather than running the remaining pad down to the published limit. This is particularly sensible if the bike sees frequent rain, grit, long descents or heavy braking.
What to do after fitting new bike disc pads
Use pads and rotors compatible with the brake system. Pad shapes are not universal, and “it fits in the gap” is not a reliable compatibility standard. If you are choosing a compound, the best mountain bike disc brake pads guide is more useful than naming one universally best option. Rider weight, wet conditions, rotor type and terrain all affect the sensible choice.
If the rotor is reusable, clean its braking surfaces with isopropyl alcohol or an appropriate bicycle brake cleaner. Do not handle those surfaces with oily fingers, and do not spray cleaner indiscriminately into the caliper.
Bed in the new pads according to the brake or pad manufacturer’s instructions. In general, that means repeated controlled stops that gradually build braking force, rather than one dramatic panic stop. Bedding transfers an even layer of pad material to the rotor and helps the brake develop consistent power.
Before riding in traffic or starting a descent, confirm that the wheel is securely installed, the rotor runs between the pads, the lever feels normal and braking force builds progressively. For the wider cleaning, alignment and inspection process, see how to maintain disc brakes. Shimano owners can also use the guide to adjusting Shimano hydraulic disc brakes, while SRAM users may find the SRAM MTB disc brakes reference more relevant.
Frequently asked questions
Can I use a 2 mm bike disc brake pad rule?
Not reliably. Bike brands define wear limits differently, and some figures measure friction material while others include the backing or carrier plate. Use the limit for your brake model, not a generic 2 mm rule borrowed from another brake system.
Should I replace both disc brake pads together?
Usually, yes: replace both pads in the same caliper as a pair. Before fitting them, investigate uneven wear. A difference between the pads can point to caliper alignment, sticky pistons, contamination or another problem that a new pair would temporarily hide.
Can I measure disc brake pads without removing them?
You can make a rough inspection in place, but it is less dependable. The caliper, pad spring and backing plate can hide the thinnest section of friction material, and uneven wear may be missed. Removing the pad, or at least the wheel where the brake design permits a clear view, gives you a better inspection. If you cannot confirm the measurement or the brake’s condition, use a qualified mechanic before riding.

I’ve spent way more time in the bike trade than anyone should reasonably want to. In that time I’ve wanted to make cycling jargon and marketing easier to cut through to help people get the bike of their dreams.
When I’m not writing about bikes, I can be seen out bikepacking on single speed bikes or teaching kids how to ride.


