If you want to know how to check bike chain wear, do not start with an arbitrary mileage number. A chain used through winter grit can wear far faster than one used indoors or kept clean, so the useful answer comes from measuring it.
You can check a chain while it is still fitted to the bike, using either a dedicated chain-wear checker or a ruler. The checker is quicker for regular maintenance; the ruler is slower but makes an excellent second opinion when a gauge reading looks suspicious.
This guide assumes you can shift safely and turn the cranks by hand. It covers measuring chain wear with a tool and with a ruler or tape measure. It does not cover roadside broken-chain repair or provide a mileage-based replacement schedule; for that, see our guide to how often to replace a bike chain.
Why measuring chain wear beats guessing by mileage
A worn chain has not usually stretched like a rubber band. The plates remain much the same length, while the pins and the bearing surfaces around the inner plates and rollers wear at their contact points. That small amount of wear adds up across the whole chain, increasing the distance between the rollers. This is what chain-wear tools and ruler measurements are detecting.
The rate depends heavily on how and where you ride. Wet grit works its way into the moving joints. Poor cleaning leaves abrasive paste around the rollers. Heavy shifting under load adds stress, while indoor training may produce a different mixture of sweat, dust and lubricant. Two riders can put similar distances on the same type of chain and end up with very different readings.
That makes mileage useful as a reminder to check, not as a replacement rule. Measurement should decide whether the chain stays in service. Do not assume that a chain is healthy simply because it has not reached somebody else’s replacement interval.
Ignoring wear can become expensive. Shifting may grow less precise, the chain can skip under load, and the worn chain may accelerate wear on the cassette and chainrings. A chain is relatively inexpensive compared with a complete drivetrain, so replacing it before severe wear is usually the sensible financial decision.
For most modern multi-speed drivetrains, around 0.5% wear is a sensible point to plan replacement, subject to the instructions for your chain and checking tool. Do not casually wait for a reading of 1.0%. Older, wider chains, single-speed chains and internally geared systems may use different limits, so the number is guidance rather than a universal law.
Clean the chain enough to identify the links and operate the gauge correctly before measuring. A thick layer of dirt or lubricant can affect how the tool sits, and visual clues are poor substitutes for a measurement. Rust, noise or shiny side plates may indicate a maintenance problem, but none tells you the percentage of chain wear reliably.
What you need before checking the chain
- A dedicated chain checker: the fastest option for routine checks. It is compact and repeatable when you follow its instructions.
- A ruler or tape measure: the best no-special-tool method. It takes longer, but it can verify a borderline chain-checker result.
A basic chain checker is the practical default if you maintain a multi-speed bike regularly. You do not need an elaborate workshop collection for this job. A simple gauge, a rag, good light and a few minutes will cover most checks. A Park Tool CC-4-style checker is one example of the type, but the important point is how the gauge is designed to contact the chain, not the logo printed on it.
Keep a steel ruler or tape measure available even if you own a checker. Different gauges use different contact points, and some designs can be influenced by roller play. A ruler is especially useful when the gauge reading is close to its threshold or does not agree with the chain’s apparent condition.
You will also need a rag and, if the chain is dirty, an appropriate chain cleaner or degreaser. It does not need to be spotless for a measurement, but you should be able to see the rivets and move the chain freely. Avoid measuring over a visibly damaged section if another clean section is available.
Use a repair stand if you have one. Otherwise, place the bike securely so it cannot tip while you turn the cranks by hand; do not balance an unstable bike merely to lift the rear wheel. Shift to a gear that leaves a reasonably straight section of chain, then rotate the cranks to find a clean, undamaged run.
Before reading any number, identify the chain type and drivetrain. Narrow modern multi-speed chains, single-speed chains and manufacturer-specific systems may require different thresholds. Check the gauge instructions and, where available, the chain manufacturer’s guidance. Also inspect for a cracked plate, missing rivet, seized link or serious corrosion: those are physical faults requiring attention regardless of what a wear gauge says.
How to check bike chain wear with a chain checker
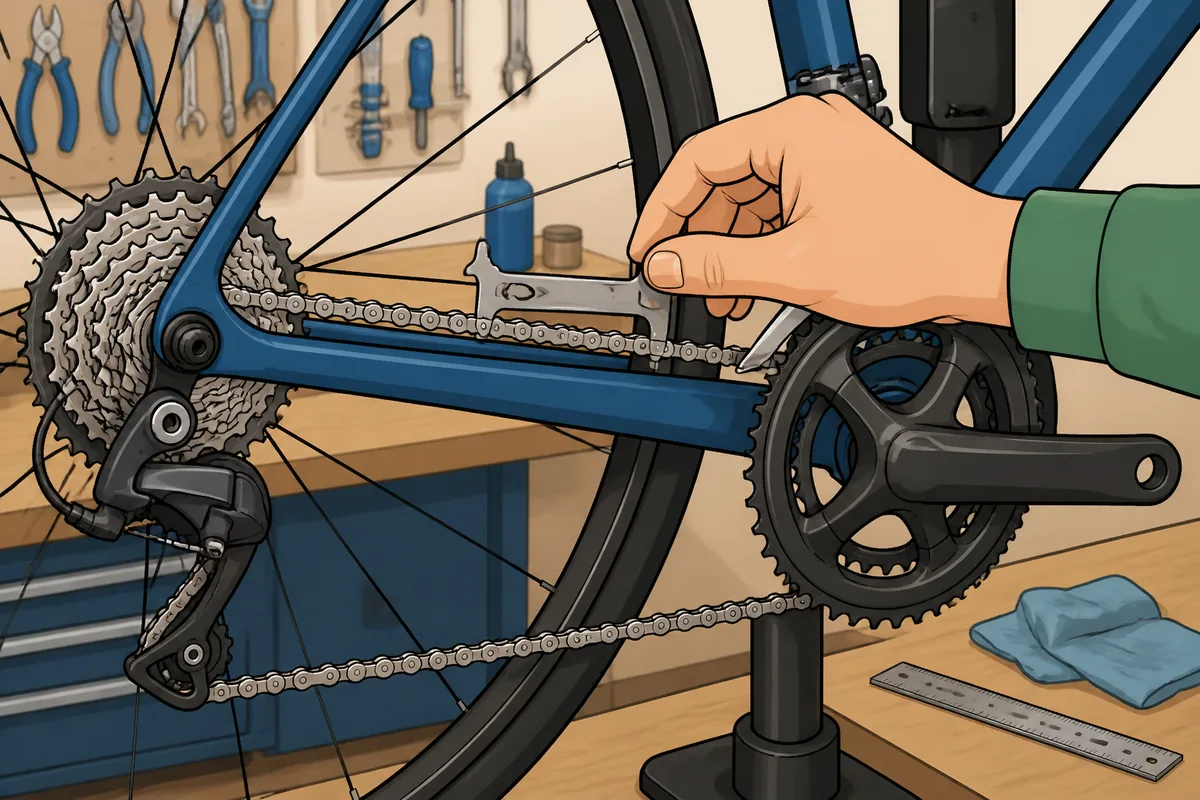
Rotate the cranks until you find a reasonably clean, straight section of chain. A chain checker is not a pair of calipers for bicycle chains. Its contact points are designed to sit in particular places, and the result depends on using them as intended.
On a two-sided gauge, place the fixed end between the rollers first, then let the other end rest in the chain. Do not force it into place or press down on the gauge to make it reach.
This matters because some gauges account for roller movement differently from others. If the gauge tip bears on a roller rather than seating against the correct chain surfaces, it can show more wear than the chain actually has. Dirt between the rollers can cause the same sort of nonsense.
For a detailed explanation of gauge design and technique, see Park Tool’s chain-wear indicator guide. Follow the gauge’s instructions, keep the chain reasonably clean, and do not turn a borderline reading into a dramatic one by leaning on the tool.
Many chain checkers show readings such as 0.5%, 0.75% and 1.0%. These figures are useful, but they are not universal laws. The correct replacement point depends on the chain design, drivetrain speed, gauge and manufacturer’s guidance.
For most modern multi-speed drivetrains, 0.5% is the sensible point at which to plan replacement. Do not casually keep riding until a gauge reads 1.0%. That may be acceptable for some older or wider chains, but it is a poor default for an expensive modern cassette.
Check two or three sections of the chain rather than trusting one reading. Rotate the cranks and repeat the test at different points, particularly if the chain has a quick link, a dirty section or a link that does not move freely.
If the gauge remains below its relevant threshold, keep using the chain and monitor it. If it reaches or passes the threshold, replacement is usually cheaper than gambling on the cassette and chainrings. A chain checker can tell you about wear, but it cannot certify a cracked plate, seized link or missing rivet as safe.
How to check chain wear with a ruler or tape measure
A ruler is the best no-special-tool method, and it is also a useful second opinion when a chain checker gives a result that does not look right. You can perform the measurement with the chain installed; you do not need to remove it from the bike.
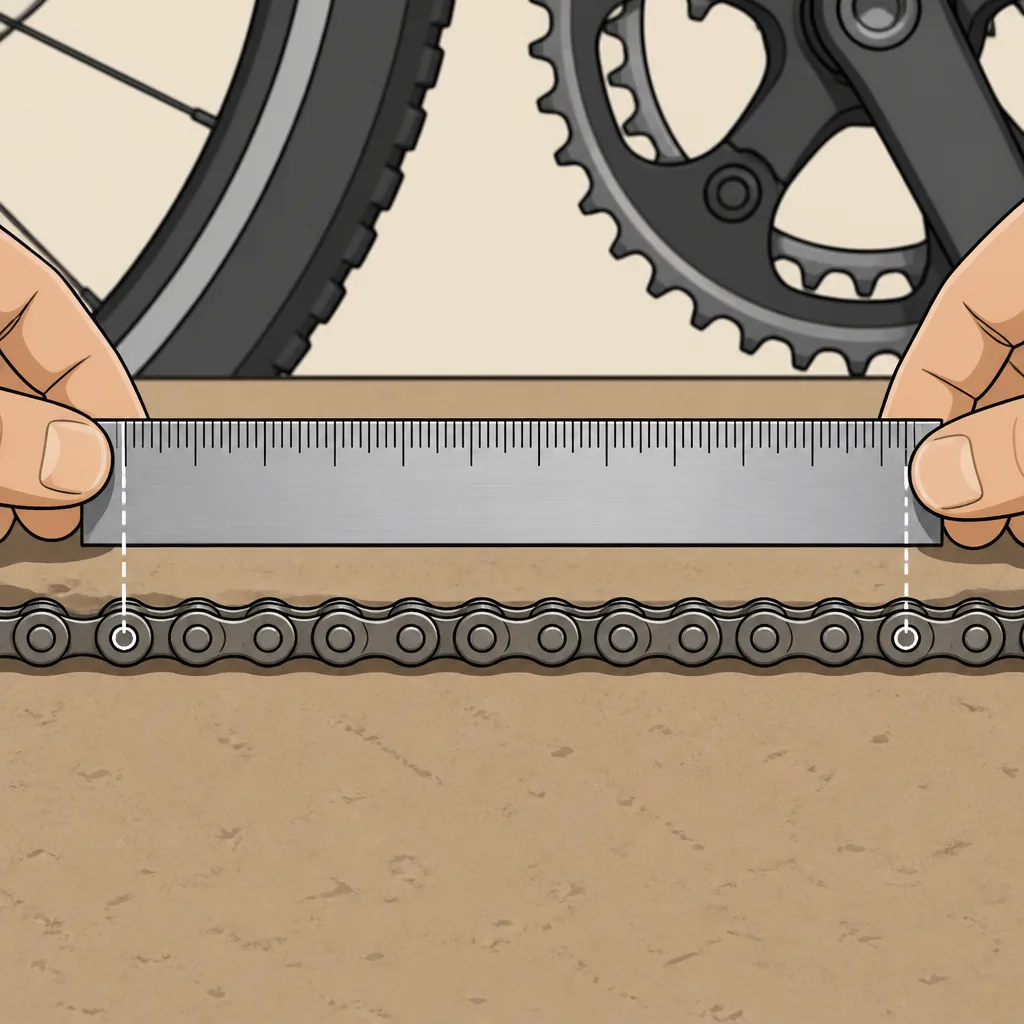
Use a clean section of chain and measure from the centre of one rivet to the centre of another rivet 12 complete links away. Keep the ruler parallel with the chain. Do not measure from the outer edge of one plate to the edge of another, and do not use the roller edges as your reference points.
On a new chain, 12 complete links measure exactly 12 inches from rivet centre to rivet centre. That is 304.8 mm. An increase of 1/16 inch, approximately 1.6 mm, is a commonly used warning point.
That figure needs some context. Modern multi-speed chains and drivetrains may justify replacing earlier, and the chain or gauge maker’s instructions take priority. If you are measuring a narrow 10-, 11- or 12-speed chain, treating 1/16 inch as permission to keep riding indefinitely is not a particularly clever economy.
Pull the chain gently so the slack is removed, but do not stretch it hard. Align the zero mark with the centre of a rivet and read the position of the rivet 12 links away. A steel ruler with clear graduations is easier to read accurately than a flexible tape, although a tape can work if it stays straight.
Repeat the measurement at another point around the chain. If one section gives a different result, inspect that area for a stiff link, damaged plate, dirt or a poorly moving quick link. A chain with a physical fault needs attention regardless of what the average measurement says.
A ruler takes longer than a dedicated checker, but a careful ruler measurement is often more useful than a badly applied gauge. If the gauge says 0.75% and the ruler suggests very little elongation, clean the chain, repeat both measurements and check that the gauge is compatible with the chain.
How to interpret the measurement
| Measurement or condition | What to do |
|---|---|
| Below the relevant threshold | Keep the chain in service. Clean and lubricate it correctly, then record the date, distance or gauge reading for the next check. |
| Borderline or inconsistent reading | Check another section, clean the chain and verify the result with a ruler. Do not force the gauge or rely on one questionable measurement. |
| At the recommended threshold | Plan to replace the chain, particularly on a modern multi-speed drivetrain where 0.5% is a sensible conservative default. |
| Over the threshold or visibly damaged | Replace the chain and inspect the cassette and chainrings. Cracked plates, missing rivets, seized links and severe corrosion are faults, not just percentage readings. |
Older, wider chains and some single-speed or internally geared applications may use different limits. A threshold that suits one chain checker or chain type should not be copied blindly to another. Use the chain and tool manufacturer’s guidance rather than treating a number on a forum as sacred scripture.
Replacing a chain slightly early is usually the cheaper mistake. If the old chain was significantly overdue, a new chain may skip on worn sprockets. Chainrings can also develop hooked or uneven teeth, while a bent derailleur hanger, poor adjustment or a stiff link can cause similar shifting complaints.
Visual clues are useful for finding problems, but they are not reliable wear measurements. Rust, noise, a shiny appearance or a dirty surface does not tell you precisely how much the chain has elongated. Measure it, then inspect it for separate physical damage.
Common mistakes that produce bad readings
- Forcing the chain checker into place. Let the gauge settle according to its design. Pushing it down can make roller play look like chain wear.
- Using the gauge from the wrong side. Some tools have different contact points or readings on each end. Read the markings and instructions.
- Checking a filthy or damaged section. Check another section after cleaning.
- Confusing slack with wear. With a ruler, take up normal slack and measure rivet centre to rivet centre.
- Measuring the wrong points. Plate edges and roller edges are not the reference points.
- Checking only one location. Rotate the chain and repeat the check.
- Replacing by mileage alone. Distance is a useful reminder to inspect the chain, not a replacement rule.
- Ignoring physical damage. Do not ride a visibly damaged chain until it has been repaired or replaced.
- Using the wrong threshold. Check the drivetrain and tool requirements first.
What to do after checking the chain
If the chain is below the threshold, clean it and apply the correct lubricant for your conditions. Wipe away excess lubricant, then record the reading or date.
If the chain has reached the replacement point, fit a chain that matches the drivetrain speed and manufacturer’s compatibility requirements. Check the correct chain length, use a compatible quick link or connecting rivet, and make sure every link moves freely after installation.
Turn the cranks by hand and shift through the gears before riding normally. If the new chain skips or shifting remains poor, inspect the cassette, chainrings, derailleur adjustment and chain for a stiff link.
For service intervals, see how often to replace a bike chain. If you are choosing a replacement, our guide to best bike chains covers compatibility and selection.
Frequently asked questions
Why does my chain checker show more wear than a ruler?
Gauge design, roller play, incorrect placement and chain dirt can affect the reading. Clean the chain, recheck the gauge technique and verify a borderline result with a ruler. If the readings still disagree, follow the manufacturer’s guidance for the specific tool and chain.
Should I replace the chain at 0.5% or 0.75% wear?
For many modern multi-speed drivetrains, 0.5% is the sensible replacement-planning point. Some chains and gauges specify a different limit, so do not transfer a threshold from one tool or drivetrain to another.
Can a new chain skip even if I measured the old one correctly?
Yes. If the old chain was significantly overdue, the cassette or chainrings may already be worn. A new chain can expose that wear under load, so persistent skipping deserves a drivetrain inspection rather than more lubricant.
A simple chain-wear checking routine
Check the chain whenever you clean it thoroughly, after particularly wet or gritty riding, or at a regular maintenance point that you can remember. Do not wait for loud noise or skipping.
For most riders, the practical setup is an inexpensive dedicated chain checker and a ruler for confirming readings close to the limit. Use the manufacturer’s guidance when the numbers do not line up neatly.
- Clean the chain enough to inspect and measure it.
- Check in at least two places around the chain.
- Use the correct threshold for the chain, drivetrain and gauge.
- Inspect for cracked plates, missing rivets, stiff links and corrosion.
- Replace a modern multi-speed chain around the relevant 0.5% planning point rather than waiting for severe wear.
- After fitting a new chain, check shifting and watch for cassette or chainring wear.
Measure rather than guess, verify a borderline result, and replace before a worn chain turns a modest maintenance job into a complete drivetrain bill.

I’ve spent way more time in the bike trade than anyone should reasonably want to. In that time I’ve wanted to make cycling jargon and marketing easier to cut through to help people get the bike of their dreams.
When I’m not writing about bikes, I can be seen out bikepacking on single speed bikes or teaching kids how to ride.