
Removing bike pedals looks simple until the wrench slips, the flats round off, or you discover that the left pedal is threaded the wrong way for your instincts. Get three things right: identify the pedal side, use the correct tool, and apply controlled leverage.
Covers standard platform, road and clipless pedals for transport, servicing, replacement or crank work. Assumes you can safely support and handle your bike. Does not cover cleat adjustment, power-meter crank service or diagnosing pedal and drivetrain noises.
What you need before removing a pedal
Start with the right tool. Many pedals have wrench flats on the axle and need a thin 15 mm pedal wrench, such as a Park Tool PW-5 or similar. Other pedals have no external flats and use a 6 mm or 8 mm hex key inserted through the back of the crank.
- A proper 15 mm pedal wrench, or the correctly sized 6 mm or 8 mm hex key
- A clean rag
- Degreaser or a suitable cleaner
- Gloves, if you prefer extra grip and protection
- A stable way to hold the bike
- Penetrating lubricant only if the pedal is genuinely stuck
A pedal wrench is thin enough to fit between the pedal and crank on many designs. An adjustable wrench may work if it fits the flats tightly, but it is a poor default: it is often too bulky, and any play makes slipping or rounding more likely. A longer handle gives you more leverage, but it also gives a slipping tool more energy. That is not a performance upgrade you want to test on your knuckles.
Support the bike securely. If you are working in a stand, make sure it cannot twist or tip when you push on the wrench. If the bike is on the ground, keep it stable and use the frame and wheels as support rather than balancing it awkwardly.
If necessary, shift the chain onto a useful position and rotate the crank until you have clear access. Keep your fingers away from the chainrings while positioning the crank. The chain is not sharp by cycling standards, but it is perfectly capable of making a small job memorable.
Remember the left and right pedal threads
This is the part that causes most avoidable damage.
| Pedal | Loosen direction viewed from outside the crank |
|---|---|
| Right-side, drivetrain-side pedal | Counterclockwise |
| Left-side, non-driveside pedal | Clockwise |
The right pedal uses a conventional right-hand thread. Viewed from the outside of the right crank, turn it counterclockwise to loosen it.
The left pedal uses a reverse, left-hand thread. Viewed from the outside of the left crank, turn it clockwise to loosen it.
A useful physical memory aid is that both pedals loosen toward the rear of the bike when the wrench is positioned appropriately. Still, do not rely on a slogan while applying force. Check which side you are looking at, where the tool is fitted and which way the wrench will move.
Most damaged crank threads and rounded pedal flats come from treating both pedals as conventional threads. If the pedal is getting tighter, stop and reassess before adding more force.
How to remove bike pedals step by step
- Secure the bike. Place it in a stable repair stand or support it firmly on the ground. Rotate the cranks so the wrench or hex key has room to move without striking the frame, floor or chainring.
- Start with the drive-side pedal. This is the right-hand pedal on the side with the chain and rear derailleur. Fit the 15 mm wrench fully onto the axle flats, or insert the hex key fully into the rear of the axle.
- Check the tool alignment. Keep the wrench or hex key square to the axle. A tool that is only partly seated can slip and damage the flats or hex socket.
- Apply steady pressure counterclockwise. Hold the crank securely and press the wrench in a controlled movement. Avoid stamping on it or using a sudden jerk. Once the threads break free, remove the tool and spin the pedal out by hand.
- Move to the non-drive-side pedal. Fit the tool fully and turn it clockwise when viewed from outside the left crank. The direction feels counterintuitive because this pedal has a reverse thread.
- Unscrew the pedal carefully. Keep the axle aligned with the crank as it comes out. Do not force it at an angle, since dragging damaged or gritty threads through the crank can make the problem worse.
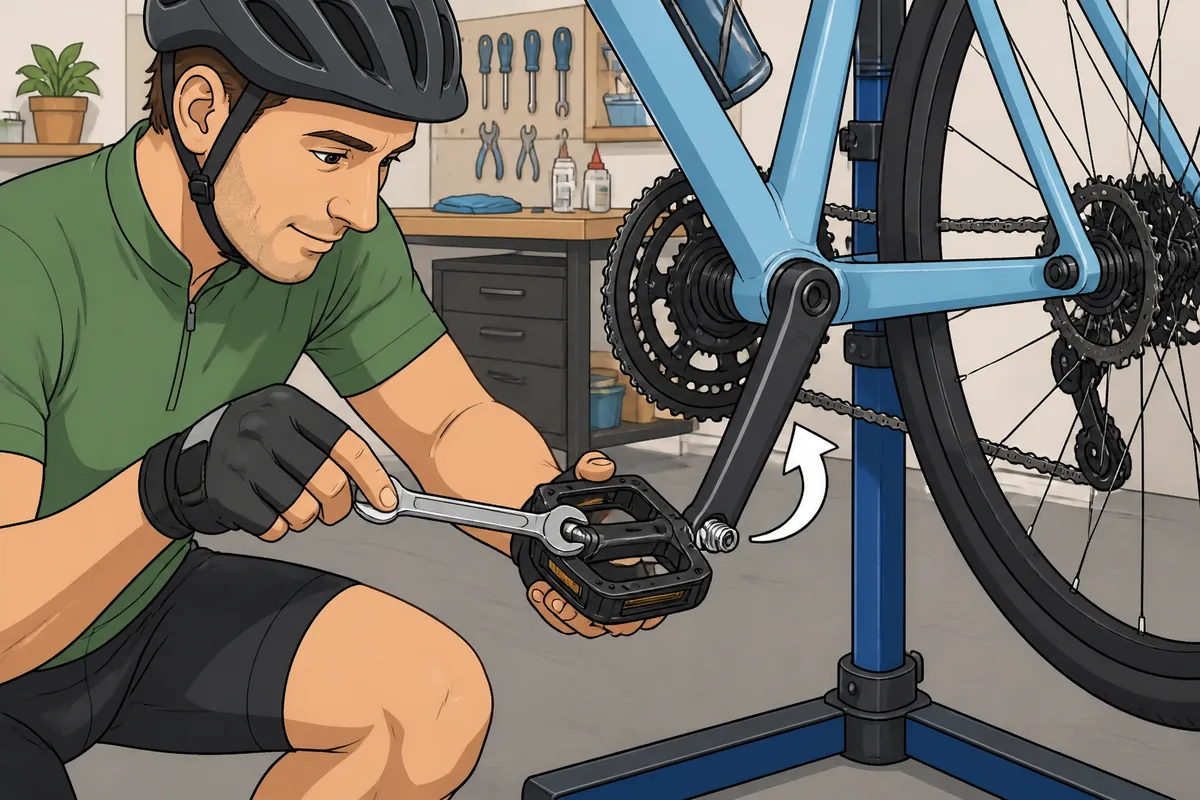
Place a rag between the tool and nearby painted surfaces where practical, but do not let the rag stop the wrench from seating properly. Your force should be applied through the pedal axle flats or the axle’s internal hex socket. Do not try to turn the pedal by gripping its body, chainring or crank in a way that twists the wrong part.
Once each pedal is out, set the left and right pedals somewhere separate. They are not interchangeable, and mixing them up now creates another opportunity for cross-threading during installation.
What to do when a pedal is stuck
First, confirm the side and thread direction. This is the most common reason a pedal appears impossibly tight. If you have been turning in the tightening direction, more force is not the solution.
Next, clean the pedal flats or hex socket. Fit the correct tool fully and check that it remains square to the axle. If the flats are rounded or the hex socket is damaged, stop using a tool that no longer has a reliable grip.
A longer pedal wrench can help, as can a controlled extension, but only when the bike is well supported and the tool stays square. Keep your body out of the likely path if the wrench slips. Sudden jerks can send the tool into the frame, chainring or your hand.
For a seized pedal, apply a small amount of penetrating lubricant where the pedal axle enters the crank and allow time for it to work. Use only enough to reach the joint, then try again with the correct removal direction. Penetrating lubricant is a stuck-pedal rescue measure; it is not a substitute for grease during installation.
Stop and use a bike shop if the crank is carbon, the pedal flats are badly rounded, the axle is damaged, the crank is flexing or the required force is escalating sharply. Do not heat a carbon crank, and do not clamp it in a way that can crush or mark it. Saving a service fee is not worthwhile if the alternative is replacing an expensive crank.
Inspect the crank and pedal after removal
Clean the parts and inspect the crank threads for flattened sections, embedded grit, crossed threads or signs that the pedal entered at an angle. Look at the pedal axle threads as well as the wrench flats or internal hex socket.
Before reinstalling, clean both sets of threads. A suitable layer of grease on clean pedal threads helps reduce corrosion and the chance of seizure. For the complete preparation and installation process, see our guide to greasing bike pedals.
Do not ride if the crank threads are pulled out or visibly damaged. A professional can assess whether the crank needs replacement or whether an appropriate thread insert is possible. A pedal that is not securely retained is a safety problem, not a minor workshop imperfection.
After installation, confirm that each pedal is fully seated, the correct left or right pedal is on its matching side, and the crank shows no damage. The pedal should spin normally without obvious play. If anything feels rough, loose or crooked, stop and inspect it before riding.
Frequently asked questions
Why will my bike pedal not unscrew?
Check that you are using the correct left- or right-hand loosening direction, then confirm the tool is fully seated. A stuck pedal may need penetrating lubricant, more controlled leverage or professional help.
Can I remove bike pedals with an adjustable wrench?
You can in an emergency if it fits the flats tightly, but a proper 15 mm pedal wrench is safer because it is thinner and less likely to slip or round the flats.
Should I use grease when reinstalling bike pedals?
Usually, yes. A suitable layer of grease on clean pedal threads helps prevent corrosion and seizure. Follow the separate pedal-greasing guide for the full installation process.
The safest default is simple: identify the side, use a proper pedal wrench or correctly sized hex key, and apply steady pressure in the correct direction. If the tool slips, the crank is carbon or the threads look damaged, stop before a straightforward pedal removal becomes a crank replacement.

I’ve spent way more time in the bike trade than anyone should reasonably want to. In that time I’ve wanted to make cycling jargon and marketing easier to cut through to help people get the bike of their dreams.
When I’m not writing about bikes, I can be seen out bikepacking on single speed bikes or teaching kids how to ride.


