Getting how to set bike saddle height right is one of the quickest ways to make a bike feel more comfortable and controlled. Too high, and you may rock your hips or reach for the pedals. Too low, and your pedalling can feel cramped or inefficient.
This guide assumes you can balance and pedal a bike. It covers saddle height only, not saddle fore-aft position, handlebar height, cleat setup or a complete bike fit.
What correct saddle height should feel like
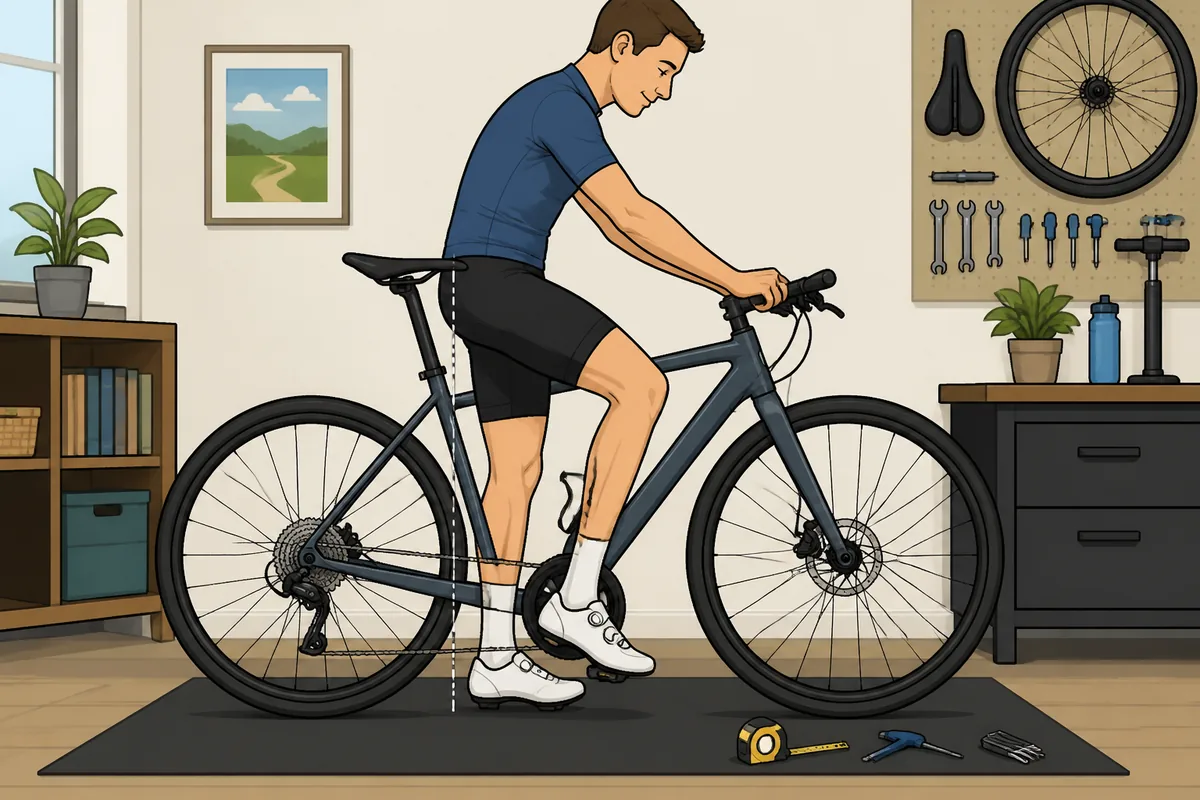
At the bottom of the pedal stroke, your knee should have a slight bend. It should not be locked straight, but neither should your leg look heavily folded. That small bend gives you room to pedal smoothly without forcing your hips to compensate.
Saddle height affects more than leg extension. It changes how easily you can keep your hips stable, how much control you have over the bike and whether your legs feel cramped on longer rides. The safest default is to start slightly low rather than slightly high. Excessive height commonly causes hip rocking, toe-pointing and a feeling that you are reaching for the pedals.
Your effective saddle height also depends on your shoes, cleats, pedals and the shape of the saddle. A thick-soled mountain-bike shoe can put your foot higher than a road shoe. A saddle with a deep or raised profile can change the measurement even if the seatpost has not moved. This is why a number from another bike is only a clue, not a setting to copy.
Measure your bike and mark the starting point
Before changing anything, put a small piece of tape around the seatpost at the top of the frame. This gives you a reference point if you need to return to the original setting. A tape measure, marker and the correct Allen key are usually enough; a torque wrench is useful when refitting the clamp, but specialist equipment is not essential.
For a repeatable measurement, measure from the centre of the bottom bracket to the top of the saddle. Follow the line of the seat tube or seatpost rather than measuring straight up. Keep the tape or ruler aligned with the frame’s centreline.
Record the number in millimetres or centimetres. It is particularly useful for recording small changes, but do not assume that two bikes with the same number have the same effective height. Different saddle shapes and saddle-rail positions make top-to-top measurements less directly comparable.
When you raise the saddle, never expose the seatpost beyond its minimum-insertion mark. Once the saddle is set, tighten the seatpost clamp to the manufacturer’s torque guidance. Too loose and the saddle can slip; too tight and you can damage the post, frame or clamp. Neither is a clever weight-saving strategy.
Three methods for setting bike saddle height
1. Heel-on-pedal method
This is the best practical starting method for most riders because it needs no calculation and quickly gets you close.
- Hold the bike upright or place it on a stationary trainer.
- Sit on the saddle and place your heel on the pedal.
- Rotate the crank until that pedal is at the very bottom of its stroke.
- Raise or lower the saddle until your leg is straight without your pelvis tilting or your body leaning to one side.
- Put your normal cycling shoes on both feet and check the position again while pedalling.
When your heel is on the pedal, your leg is longer than it is during normal pedalling with the ball of your foot over the axle. That is why the heel method normally leaves a slight knee bend when you return to your regular shoes and foot position.
Do not force your heel down by twisting your ankle or dipping one hip. If you have to reach for the pedal even with your heel, the saddle is too high. If your knee remains noticeably bent, raise the saddle in a small amount and repeat the check.
2. Inseam-percentage method
The calculation is useful when you are starting from an unknown position or setting up a new bike. Measure your cycling inseam accurately, then multiply it by 0.883:
cycling inseam in centimetres x 0.883 = starting saddle height in centimetres
The result is measured from the centre of the bottom bracket to the top of the saddle. It is not a guaranteed final fit. The formula does not fully account for crank length, shoe and cleat height, saddle profile, flexibility or how you naturally pedal.
Measure your cycling inseam with the same shoes and saddle setup you intend to use. Treat the calculation as a sensible starting estimate, then confirm it on the bike.
3. Feel-and-confirm method
Once you are close, use a trainer or a quiet, flat route to assess the position. Make only one change at a time and keep each change small. Raise or lower the saddle by 3 to 5 mm, ride or pedal for a few minutes, then compare the result.
A useful setting normally lets you keep your hips stable while your ankles move naturally. Both legs should feel as though they are contributing evenly, without one side reaching farther or collapsing more than the other. This is not a licence to chase a perfect-looking knee angle. Riders vary, and the bike still has to feel stable beneath you.
The most reliable approach is to use the heel method or the inseam calculation to get close, then use riding feel for the final small adjustment. The formula gets you in the postcode; your actual pedalling decides the house.
Saddle-height calculator and quick reference table
Use the cycling inseam x 0.883 calculation as a starting point. For example, an 80 cm cycling inseam gives 80 x 0.883 = 70.64 cm, which you can record as approximately 70.6 cm.
| Cycling inseam | Starting saddle height (inseam x 0.883) |
|---|---|
| 75 cm | 66.2 cm |
| 80 cm | 70.6 cm |
| 85 cm | 75.1 cm |
| 90 cm | 79.5 cm |
Each figure is measured from bottom-bracket centre to saddle top. Because saddle profiles differ, use the number to establish a position, not to declare the job finished. If the setting feels wrong, change it by 3 to 5 mm, record the new measurement and reassess.
Mountain-bike shoes, thick winter footwear, suspension movement and a different saddle can all require a fresh check. A suspension mountain bike may also compress under your weight, so its static position is not directly comparable with a rigid road or hybrid bike.
How to check the height while pedalling
Set the bike on a trainer if possible, or ask someone to hold it upright while you pedal gently. View the bike from the side. Put one crank at the bottom of the stroke and look for a small amount of knee bend, level hips and a foot that is not forced to reach down to the pedal.
| Possible sign the saddle is too high | Possible sign the saddle is too low |
|---|---|
| Hips rock from side to side | Pedal stroke feels cramped |
| Toes point down excessively | Knee remains heavily bent |
| Knee feels overextended | Discomfort is strongest at the bottom of the stroke |
| You keep sliding forward on the saddle | You naturally try to sit farther back |
These are useful setup clues, not a medical diagnosis. Persistent pain, numbness or worsening symptoms are reasons to stop experimenting and seek qualified advice. Do not keep raising or lowering the saddle indefinitely in an attempt to solve a problem that may come from another part of the bike or from an underlying injury.
Common saddle-height mistakes and when to get help
Do not copy another rider’s saddle height, even if your bikes look similar. Different frame sizes, crank lengths, shoes and saddles can produce different effective positions. A fixed number from a bike shop sticker or an online calculator is no more sacred than any other starting estimate.
Do not raise the saddle simply because a higher position feels faster, or lower it permanently because it feels more secure at a stop. A low saddle can feel reassuring when you are learning, but it may leave the pedal stroke cramped. A high saddle can look sporty, but hip rocking is not an aero feature.
Change one thing at a time. Moving the saddle fore or aft changes how the height feels, so avoid making both adjustments together. For that separate adjustment, see our guide to saddle fore-aft position. Frame dimensions also affect how the bike fits around you; bike stack and reach explained covers that broader subject without turning this adjustment into a full bike-fit seminar.
Professional help is sensible if you have persistent discomfort, a significant leg-length difference, an unusual riding position, major asymmetry or no stable setting after several measured changes. The safest starting choice for most riders remains simple: use the heel-on-pedal method or the 0.883 inseam estimate, start slightly low if uncertain, then make 3 to 5 mm changes while watching for stable hips and comfortable pedalling.

I’ve spent way more time in the bike trade than anyone should reasonably want to. In that time I’ve wanted to make cycling jargon and marketing easier to cut through to help people get the bike of their dreams.
When I’m not writing about bikes, I can be seen out bikepacking on single speed bikes or teaching kids how to ride.