A snapped chain can turn an ordinary ride into a walk home, but you can often make a reliable repair with a chain tool and the correct master link. The important part is knowing whether you have a clean break, a damaged drivetrain, or a chain that is no longer safe to trust.
Below is how to fix a broken bike chain at home or on the road. Assumes you can balance and pedal; focus is emergency repair, not chain-wear measurement or deciding how often a chain should be replaced.
What you need to fix a broken bike chain
For a roadside repair, carry a compact multi-tool with a chain breaker, the correct master link for your chain, a small rag or nitrile gloves, and a little chain lubricant. A pump and tire levers are useful, but they will not do much when the chain has parted. The chain tool earns its space here.
A Park Tool CT-3.3 is a more comfortable workshop option, while a compact multi-tool chain breaker is adequate for most emergency repairs. The small tool can be awkward with a heavily damaged or very stiff chain, so use controlled pressure rather than trying to force it.
Master links are not universal. They are matched to chain speed and drivetrain design, so a link for an 11-speed chain is not automatically suitable for a 10-speed chain. Shimano, SRAM and KMC all make compatible options, but you need the link that matches your chain. Carrying one random link in your saddle bag is not a repair strategy; it is a tiny piece of optimism.
At home, add a proper chain tool, replacement connecting pins where the chain manufacturer specifies them, master-link pliers, and a workstand if you have one. You can manage without the stand, but keeping the bike stable makes routing the chain and checking the repair much easier.
Inspect the damage before you start
Move the bike away from traffic. If the chain is still connected and shifting is possible without forcing the drivetrain, select a gear that leaves it relatively slack. If the chain has fallen off, do not force the shifter or pull hard on the chain. First look at where it separated and inspect the rear derailleur, cassette, chainrings and jockey wheels.
A clean break at a normal chain pin is usually repairable. A link that is bent, twisted or cracked is a different problem. Also check whether the derailleur cage is bent, jammed, or pulled toward the wheel. A chain can break because something else in the drivetrain failed, and reconnecting it without finding that damage can turn a short repair into a larger bill.
Wipe away grit before handling the chain. Look for cracked side plates, a chain wrapped around the cassette, or a derailleur that no longer sits straight. If the chain cannot run in a straight path, or the derailleur is visibly damaged, do not force the pedals. Walking or arranging transport is safer than testing the repair with your full body weight.
| Situation | Best practical response |
|---|---|
| Clean break and compatible master link available | Remove the damaged section, fit the correct master link and check the chain by hand before riding. This is the safest and simplest roadside default. |
| Link is bent, twisted or cracked | Remove the damaged links and reconnect only if the remaining chain and drivetrain are straight and undamaged. Otherwise, stop and recover the bike. |
| No spare master link but a suitable replacement pin is available | Use the chain tool and the manufacturer-approved pin. It can be a sound repair, but it is less convenient at the roadside. |
| Severe derailleur damage or doubtful connection | Do not load the chain. Disconnect it if necessary and walk, arrange a lift, or use bike recovery rather than forcing an unreliable repair. |
How to fix a broken chain with a master link
A compatible master link is normally the preferred roadside fix. You use the chain tool to remove the damaged section, then join the two remaining ends with the master link.
- Remove the damaged section. Use the chain tool to push out the pin beside the damaged link. Remove enough chain that the two remaining ends have sound plates suitable for the replacement link. Do not leave a cracked or distorted plate in the repair.
- Route the chain correctly. Before joining it, make sure the chain passes through the rear derailleur correctly. It must run around the jockey wheels and through the cage guide tabs, not over or outside them. At the front, route it around the selected chainring and cassette sprocket.
- Fit the master-link halves. Attach one half to each end of the chain. Check that the link is designed for your chain speed and follow any directional arrow or branded orientation shown by the manufacturer.
- Lock the link using the specified method. Some links lock under pedal tension, while others require master-link pliers. Follow the link manufacturer’s instructions rather than forcing it. If the link uses pedal tension, position it correctly and apply a controlled load with your hands clear of the chain, chainrings and sprockets.
- Check the connection. Rotate the cranks by hand several complete turns. Watch the repaired link as it passes through the jockey wheels, cassette and chainring. The plates should sit flat and the link should not bind, lift or catch.
Keep your fingers clear of the chain and sprockets while turning the cranks. If you need to reposition the chain, stop the cranks first. A chain repair is not improved by adding a little blood to the lubricant.
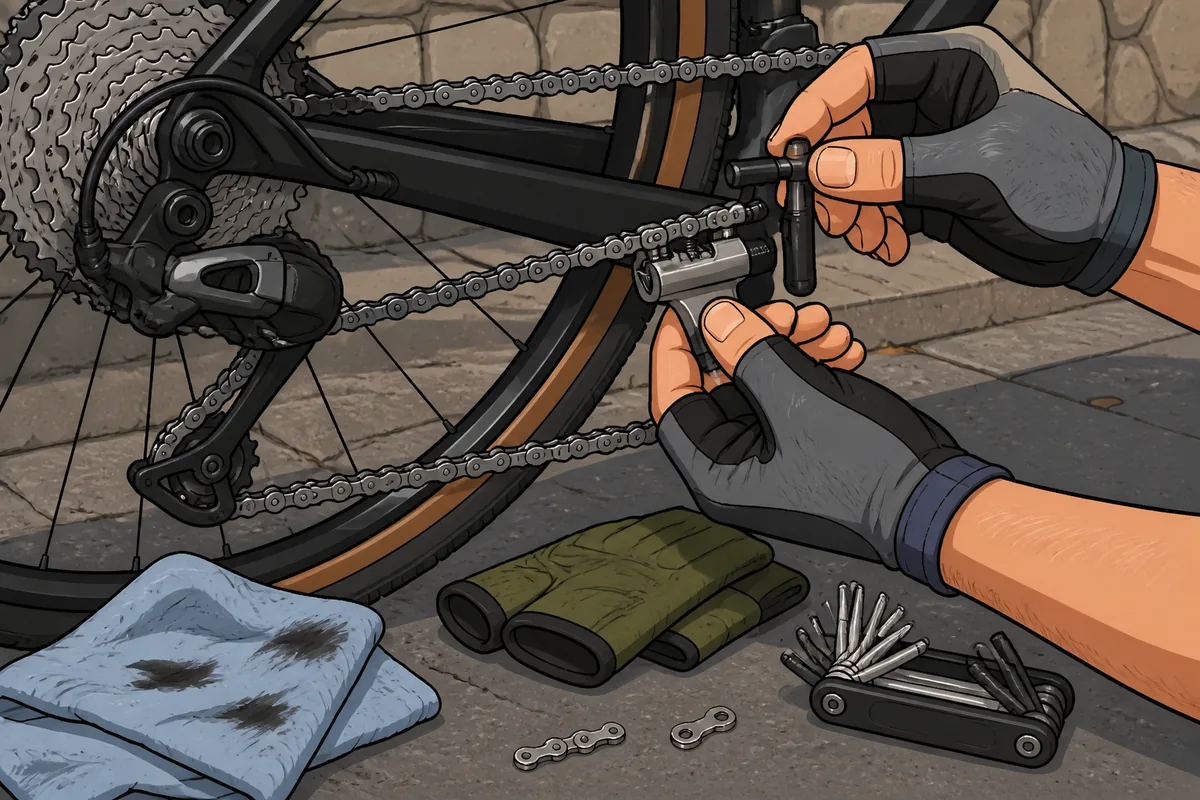
Do not assume that a link which looks joined is fully locked. If the manufacturer’s instructions specify a particular installation direction or tool, follow them.
If the chain broke because it was too short, badly routed, or caught in the derailleur, inspect that cause before riding away. The master link may be correctly installed while the original problem remains.
How to join a chain without a master link
Some chains can be rejoined with a dedicated replacement connecting pin. This is different from simply pushing an old pin back into place. Check the chain manufacturer’s instructions and use the correct pin for that chain.
- Use the chain tool to remove the damaged link and leave matching inner and outer plates.
- Align the chain ends so the plates sit squarely together.
- Press the replacement pin through the outer plate and inner plates evenly with the chain tool.
- Follow the manufacturer’s specified insertion depth and, where applicable, snap off the pin’s guide section after it is fully installed.
- Flex the repaired link sideways and check that it moves normally through the drivetrain.
Many chains use a special replacement pin with a shaped tip or defined insertion point. Do not reuse a pushed-out pin unless the chain manufacturer specifically says that it is safe. Once a pin has been forced out, its retention may no longer be dependable.
A repaired link can be stiff immediately after joining. Hold the chain on either side of the link and flex it gently sideways until it moves freely. Do not bend the chain aggressively or twist the plates. In most roadside situations, carrying the correct master link is simpler than trying to recreate a factory connection with a used pin.
Temporary fixes when you only need to get home
If the chain has a damaged section and you cannot make a normal-length repair, you may be able to remove the damaged links and shorten the chain enough to reach home. This is a get-home measure, not a proper long-term repair.
A shortened chain may no longer reach every gear combination safely. Avoid the large chainring and largest rear sprocket combination, and use one chainring with a conservative range of rear sprockets. If the chain is too short, shifting into a demanding combination can pull hard on the derailleur or chain and cause another failure.
Keep the effort gentle and avoid standing hard on the pedals. Once you reach a safe destination, replace the chain or have a shop inspect the drivetrain. A shortened chain is not a reason to continue a long ride, start climbing, or pretend the repair has become permanent through sheer enthusiasm.
Do not use cable ties, wire or a piece of cord as a load-bearing chain connection. They might hold a loose chain in place, but they will not reliably transmit pedaling force. If the chain cannot be joined with a proper link or approved pin, walk, arrange transport, or use a bike-recovery service.
Check the repair before you ride
Hold the rear wheel off the ground where practical and turn the cranks slowly by hand. Watch the repaired link as it passes through both derailleurs, the cassette, the chainring and the jockey wheels. It should run smoothly without clicking, lifting or catching.
Shift gently through a limited range. Listen for skipping, repeated clicks or a stiff link. If the chain was wiped clean or has become dry during the repair, apply a small amount of chain lubricant and wipe away the excess.
Stop if the chain runs crooked, binds, skips under light pressure or repeatedly opens. A repair that looks acceptable while stationary can still fail under load. Replace the chain or ask a shop to inspect it rather than gambling on a connection you do not trust.
For related maintenance and replacement guidance, see our advice on choosing the best bike chain, how to check bike chain wear, and how often to replace a bike chain. Those are different decisions from fixing an emergency break.
Frequently asked questions
Can I ride home with a shortened bike chain?
Usually, but only as a temporary fix and only in gears the shortened chain can safely reach. Avoid cross-chaining and replace or properly repair the chain afterward. Use gentle pedal pressure and stay away from gear combinations that stretch the shortened chain too far.
Can I reuse a bike-chain pin after pushing it out?
Usually not. Many chains require a dedicated replacement pin, and reusing a pushed-out pin can leave a weak connection. A compatible master link is generally the simpler roadside solution, provided it matches the chain.
What should I do if my chain broke and damaged the rear derailleur?
Do not force the drivetrain. If the derailleur is bent, jammed or pulled into the wheel, disconnecting the chain and walking or arranging recovery is safer than riding. A new chain will not correct a derailleur that is no longer tracking correctly.
The practical default is straightforward: carry a chain tool and the exact master link for your drivetrain, inspect the surrounding components before reconnecting anything, and test the repair by hand before applying power. If the connection is doubtful, the correct repair is to stop riding.

I’ve spent way more time in the bike trade than anyone should reasonably want to. In that time I’ve wanted to make cycling jargon and marketing easier to cut through to help people get the bike of their dreams.
When I’m not writing about bikes, I can be seen out bikepacking on single speed bikes or teaching kids how to ride.