
Putting together kids cycling protective gear does not need to become an expensive expedition through the children’s section of a bike shop. For most family rides, the sensible starting kit is simple: a correctly fitted cycling helmet, visible clothing or reflective details, closed-toe shoes, and clothing that cannot catch in the wheels or drivetrain.
Supervision, a suitable route, and a bicycle your child can control matter more than adding every pad and accessory on the shelf. Specialist protection has its place, but it is not a substitute for choosing an appropriate riding environment.
This guide assumes your child can already balance and pedal, or is using a balance bike under close supervision. It covers protective and visibility gear, not how to teach cycling or choose a complete bicycle.
The short checklist: what most children need
Use this as the basic buying and packing checklist for ordinary road, pavement, park, and family-path riding:
- Certified bicycle helmet: correctly fitted and worn for every ride.
- Bright or reflective clothing: especially in shade, poor weather, or low light.
- Secure closed-toe shoes: with soles that grip the pedals.
- Safe-fitting clothing: no dangling cords, loose laces, or garments that can catch.
- Supervision and a suitable route: still more important than buying another layer of equipment.
Gloves, eye protection, lights, and knee or elbow pads are useful in particular situations, but they are not automatically required for every child. A short ride around a quiet park does not need the same kit as a BMX session or a rocky mountain-bike trail.
| Gear | When your child needs it |
|---|---|
| Bicycle helmet | Every ride, including balance-bike use; choose a cycling-specific, certified model. |
| Bright clothing or reflectors | A sensible default for roads, shared paths, shade, poor weather, and low light. |
| Secure shoes | Every ride; closed toes and grippy soles are the safe default. |
| Gloves | Useful for grip, comfort, cooler weather, trails, and minor palm protection. |
| Eye protection | Optional; helpful against glare, dust, insects, and light debris. |
| Knee and elbow pads | Activity-specific: useful for skateparks, BMX, pump tracks, and rough trails. |
| Body armor | Generally reserved for downhill, enduro, or other genuinely high-impact riding. |
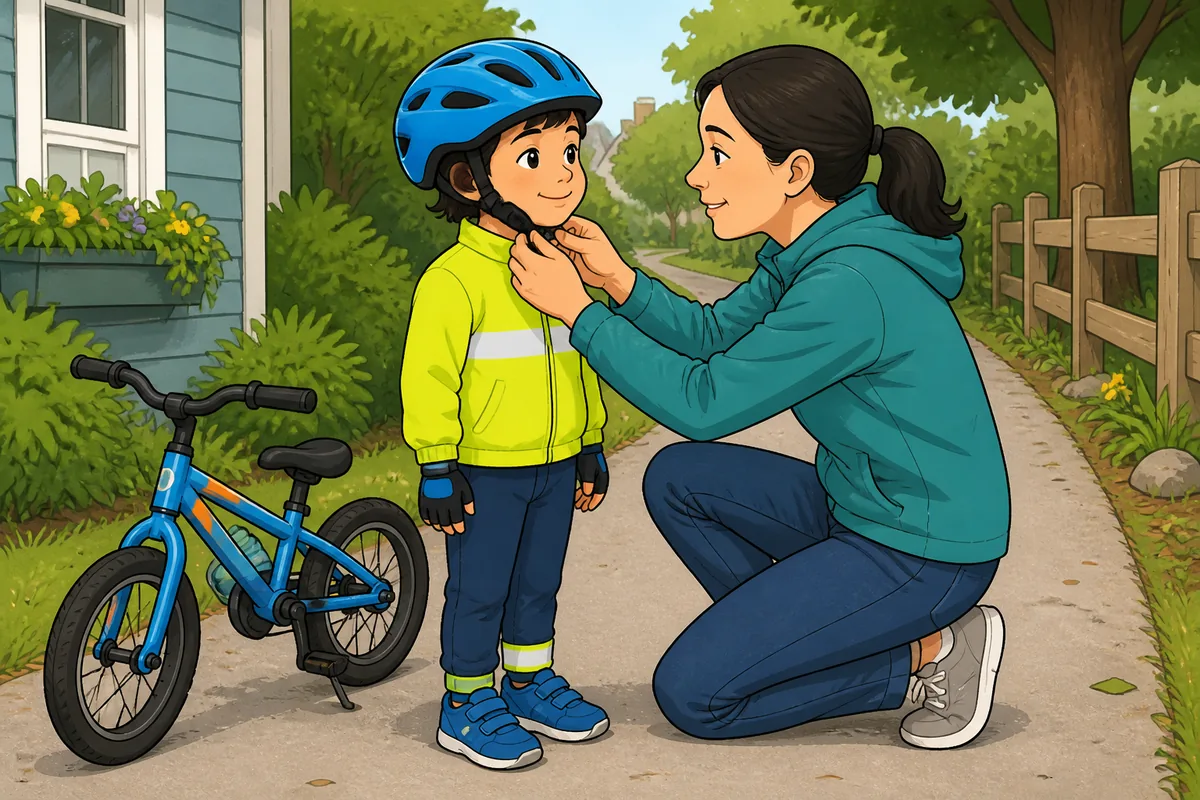
A bicycle helmet is the non-negotiable item
A bicycle helmet is designed to reduce the risk of certain head injuries in a crash. It does not make cycling risk-free, and it cannot compensate for poor supervision or a route beyond the child’s ability, but it remains the safest first purchase.
Choose a helmet designed and certified for cycling in your market. A climbing helmet, skate helmet, or equestrian helmet is not automatically interchangeable with a bicycle helmet. The construction and certification are intended for different activities and impact patterns. The CPSC bicycle helmet guidance is a useful reference for fit and safety considerations, although local certification requirements may differ.
How a child’s helmet should fit
The helmet should sit level on the head, not tipped back, with the front sitting low on the forehead. It should not rock freely when the child moves their head. The side straps should form a snug V around the ears, and the chin strap should be secure without digging into the skin or making the child reluctant to wear it.
Have the child shake their head gently and look up and down. If the helmet slides over the eyes, shifts from side to side, or needs to be tightened to an uncomfortable degree, it is not the right fit. Fit the helmet with the hairstyle and any normal headwear the child will actually use, not with a thick hat that will be absent on the next ride.
Buying a helmet several sizes too large is a false saving. Excess movement reduces the quality of the fit, and a loose helmet is more likely to be worn badly or abandoned altogether. Buy a snug helmet now and replace it when it no longer fits, is damaged, or has been involved in a significant impact.
Do not use a helmet with cracks, crushed foam, damaged straps, or a broken buckle. Be cautious with second-hand helmets: if you cannot confidently verify their history, condition, fit, and certification, buying new is the safer choice. The NHS physical activity guidance also supports using a helmet and taking sensible precautions without suggesting that protective equipment removes every risk.
Visibility and clothing that help without creating hazards
Bright colors and reflective details help other road users and path users notice a child sooner, particularly in shade, rain, dusk, and busy surroundings. A high-visibility layer, reflective ankle bands, or reflective details on a backpack can be worthwhile additions when the route and time of day call for them.
Visibility gear should not create a new problem. Check that bands are secure and cannot fall into the wheel or drivetrain. Keep coats, scarves, and backpack straps away from moving parts. Tuck in loose clothing, tie laces securely, and avoid dangling cords. A brightly colored jacket with a lace wrapped around a crank is not a triumph of safety design.
Lights and reflectors can be both equipment choices and legal requirements, but the rules vary by location. Check your local regulations before riding on public roads, especially around dusk or at night. For daytime family riding away from traffic, bright clothing may be the more noticeable upgrade; in low light, appropriate lights become much more important.
Sunglasses or clear protective eyewear are optional. They can help with glare, dust, insects, and light debris, and children riding on dry trails may appreciate them. They should fit securely and provide a clear view. Do not force eyewear on a child who is constantly pushing it up or looking over the top.
Gloves, shoes, and useful comfort upgrades
Cycling gloves provide grip, reduce pressure and vibration through the hands, and offer some palm protection if a child puts their hands out during a fall. They are useful, but they are not a replacement for a helmet, a controlled route, or supervision.
For many short, easy rides, simple short-finger cycling gloves are enough if your child wants them. Full-finger gloves make more sense in cooler weather, on trails, or for children who are likely to brush against vegetation or put their hands down when they fall. Fit matters: gloves should not bunch at the fingers or make it harder to operate the brakes.
Secure closed-toe shoes with grippy soles are the sensible default. Avoid loose sandals, untied laces, slippery soles, and footwear that can come off the foot. Your child should be able to keep their feet on the pedals without constantly correcting their shoes.
Padded shorts are optional and usually unnecessary for short family rides. If a child is uncomfortable on longer rides, first check saddle height, clothing, and the bicycle’s overall fit. There is no need to turn a trip to the local park into a miniature racing team kit.
When knee pads, elbow pads, and body armor make sense
Knee and elbow pads are not standard equipment for ordinary family cycling on roads, pavement, or quiet paths. For that use, buying pads before getting the helmet and clothing basics right is the wrong spending order.
Pads become reasonable for skateparks, pump tracks, BMX practice, downhill trails, mountain-bike riding, and rough areas where falls are more likely or the surface is less forgiving. They can reduce scrapes and some impact exposure, but they do not make a dangerous activity safe.
Choose equipment designed for the activity rather than generic bulky padding. Pads should fit snugly, stay in place, allow full movement at the knees and elbows, and have intact fasteners. If a child cannot bend, steer, brake, or get on and off the bicycle normally, the protection is poorly chosen even if it looks impressively armored.
Body armor is an even more situation-specific purchase. It may be appropriate for serious downhill or other high-impact riding, but it is unnecessary expense for a supervised family loop. Bulky gear can trap heat and create false confidence in both child and parent. Skill, supervision, and a suitable environment remain the first line of protection.
What to check before every ride
Keep the pre-ride check quick enough that it actually happens:
- Check that the helmet is level, snug, undamaged, and buckled.
- Make sure shoes are secure and laces, cords, coats, and bags cannot catch.
- Confirm that the child can comfortably reach and operate the bicycle’s fitted brake controls.
- Check the brakes, tires, wheels, handlebars, and saddle for obvious looseness or damage.
- Look for cracked helmet foam, torn straps, loose pads, damaged gloves, or missing reflective equipment.
- Check lights and reflectors where they are relevant to the route, time, and local rules.
Brake reach deserves particular attention after a bicycle adjustment or growth spurt. A child who has grown taller may still need the controls positioned so they can brake confidently, rather than simply being moved to a larger saddle height and sent off.
The buying order is straightforward: get a correctly fitted cycling helmet first, then sort visibility and secure clothing, then add gloves for comfort and activity-specific pads only if your child’s actual riding calls for them. Spend on control and fit before armor. That is usually where the real safety return is.
Kids’ cycling protective gear FAQs
Do children need knee and elbow pads to ride a bicycle?
Usually not for ordinary family cycling. Pads make more sense for skateparks, BMX, downhill, mountain-bike trails, or rough practice areas where falls are more likely. They should fit securely without restricting steering, braking, or movement.
Should a child wear a helmet on a balance bike?
Yes. A balance bike can still produce falls and head impacts, so a correctly fitted bicycle helmet is sensible from the first ride. Close supervision and a suitable surface still matter; the helmet is not permission to leave a young child unsupervised.
Can a child wear a second-hand bicycle helmet?
Only if you can confidently verify its history, condition, fit, and certification. If you do not know whether it has taken an impact or been stored badly, replacing it is the safer and usually simpler choice.

I’ve spent way more time in the bike trade than anyone should reasonably want to. In that time I’ve wanted to make cycling jargon and marketing easier to cut through to help people get the bike of their dreams.
When I’m not writing about bikes, I can be seen out bikepacking on single speed bikes or teaching kids how to ride.
![[PART 3] EXTENDED GEARING FOR THE ROAD BIKE](/wp/wp-content/uploads/jch-optimize/ng/wp_wp-content_uploads_2018_01_IMG__20180122__174050941-500x300.webp "[PART 3] EXTENDED GEARING FOR THE ROAD BIKE")

