Velocomp PowerPod Review
-
Rating
Summary
As stated before, highly accurate, affordable, easy to operate and portable
Product Category: Power Meter
Product Options: ANT, BLE/ANT
Product Tested: PowerPod BLE/ANT
Options: ANT or ANT/BLE, PowerStroke, GPS Tracker, Garmin Combo Mount
Source: online and company website

Features: Accurate, Affordable, Portable ANT/BLE wireless power meter. Works with FREE Isaac Power Analysis software
How Obtained: Power Meter City
Requirements: Speed sensor required for PowerPod to work. Cadence gives optional additional analysis options and slightly faster response to starting/stopping pedaling, but the PowerPod will work without cadence.
Pros
- Small: 2.25″ x 2″ x 0.625″
- Lightweight: 1.25oz (349)
- Affordable
- Portable: easily moved from bike to bike
- Accurate
Cons
- Some may not believe in a non Direct Force Power Meter (DFPM)
User Review
( votes)WHAT IS A POWERPOD?
First off, using Google’s search engine, I found hundreds of reviews of the PowerPod. From videos, blogs, websites, periodicals, to you name it, it’s out there. So instead of rehashing the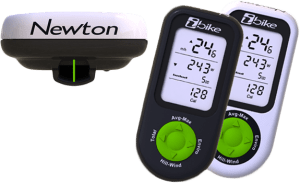 same old “this is what I thought of it after using it for 5 minutes” review, I decided to do more of a complete user experience in setting one of these up, followed by a review after several months of testing. So, here goes.
Everyone remembers the Newton – Velocomp’s first OPPOSING-FORCE (i.e., non-Direct Force) Power Meter. It was here one day and gaining popularity, then gone the next. So, what happened to it? Although they don’t come out and say, my belief is that Garmin happened to it.
The Garmin Edge is so popular that more than 8 out of 10 bicycles that I see are equipped with a Garmin. My guess is that cyclists thought, “I already have a display on my bike, why do I need another one?
Why would I want yet another thing on my handlebars that duplicates everything that my Garmin already shows me?” In a brilliant move, Velocomp took the guts from the Newton, removed the display, added ANT+ and BLE and created a low priced, highly accurate and light weight power meter that talks to every (GPS) head unit made! Brilliant!
Out of the box, PowerPod is a device that reports power like any other power meter, and can be used simply as that, with no need to ever look further. But for those interested in more data, it can open a whole new world of analysis and awareness of cycling performance and behavior.
HOW DOES IT WORK?
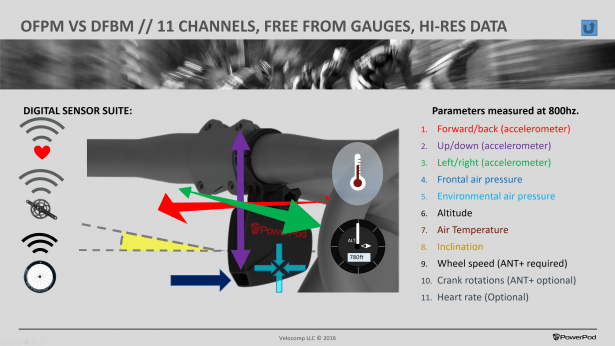
The old formula Power = Force x Velocity still applies, but how do you get ‘Force’ if there’s nothing hooked to your bicycle that you aren’t pushing on and bending? It’s really very simple. As you ride your bike, opposing forces are working against you. These is wind resistance, gravity (hills), acceleration and friction. When you combine these forces, you get the total opposing force. PowerPod calculates this total opposing force and, knowing how fast you are going and how fast you are spinning your cranks, knows the POWER you need to be outputting to overcome this total opposing force.
But by nature of measuring all these opposed factors, PowerPod doesn’t stop at just being an (affordable) power meter. By measuring a full 11 channels of data, it records and can numerically analyze your power, your efficiency (aero positions, pedaling smoothness, etc.) and even your riding technique (how well do you draft, how much and where do you brake, etc.)

HOW EASY IS IT TO SET UP?
The PowerPod can, for basic fitness seeking users, simply be used as a plug and play unit. As such it is significantly more accurate than any activity tracker and allows well controlled fitness training based on watts.
For advanced cycling users, it is recommended the unit be personally calibrated for the rider. As with most power meters, there are several items that all need to be working together to make for a successful result. In this case, these individual items are;
- initially charging the battery on the PowerPod,
- downloading and installing ISAAC software (explained later),
- purchasing and installing a ‘power-ready’ head unit,
- purchasing and installing both speed and cadence sensors,
- pairing speed and cadence sensors to the head unit,
- setting up the PowerPod via ISAAC – set date, time, odometer, sample rates, display units, body weight, etc.,
- pairing the PowerPod & sensors first, then
- pairing the PowerPod to the head unit (PowerPod wont connect to a head unit until it has a speed sensor paired to it), and finally
- go on a one-time 10-minute out-and-back calibration ride.
These steps are all required, and some in a specific order for this ‘system’ to work flawlessly. But chin up, it’s not really that bad since this is only a one-time process. So, take your time and do this right and when it’s done correctly, it’s amazing how easy it is to display and record power when you train, race or even go out on a recovery ride.
If in doubt about any of this, Velocomp has a great support/tech person, Tom Gore, as well as a great tech support website.
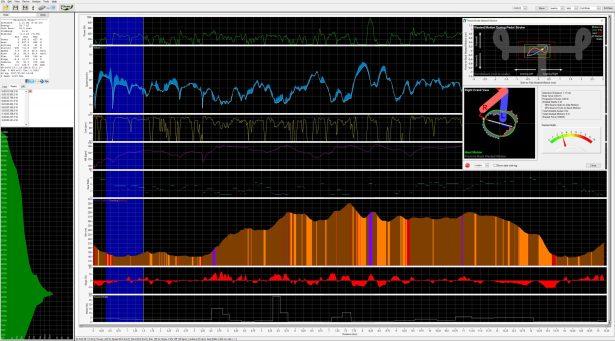
Moving on, as soon as you open the box, plug your PowerPod into your PC using the supplied USB cable. While the PowerPod is charging, download the free Isaac Configuration& Analysis software.
Isaac is just like the PowerPod itself. It can be set up to be extremely simple or very advanced.
Simple Isaac displays
- Power
- Speed
- Heart rate (optional)
- Elevation
- Map
- Graphic data summary table.
- Laps/effort breakdown/map (cloud GPS data can be stitched in from your phone with tracker software upgrade, or your head unit data be stitched in manually)
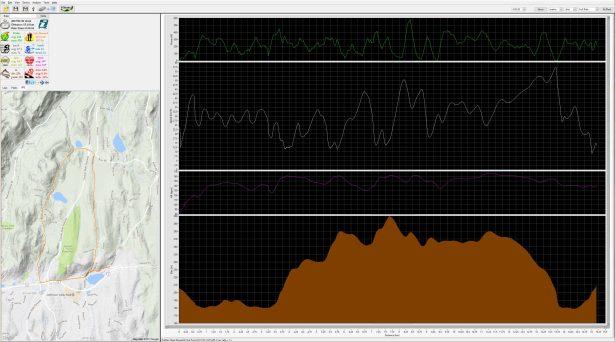
By clicking a few option boxes and buying some software upgrades, it can become a very capable and broad reaching analysis suite. At this detailed end of its scaling up, allows you to do very in-depth ride analysis to get the most out of your training. Isaac helps you perform aerodynamic drag (Cda) analysis, rolling resistance, track your distance, energy output, calories burned, power, speed, cadence, wind, elevation totals, energy lost to braking and riding inefficiencies, quality of drafting and a lot more. A great tool, and it’s FREE!
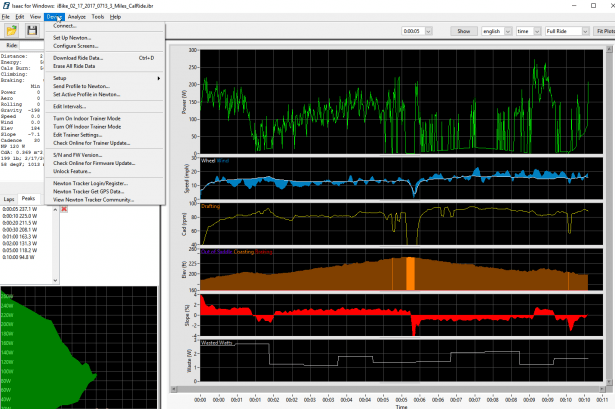
Advanced Isaac displays
- Power
- Wheel and Wind Speed
- Heart rate (optional ANT+ sensor pairing required)
- Cadence (optional ANT+ sensor pairing required), showing when you draft too
- Gear roll-out
- Elevation profile with behavior, displaying where you were Pedaling seated, Sprinting, Freewheeling or Braking
- Incline
- Wasted watts from handling/technique (part of powerstroke upgrade pack)
- The same Laps/effort breakdown/map
- Numerical data summary table.
I also recommend purchasing the PowerStroke software as it helps you analyze your entire pedal stroke for each leg in detail. Knowing how you are pedaling, you can make changes that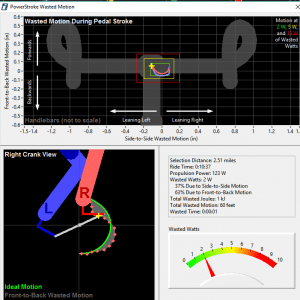 will allow you to pedal more efficiently.
This is a very unique analysis, based on accelerations and not the classic pedaling torque metrics many of us have seen or know. This PowerStroke analysis tells you how many watts you have wasted from front to back surges and side to side swaying as you ride: going so far as to tell you how many watts and how many seconds have been lost as a result, and which % is due to front to back or side to side individually.
A bike fit by a competent fitter is also highly recommended so that you can be in your most optimal position to advantage of what Isaac is helping you with. If you are not fit on the bike correctly, you will not be able to pedal efficiently/effectively.
If you aren’t pedaling efficiently/effectively you can’t apply your potential power – and you also risk injuring yourself – and that’s no fun. So, get a bike fit as part of your overall training plan!
When installing Isaac, you will need to ‘baby-sit’ your PC for around 10 minutes answering several questions that Isaac will ask as it installs several drivers. At the same time, I highly recommend that you download the free 80-page ISAAC software instruction manual.
Because the PowerPod can be used as far more than just a power meter (user that want to can unlock all its features to have a full picture bike analysis system that reports power, technique and efficiency, amongst other things) and ISAAC is a very powerful program that has A LOT of analytical features your average power based software doesn’t need or have.
So, it makes sense to read this manual. In the meantime, you can start working on the next task – installing your SPEED (& optional cadence) sensor(s) onto the bike. See, it’s not that bad, you are already multitasking – working on 4 things at once!
If you have an ANT+ or BLE GPS head unit that displays power, you probably already have a  speed sensor installed on your bike. If not, the PowerPod needs a speed sensor to work (A cadence is only a required item if you want to see that data, want faster power response or want to buy the PowerStroke upgrade). When installing, follow the supplied directions that came with your PowerPod, making sure to keep magnet-to-sensor clearances to a minimum.
Important note: Contact Velocomp to ask about their current list of approved sensors.
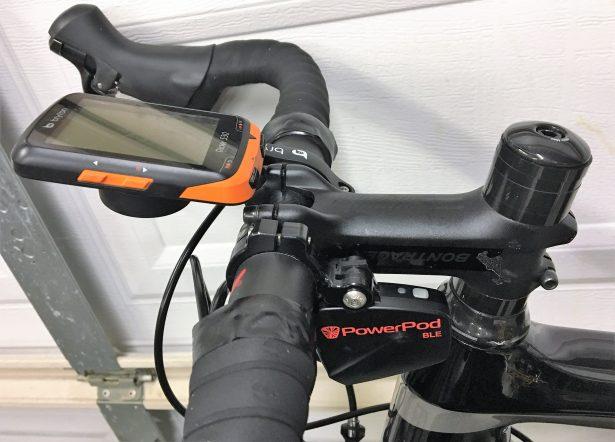
Once the sensors are installed, spin the cranks/wheel a couple of times to wake them up, then pair them to your head unit. At this point, go ahead and attach the supplied mount to the handlebars. Leave it loose, since you will eventually attach the PowerPod, and then you can make the final adjustments. Also, make sure the PowerPod is level and that nothing is blocking its wind port.
While charging, PowerPod’s status light flashes RED. When fully charged, the light turns off. The initial charge takes the longest – a little over an hour. After each ride, I plug my PowerPod into the PC and download the ride data. After about 10 minutes, the PowerPod is back to being fully charged.
Place PowerPod in its new handlebar mount then tighten the mount so that the PowerPod lettering is parallel to the ground.
Now, let’s pair the PowerPod to the speed & cadence sensors. At this point, it’s best to have the bike in a bike repair stand with the bike being parallel to the ground – how it would sit if it was on the ground, then spin the cranks to wake up the sensors.
Next, PRESS-HOLD PowerPod’s button for 4 seconds to start pairing. Release the button when the status light flashed green. If successfully paired, the status light should be a solid green.
Red means unsuccessfully paired. If red, check to see (a) magnets are breaking the sensor fields on their indicated marks and (b) that the distance between the magnets and sensors are a maximum of 2-3mm.
Next, pair your sensors to the head unit. Follow head unit manufacturers’ pairing instructions.
Lastly, we need to pair the PowerPod to your head unit. Follow head unit manufacturers’ pairing instructions here as well.
PRE-CALIBRATION
Reconnect your PowerPod to your PC one last time. Open Isaac and click DEVICE | CONNECT to test the connection between your new PowerPod and your PC. Once complete, check that you have the latest firmware then click on DEVICE | SET UP NEWTON to fine-tune your settings. On the final screen, choose BEST ACCURACY then go out on a one-time 10-minute calibration ride (described below).
CALIBRATION RIDE
There are quite a few moving parts that need to come together to make a successful calibration ride. In fact, Velocomp has now includes a separate instruction sheet for exactly 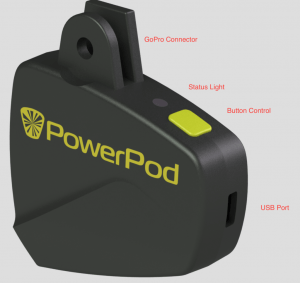 how to do this with their new PowerPods. Here’s how I did it.
STEP 1 – Plan an out and back prior to doing your calibration ride. Look for an out-and-back with minimal wind, no traffic, no drafting and no stopping. Plan for 5 minutes out and then a return back to your starting point (the outbound leg is defined by 5 minutes’ time, whereas the return leg is defined by distance to return to the starting point). Also, make sure that no cables are blocking the PowerPod’s wind port
STEP 2 – make sure that your head unit is fully charged, that your sensors have fresh batteries and your PowerPod is fully charged. Also, make sure that the sensors and PowerPod have been previously paired to the GPS head unit.
STEP 3 – On your GPS head unit, select a screen that displays POWER. Next, wake up your sensors and make sure your GPS head unit sees them. The best way to do this is to pick the bike off the ground so that the rear wheel can spin freely. Spin the cranks and see if speed and cadence show up on your GPS head unit. The reason for this is that if you perform this test while riding, your head unit will more than likely default to its internal GPS speed and not the speed sensor. Perform this test just prior to your calibration ride.
STEP 4 – Jump right on your bike and turn on your PowerPod by pressing the button. The status light should be SOLID YELLOW = ready to calibrate.
STEP 5 – Ride to your starting point and once at your starting point, come to a COMPLETE STOP. Don’t touch PowerPod yet. It will do an autodiagnostic in this period and PowerPod’s light will eventually start flashing RED/GREEN signaling it is ready.
STEP 6 – Click PowerPod button. PowerPod should indicate 0 Watts. GREEN/RED flashing light turns to yellow flashing, signaling you can start the out portion.
STEP 7 –Ride the out portion (about 5 minutes). Your GPS head unit will go from 1W to 50W (indicating 1% to 50% test complete). Once the watts indicate 50, turn around at your convenience then come to a COMPLETE STOP. Just to make sure, unclip both feet. On my calibration run, I ended up riding a little more than 5 minutes out – as long as you don’t ever go below 10mph/16kph during the out portion, the unit will not start the back leg yet.
STEP 8 – Inbound. When you start riding, the watts will indicate 51W to 100W (or 51% to 100% complete).
STEP 9 – When you reach 100W, the flashing yellow light goes out and the PowerPod is now calibrated. Actual watts will now show on the head unit. Now you are good to go!
STEP 10 – This is only a 1-time deal. From here on out, just press the button, a green light should be displayed and the PowerPod will be sending your calculated Watts to your head unit.
PowerPod can be used on up to 4 bikes, and is as easy as a GoPro camera to move from bike to bike on the supplied mounts (additional mounts can be bought from shops or Velocomp’s website). Each bike will need its own unique speed sensor: you will do one of these calibration rides per bike, and the unit will automatically hear the speed sensor of the bike you have chosen in future and switch profiles automatically.
Note: At the end of each ride, you will have 2 ride files. One that will be recorded by your head unit and the other recorded on the PowerPod. You can merge these files using ISAAC. It’s is possible to merge these files to gain GPS data or you can buy the “tracker” phone app license to do the same automatically through the cloud on every ride (It is a Strava like app, just start/end recording as you start and end your ride, the rest is automatic) . The accepted formats are FIT, GPX, TCX, HRM, IBD, as well as some CSV and TXT files. Every so often, Isaac will ask you whether a ride started where it began, or whether you drafted at all. IT does this to dial-in/tweak the PowerPod’s settings for an even more accurate calibration. What this also is good for is to check that your settings are correct – rider weight, bike weight, tire size, etc. The more accurate the data in, the more accurate the data out.
BONUS FEATURE: POWERPOD CAN BE USED WITH YOUR ROLLERS OR TRAINER!
You can also use the PowerPod with your indoor trainer or rollers! Here’s how to do it.
STEP 1 – SELECT YOUR TRAINER
To do this, plug the PowerPod back into your PC and launch Isaac. Select DEVICE | EDIT  TRAINER SETTINGS then select your trainer or rollers from the provided list. Lastly, click the SEND TO IBIKE button so that PowerPod will remember your selected indoor trainer.
STEP 2 – TURN ON INDOOR TRAINER MODE.
In Isaac, select DEVICE | TURN ON INDOOR TRAINER MODE. Once established, Isaac will confirm.
STEP 3 – TRAIN
STEP 4 – TURN OFF INDOOR TRAINER MODE.
In Isaac, select DEVICE | TURN OFF INDOOR TRAINER MODE.
Note: If trainer mode = ON, PowerPod will NOT provide accurate power readings when used on outdoor rides. Conversely, if trainer mode = OFF, PowerPod will not provide accurate readings when used for indoor rides on a trainer.
HOW ACCURATE IS IT?
DC Rainmaker did an in-depth review of the PowerPod last year so I won’t try and recreate his in-depth review here, but, it’s well worth the read. On Velocomp’s website, there are several long-term comparison studies that show only a 2.5% difference between the PowerPod 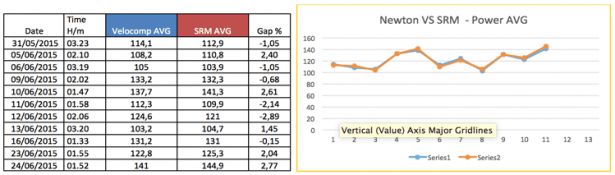 (and/or Newton) and another DFPM. Where the single-leg DFPM’s let us down is for those cyclists that favor one leg over the other – which, as it turns out, applies to most of us.
Let me give you an example. Stages (and many others) are setup to measure your left-leg power only. They take your left-leg’s number, multiply it by 2.0 and shoot this up to your head unit for you to view as total power. Many claim a +/- 2% accuracy (left leg only), but, the BIG assumption here is that both legs need to output the same power for this data to be useable. As a bike fitter and USAC coach, I put clients on my Computrainer which measures their left and right power.
99% of cyclists I have measured have a large power discrepancy between their left leg and right leg. Most cyclists I have measured on the Computrainer are initially 60%/40%. About half favor the right leg, half favor the left leg. Right leg dominant vs left leg dominant does not seem to apply here. Me included. I am right hand and right leg dominant and when I first tested myself, I was 60% left leg and 40% right leg. Knowing this, I have been able to work on balancing out my power to 50%/50% over a 3-month period. Although PowerPod does not measure right and left legs separately, PowerStroke is available that can help you analyze this.
So, let’s compare a DFPM to PowerPod in a realistic scenario.
Example #1 – a cyclist with a right leg emphasis. This means that the left leg is producing less power than the right leg. The DFPM will calculate and display a number quite lower than the PowerPod. This is because the DFPM uses only left-leg power which is lower than the right leg. See table below.
Example #2 – if the cyclist has a left leg emphasis, this means that the left leg is producing more power than the right leg so the DFPM will calculate and display a power number much higher than the PowerPod. See table below.
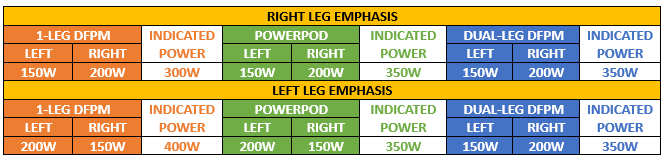
So, whose right? As you can see from the table above, unless your left/right legs are pretty equal (which, in my experience and observations that is NOT the case with most of us), a single-leg DFPM can be way off from actual total power. The way PowerPod’s algorithms work make it much closer to what a dual-leg power meter would indicate. Even though PowerPod does not actually measure nor report left/right power, it is still more accurate than a single-sided DFPM in most cases.
PowerPod actually measures your total power needed to maintain a given speed. So, as a side-effect of their algorithm, PowerPod does combine your left leg power + right leg power to get total power. But, as mentioned before, PowerStroke can help somewhat with this.
What about a true dual-leg/dual-sided power meter? This solution can be the most accurate and can definitely help in training to use both legs equally but at what cost? At time of publication (3/2017), a basic ANT+ PowerPod is $299. To compare, a true dual-sided power meter like Pioneer with head unit (to display leg vector analysis) is $1,100-$2,000 (depending on Ultegra/Dura-Ace and if you supply crankset or use theirs), Rotor is $1,200-$1,500, 4iiii is $750 your crankset or $1,500 their crankset. These are the ultimate power meters since they measure each leg independently. The only drawback is their HIGH cost. At $299, the PowerPod is still the power meter of choice for most of us.
HOW DID IT WORK?
When all is said, and done, it comes down to (a) how easy is it to operate and (b) how easy is it to get the data from.
Again, if you take your time prepping, setting up, installing, etc., you can now enjoy its ease of use. When I take my bike out of the car, the first thing I do is turn on the head unit. While I’m getting dressed, the head unit is initializing and finding its required number of GPS satellites to operate. After I clip in, I hit the PowerPod’s power button and after 1-2 pedal strokes I am shown Power, cadence, heart rate, etc. – whatever I have selected on my Bryton 530 head unit.
Post ride, I plug the PowerPod into the PC and open Isaac which I have set to automatically download the PowerPod data file. From here I can analyze the ride within Isaac or with one click of the mouse, upload the data to Training Peaks or even export the data to CSV, GPX, TCX, PWX or KML to analyze in WKO4.
Truly powerful!
SUMMARY
Currently, power meters have dropped quite a bit in price. But, with the PowerPod priced at less than $299, the others must reduce their prices by at least another 50% to even get close. Only PowerPod works with any pedals, cranks, and wheels, provides both-leg power measurement, and is as easy to move from bike to bike.
With its optional upgrades, it also becomes more than just a power meter, allowing you to analyze and improve technique, like how well you draft, how much and where you brake, how many watts you lose through pedaling and bike handling inefficiencies, and even a basic wind tunnel function is in development for people with approved classic power meters.
POWERPOD IS SIMPLE TO USE and a BARGAIN AT EVEN TWICE THE PRICE!!!
HIGHLY RECOMMENDED – A TRUE 5/5 STAR RATING!

I have always enjoyed bicycling and, through a series of coincidences, became a Bicycle Industry Consultant and Product Tester. I test prototype products for companies and have published only off the shelf production products on biketestreviews.com.

