KNEE PAIN BACKGROUND
In the last article, we spoke in-depth about crank-arm length and how crankarms that are too-long can cause knee-pain.
In this article, we will be concentrating on Pedal Stance Width and why this is important. This article focuses more on road bikes and Tri/TT bikes since they have close to the same bottom bracket shell widths and use similar if not the same cranks with q-factors right around 146mm.
MTB’s, on the other hand offer different crank width q-factors such as 168mm, 175mm, 176mm, and even wider.
TERMINOLOGY
First, let’s define several terms… PEDAL WIDTH vs. (PEDAL) STANCE WIDTH vs. Q-FACTOR. These terms are often used interchangeably but really have different meanings. Following is their correct (cycling) definitions.
-PEDAL WIDTH (not shown in Figure 1 to the right) is the distance from the center of the pedal to the outside of the closest crankarm. Standard road pedal width is 53mm.
-STANCE WIDTH (or pedal stance width) is the distance between the center of one pedal to the center of the other pedal.
-Q-FACTOR (or quack-factor which is a reference to the wide stance and waddling gait of a duck) is the distance between the outside of one crankarm to the outside of the other crankarm measured at the points of the threaded portion where the pedal axle attaches.
THE PROBLEM & THE CAUSE
When pedaling, there are 3 points for each leg that ‘pivot’.
- Femoral Head. But, since you can’t see or feel this, the Greater Trochanter (GT) is the next best thing. The GT is the boney protrusion that you feel below the top of your hip (Iliac Crest) and is positioned so that it accurately represents the top pivot point.
- Knee. Simply defined, the knee divides the Femur and the Tibia/Fibula and is the joint that allows the leg to bend. To find this pivot point, locate the bottom of the Patella and move laterally to the outside center of the knee. This will be very close to the pivot point.
- Ankle. The easiest pivot point to locate. Just look for the Malleolus, or the protruding round bone commonly referred to as the ankle bone.
When pedaling, you want all of these pivot points aligned so that you are pushing straight down. Any angling will not only rob power, but worse, will place torque on your knees in a direction that is not natural – i.e., knee damage. Remember, cycling is an accumulation of micro-injuries and, if you want to continue cycling pain-free into your 60’s, 70’s, and even 80’s, it is essential to take care of yourself now.
WHAT’S GOING ON?
The real culprit is the Bottom Bracket shell width for road bikes – it’s too narrow for us Americans. The Europeans are generally thinner, narrower, lighter, shorter, smaller than us wider-hip Americans and when we lock our feet into a too-narrow stance, the knees have no other option than to oscillate (go out at the top of the pedal stroke and in at the bottom of the pedal stroke).
Mountain bikes bottom brackets and cranksets are designed and built with a larger Q-factor that, in my experience places most MTB riders with the correct pedal stance. You will know if your pedal stance (usually determined more by Q-factor) is too wide. If too wide, your knees will start diving inward at the top. You might also experience knee pain as well.

Figure 2- KNEE ALIGNMENT
Figure 2 above, shows the cause being Pedal Stance Width is too narrow resulting in the feet to be out of plumb with the hips, which causes the knees to go in and out with each pedal stroke. The round circles at the top of this figure represents the Greater Trochanter and is meant to show that the hips are badly out of plumb from the feet. At the bottom of this figure are the pedals and crank spindle. The yellow lines connect the feet, knees and pelvis.
The only difference between the ‘cyclist’ on the left and the ‘cyclist’ on the right is the Pedal Stance Width. The ‘cyclists’ feet on the left are closer together, while the ‘cyclists’ feet on the right are further apart. In this case, placing the feet further apart puts them more under the hips, allowing for a more upright “piston-like” motion while pedaling.
HOW DO WE FIX THIS?
Then how do we fix it so that our knees go straight up and down? The answer – only one-real way… The right way.

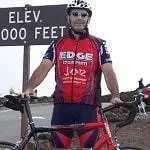
Figure 3- Post fit. This Cat 3 racer’s laser knee alignment at bottom, top and front of pedal stroke.
Two gentlemen came in recently, both having the same issue (knees going out at the top of the pedal stroke) and both were now complaining of newly developed knee pain. Both were fit by the same guy at the same bike shop, and both were fit wrong. There are several ways to correct knees moving in and out and most are wrong.
The fitter can
- Wedge the heck out of the shoe by placing numerous wedges between the cleat and the shoe. Placing the thicker side of the wedge along the outside of the shoe will result in canting the knee inward. To see how this works, while seated, place your feet flat on the floor and knees bent at 90°. Lift the outside of one foot and see what happens. The knee dives inward.
- Wedging of the insole. This works exactly like #1 above.
- Wedging of both the shoe and the insole – this is what the bike fitter did to these 2 cyclists.
- Repositioning the cleat to force the heel outwards. To see how this works, sit like in example #1 above. Take one foot and twist the heel outwards while leaving the ball of your foot in place. See what happens? Again, the knee dives inward.
- A combination of #3 and #4 above.
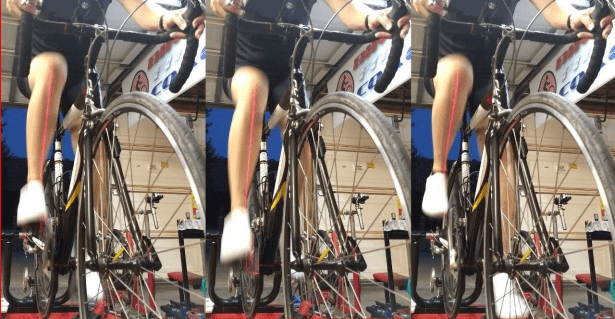
Figure 4- Post fit female recreational cyclists knee alignment.
So, what’s wrong with doing these if it makes the knee track straight. The answer is that you are artificially forcing the knee into a position it doesn’t naturally want to be in. Although that fitter got these cyclists knees to track straight, he introduced tremendous knee pain for these cyclists that they stopped riding for a couple weeks.
As can be seen in figure 2 above, the only correct way to get knees to track straight(er) is to widen the pedal stance and this can be accomplished in several ways
- Add up to 2 x 1mm pedal washers each pedal. Be cautious since adding more pedal washers may not allow enough pedal threads to engage with the crankarms. Clients that have come in to see me usually require more width but, opt out of other solutions provided below. Their decision is usually based on (a) their knees are better now than they were before and, (b) the next solutions are more expensive
- Add a Pedal Extender each pedal (each is +20mm)
- If you have Speedplay pedals, you can add longer pedal spindles (+3.175mm, +6.35mm, +12.7mm)
- If you prefer Shimano, you can opt for their +4mm Ultegra pedals
In the end, the cyclist ends up with correct cleat placement, AND straight tracking knees.
THIS SECTION IS FOR THE PEDAL MANUFACTURERS!
These statistics will vary for each geographical area, but, for South Orange County, CA. (San Clemente, Dana Point, San Juan Capistrano, Mission Viejo), the pedals that I see during bike fits are 80% Shimano Dura-Ace/Ultegra, 15% Speedplay and 5% LOOK. Twenty miles south in Encinitas (North San Diego County), I am sure that Speedplay is the dominant pedal since (a) Encinitas is the ‘Triathlon capital’ of SoCal and (b) that is where Speedplay headquarters is located.
I have taken the most popular pedals that I see during bike fits and created a table (Table 1) that shows current pedal width and recommended pedal widths. This is based on metrics collected on amount of pedal washers, +4 pedals, longer axles, etc. that I need to add to the cyclists’ stance to (a) keep them where their feet want to naturally be and (b) align their knees as straight as possible.
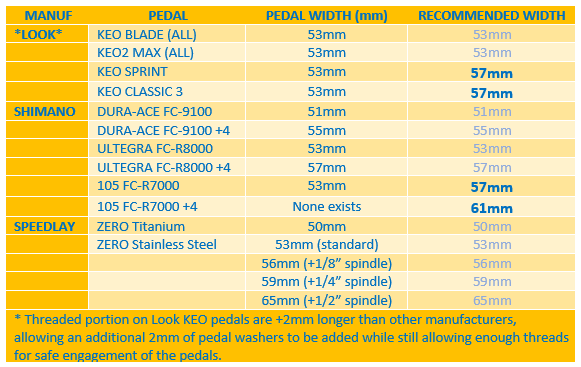
Table 1- Recommended Pedal Widths to MANUFACTURERS
Comments:
1) I recommend a wider pedal for the Look Keo Sprint and Keo Classic 3 since these are geared more for the recreational/endurance cyclist. A slightly wider platform will be more comfortable for this type of cyclist.
2) Same for the Shimano 105 FC-R7000
SUMMARY
Based on bike fitting metrics collected, I recommend that manufacturers modify their pedal axle widths to meet cyclists needs. A recommended list is included in table 1 above.
Rick Schultz, MBA, DBA
Peaks Coaching Group
PCG Associate Coach
540-587-9025 office
949-606-2767 cell
Skype: rick.schultz1000
[email protected]
peakscoachinggroup.com
I have always enjoyed bicycling and, through a series of coincidences, became a Bicycle Industry Consultant and Product Tester. I test prototype products for companies and have published only off the shelf production products on biketestreviews.com.

