Cyckit’s Aeroclam
-
Rating
Summary
Hard-shelled ‘saddle bag’, up and out of the way, waterproof, no leg interference. Really works well.
Tested:
- AEROCLAM P1
- AEROCLAM P2
Price (NZD): $49.99 (NZD), $39.15 (USD)
Source: Cyckit webstore
Designed in: Newzealand
Features: Sturdy construction, fits most saddles, can carry most of what you need for a flat fix.
Weight: 0.1357kg, 4.79oz, 0.299lb.
Pros
- Compact & aerodynamic design and integration.
- Injection-molded (IM) plastic offers tough construction and solid mounting.
- Watertight
- Easy to fit & install
- Can configure to carry different configurations of flat-fix items.
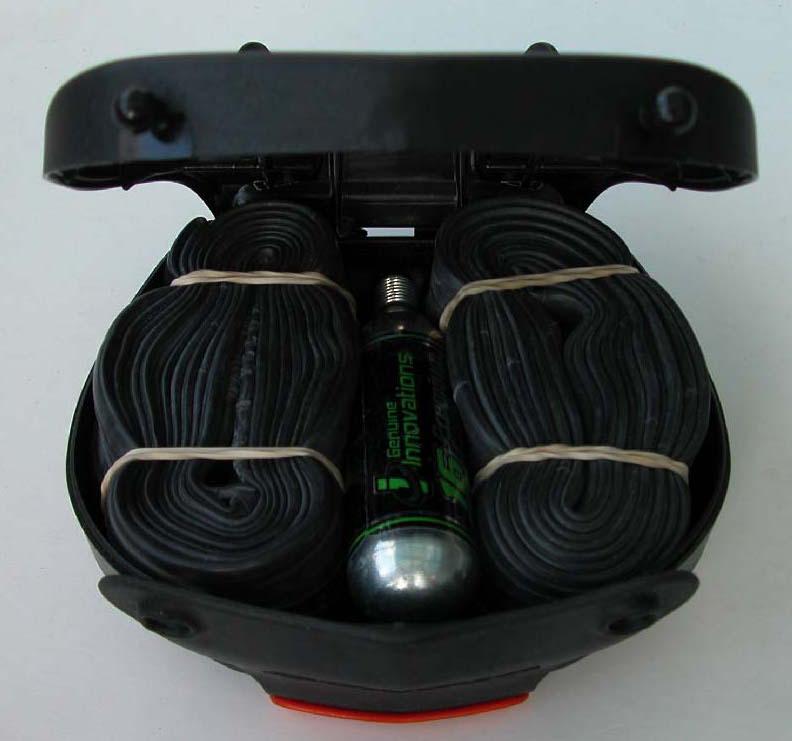
- 2 tubes + 1 co2, or
- 1 tube + 1 co2, co2 inflators, tire levers, small multi-tool.
- Body/leg clearance on any saddle tucked up and out of the way.
Cons
- Would like to see the Aeroclam just a little larger so I can carry 2 tubes, 2xCO2, tire levers, and small multi-tools.
- Parts rattled until I placed on an old MTB inner tube around each part which stopped them from rattling.
User Review
( votes)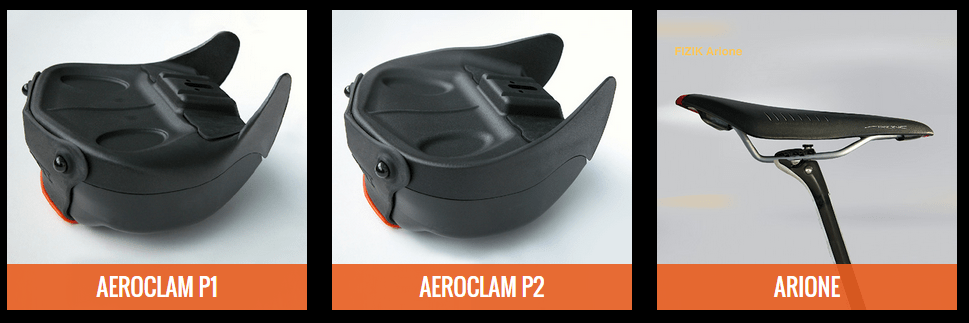
INTRODUCTION
CYCKIT Ltd, located in New Zealand, specializes in designing and producing integrated bicycling storage products which are targeted primarily for higher end users in the road bike market.
Cyckit’s initial goal was to 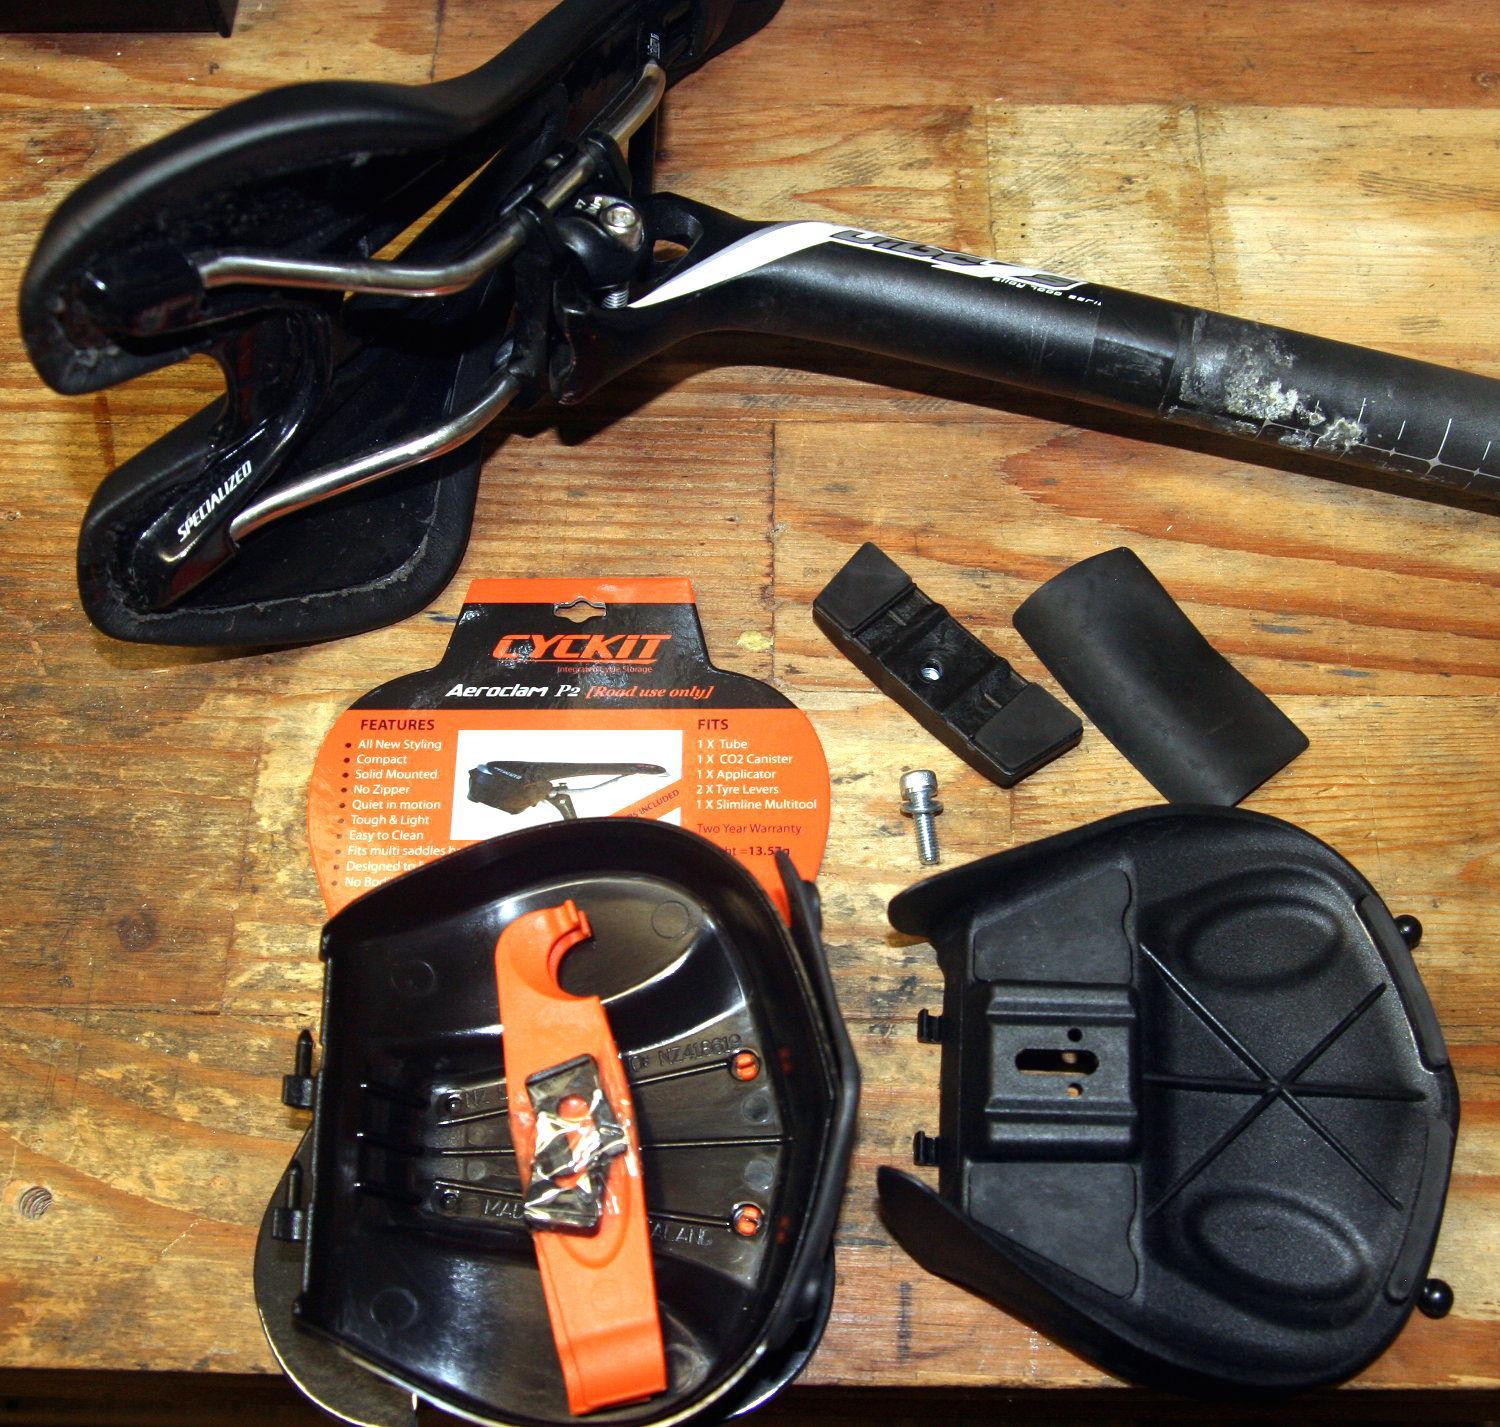 create a highly effective saddle bag without using Velcro and zippers which are two issues I have had with cloth saddle bags.
The cloth tends to fray, the Velcro wears out causing the bag to either hang down or fall off completely and zippers get stuck the first time they get dirty, which is the worst thing that can happen as it prevents you from getting to your spare tube and C02.
Cyckit’s founder, Pat Reardon, looked at the problems with current saddle bags and decided that there had to be a better way. After interviewing 125 road cyclists, common problems, issues, and enhancement requests became evident.
These being that the bag had to be completely secured under the saddle, seamless integration to the saddle (i.e., more aerodynamic), easy access to the contents, must fit most saddles and free of contact with the cyclist while riding.
The final three suggestions were (a) no cloth, (b) no Velcro, and (c) no zippers. From these requirements and Pat’s ideas, the Aeroclams P1 and P2 were built.
 MODEL DIFFERENCES
The differences in these two versions are in the contour on the top edge of the upper section. The P1 will fit more saddle brands while the P2 will fit larger brand saddles.
On the other hand, there are several saddles that the Aeroclams will not fit, mainly due to saddle protrusions into the area that the Aeroclam needs to occupy (such as the tag on the rear of the Selle SMP) as well as greatly different contours of the saddle such as the Fizik Arione.
Note: for a complete list of saddle brands that the Aeroclam fits, please go to the P1 or P2 product page on the Cyckit website, then look for the “PDF – Saddle/Wedge Info” link.
INSTALLATION WAS EASY – (See next section for a step by step installation process)
After unpacking all of the parts, I laid them out on the workbench and opened the sheet of instructions. Not only was the installation of the Aeroclam very intuitive, if you did have a question, but the instructions were also very easy to read, understand and follow. The only thing left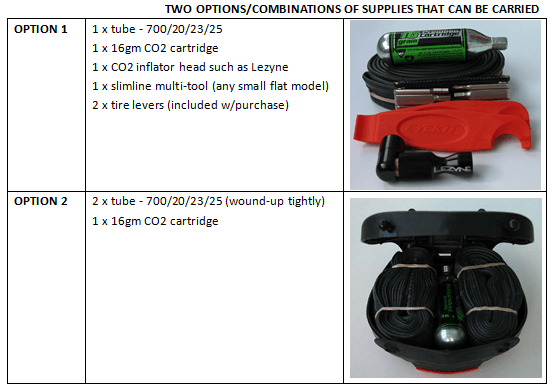 up to the customer is to figure out what you want to carry.
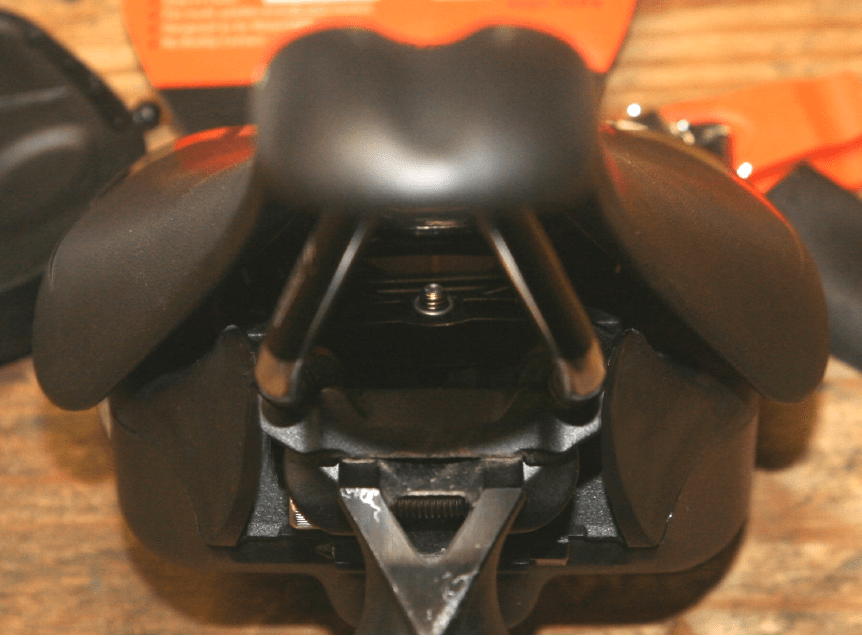
The top piece of the Aeroclam is secured to the seat rails by a glass-filled Injection Molded nylon clamp. A single stainless steel 5mm allen bolt holds these two pieces together.
Having been through the installation process several times, I highly recommend adding a little thread-lock to the bolt to hold it in place.
Rubber pads on the clamp help keep it from slipping. Installed correctly, the seat rails are sandwiched between the clamp and the top piece of the Aeroclam making for a very secure fit.
A perfect solution for those using carbon saddle rails. Everything fits extremely well and the Aeroclam was super-easy to install.
INJECTION MOLDING
The Aeroclam is 1.5mm (0.06”) thick and made from a high-impact nylon-based thermoplastic which is injection molded to make a consistently high quality part.
This ensures that you will have a very strong part that will easily withstand daily use. Several drain holes are also molded into the bottom part that will expel any water that might creep inside.
THE LATCH
While designing the rubber latch (rubber snubber), waterproofing, dust proofing and sand proofing were critical requirements. Rear 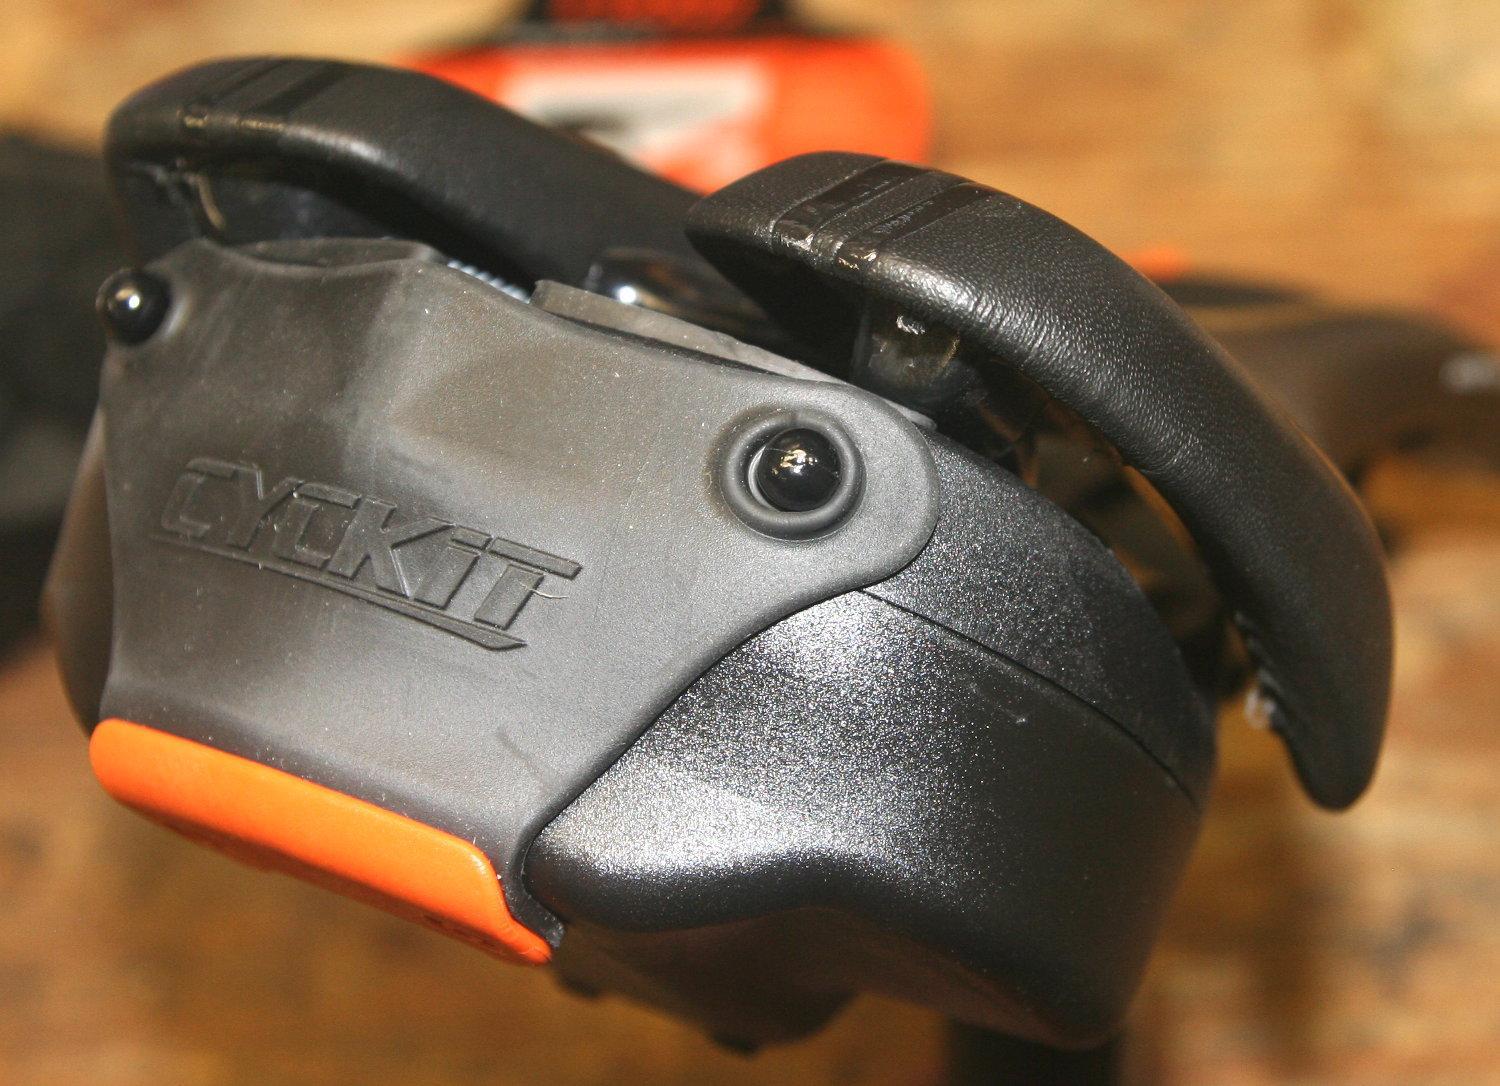 wheels throw water, sand, gravel and everything else up and onto the rear of the bicycle including the rear brake caliper, the back side of the seat tube and especially the saddle bag.
With a typical saddle bag, water, sand, grit, dirt, and mud get into the zipper and after several rides, the zippers get stuck and the rear of the bag starts to rip while tugging on the stuck zipper.
The Aeroclam solves this by utilizing a rubber latch that is strong, durable, UV resistant, easy to open/close, won’t pop open and most importantly keeps water/dirt/debris from getting inside the Aeroclam.
By opening and closing the Aeroclam over 500 times, Pat personally tested the durability of the rubber’s hinging ability as well as any deformation of the rubber eyelets. The rubber held its composition perfectly – no rips or tears were seen.
In fact, to test the UV resistance of the rubber used on the latch, Pat mounted a complete Aeroclam outside his office for a complete year and he says it is still working perfectly even after being exposed to all of the sun, rain, heat, and humidity that New Zealand has to offer. There has been no rubber rot nor cracking of the rubber even after a year of sitting outside.
HOW DID IT WORK?
I chose to run OPTION 1 (shown above). The Aeroclam held everything that they claimed it would. When opening and closing the rubber latch around the plastic snap fasteners, it was initially very tight, very difficult initially to open and close, especially if you had cold fingers.
This is actually a good thing since rubber and plastic pieces will ‘relax’ after some usage and become more pliable, and I would rather have this latch tighter than looser when attached to the plastic buttons.
RATTLES
On my initial ride, I torture tested the Aeroclam on the horrible roads of San Diego. For those who haven’t ridden here, full suspension 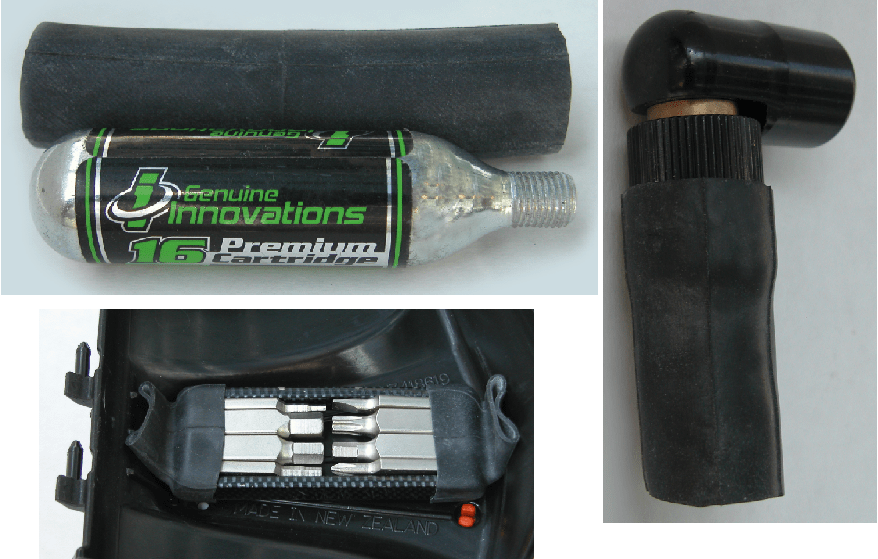 road bikes are required! Yes, the roads here are that bad! I did experience quite a bit of rattling, very loud rattling. The solution is quite easy and recommended by Cyckit.
I took an old MTB inner tube and cut it into small pieces thereby making small rubber sleeves to place each item (CO2 cartridge, multi-tool, and CO2 pump head) into. On my next ride, everything was very quiet. This actually worked very well.
WHY ONLY LIMITED STORAGE?
While Cyckit was performing their market research, four mandatory requirements kept surfacing. These included (1) a strong product, (2) a minimalist and aerodynamic design, (3) no zippers, cloth or Velcro and (4) sleek integration that fits most saddles, and still look like it‘s supposed to be part of the bike.
 While they achieved these goals, they did have to SACRIFICE one important item … STORAGE. This is the only drawback to this saddle bag.
Any way you pack it, you will either need to (a) carry only 1 tube, 1 CO2 cartridge and 1 pump head with you or (b) if you want to carry 2 tubes and 2 CO2’s, you will need to carry 1 tube and 1 cartridge in your jersey pocket.
RECOMMENDATIONS
I have spoken to Pat and recommended that he manufacture a second bottom piece that is deep enough to carry 2 of each. Pat said he is working on some ideas and we should hear something shortly.
OVERALL RATING
The Aeroclam performed very well. It is light and strong, but storage is sacrificed. Due to this issue, I rated it a solid 4.5/5.0. This is a very well-engineered and manufactured saddle bag.
SUMMARY
This unique product really works well and is very affordable. Also, Cyckits’ guarantee is that if neither the P1 or P2 fit, return the Aeroclam(s) and they will refund your money.
This is Cyckit’s way of finding out exactly what saddle brands and models do and don’t fit the Aeroclams and this customer information will be listed in Cyckits website making ordering easier.
For ease of assembly, I recommend removing the entire Seatpost with saddle still attached, marking the Seatpost height first with electrical tape.
This way, the bottom of the saddle is completely accessible and most importantly, you won’t have to go through the pain of refitting your saddle in the correct fore/aft and tilt up/down fit process.
You will notice that this was how I assembled the Aeroclam onto my saddle.
STEP BY STEP INSTALLATION:
| Step 1: Place top clamp on angled section of saddle rails. Make sure clamp is on inside of rails. | 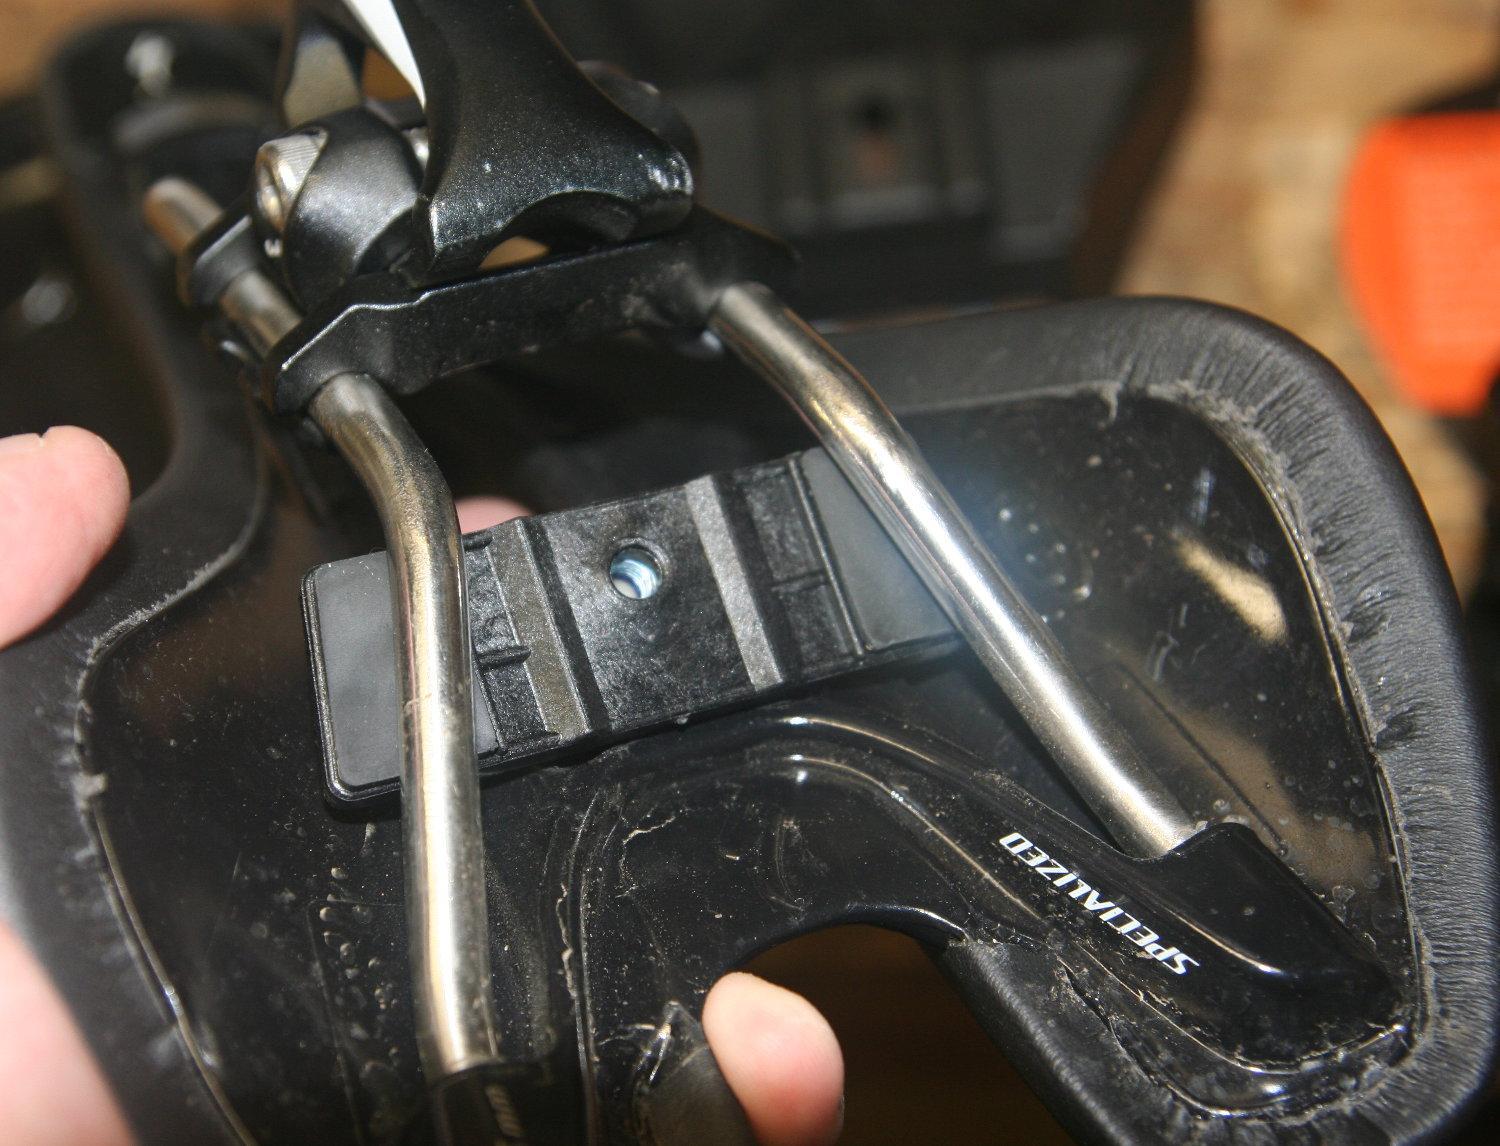 |
| Step 2: Place top section of Aeroclam onto rails and screw into clamp. Note: add a little dab of thread-lock to allen bolt to ensure that it doesn’t vibrate loose. | 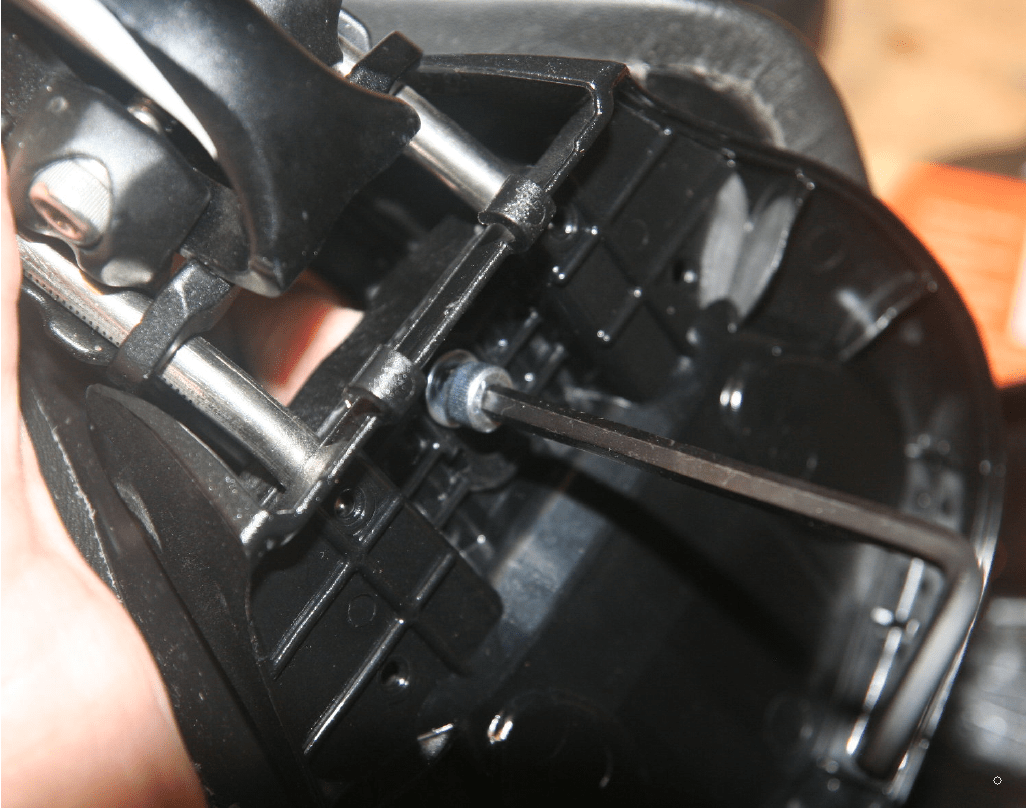 |
| Step 3: Before tightening, slide around top of Aeroclam so that it finds its own center. Then finish tightening bolt. | 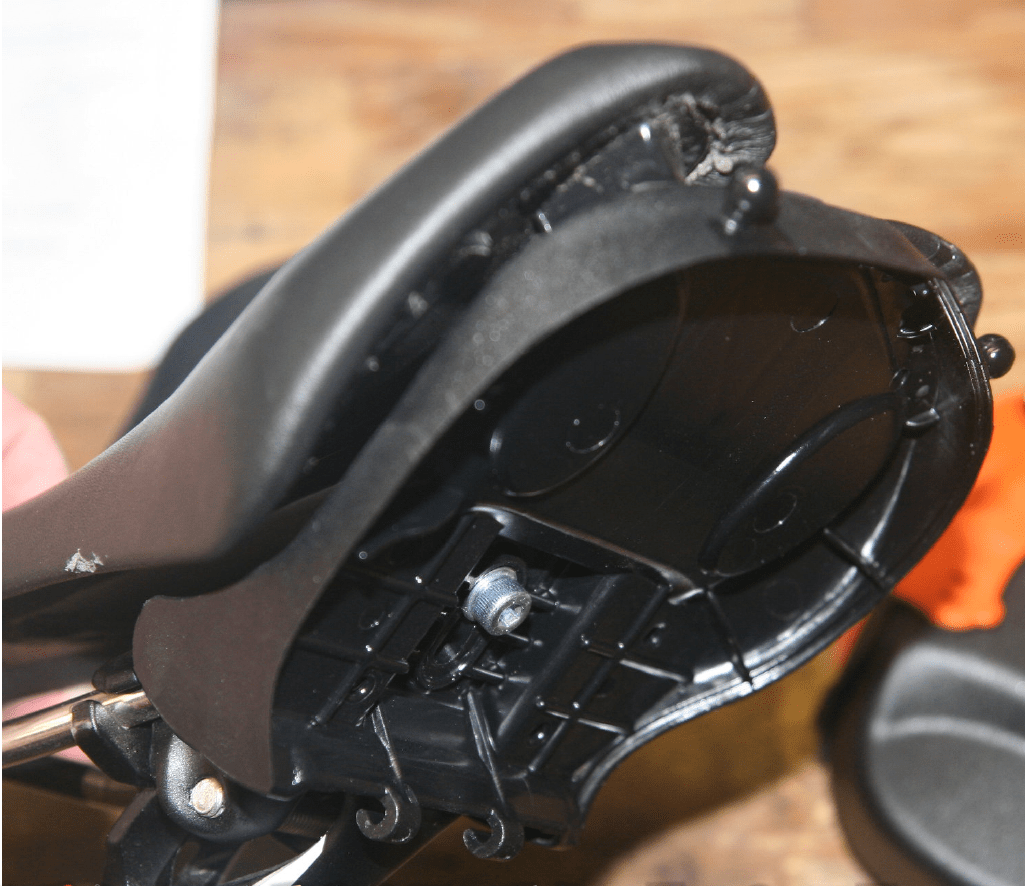 |
| Step 4: Snap on bottom cover. Add items, then close with rubber latch. | 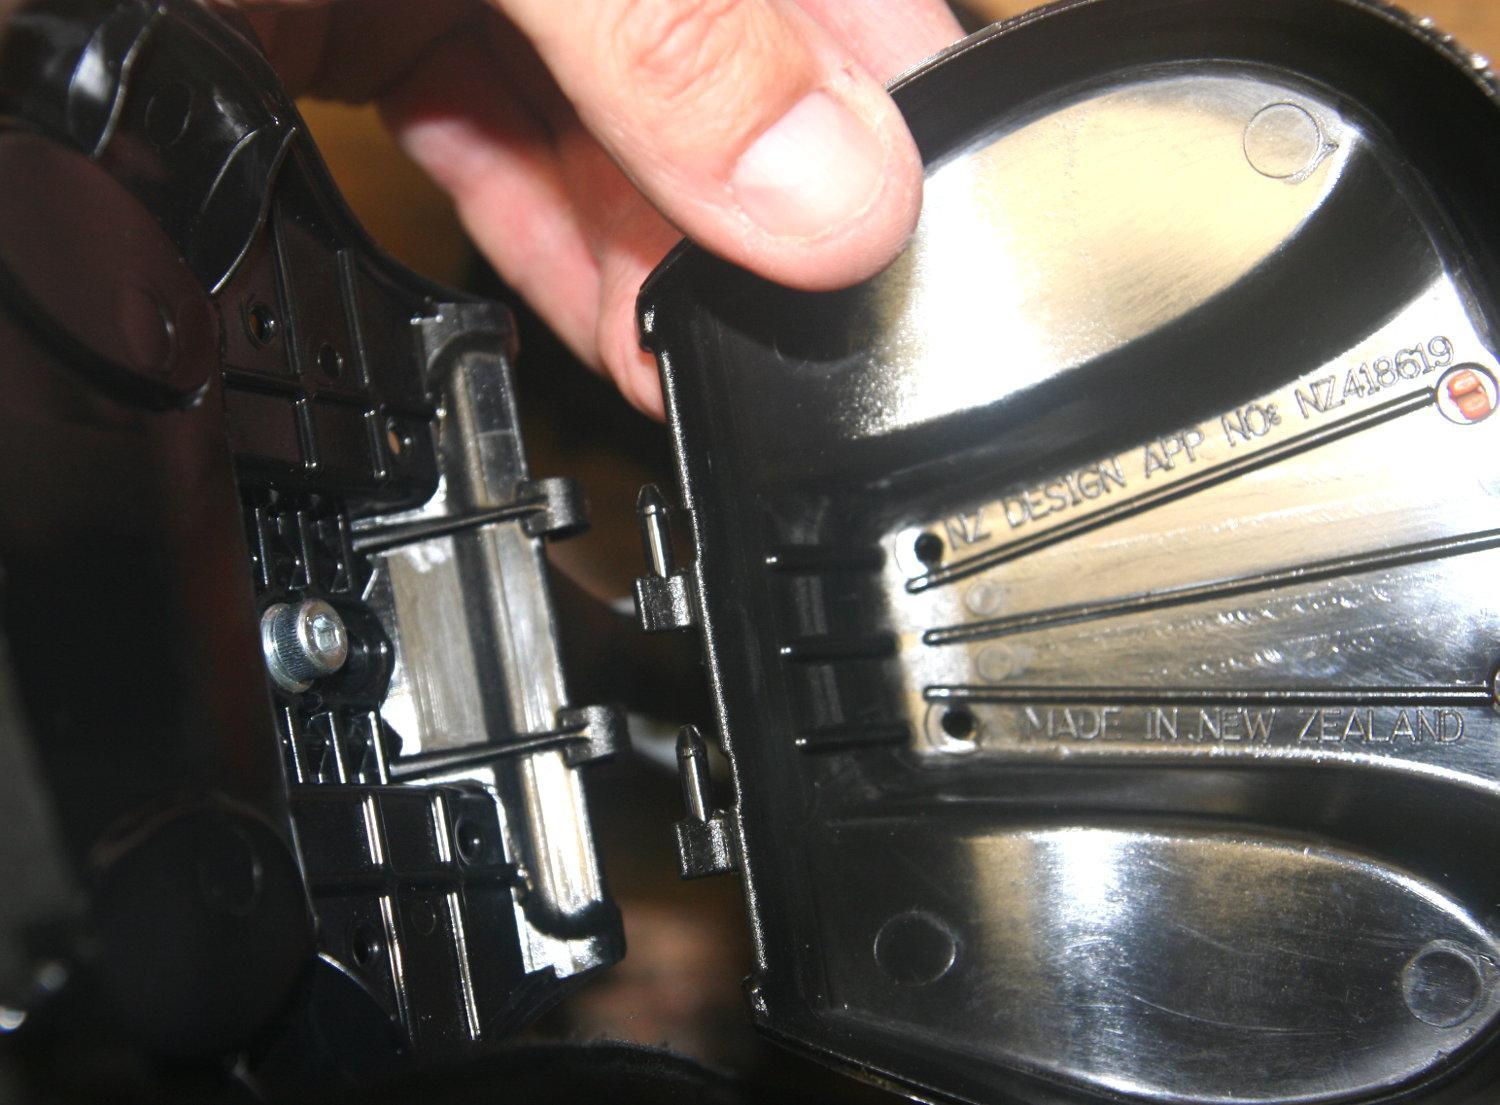 |
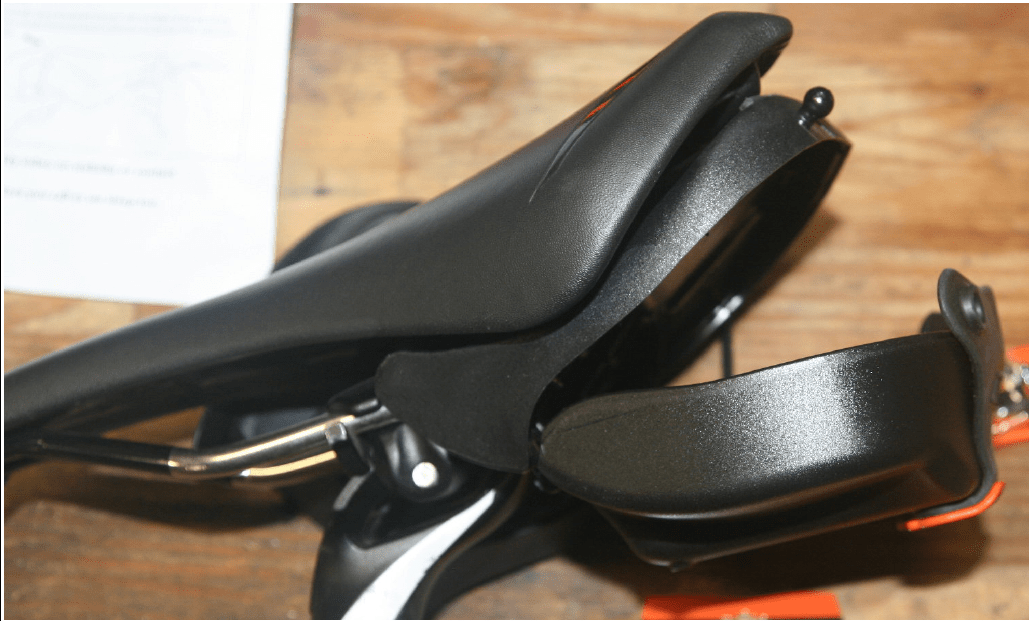 Step 5: Finished. Notice that the Aeroclam only opens so far. This is because a set of molded stoppers are built into the Aeroclam. These stoppers prevent the Aeroclam from opening any further than what you see, which ultimately prevents the contents from falling out and all over the road. Step 5: Finished. Notice that the Aeroclam only opens so far. This is because a set of molded stoppers are built into the Aeroclam. These stoppers prevent the Aeroclam from opening any further than what you see, which ultimately prevents the contents from falling out and all over the road. |
 |

I have always enjoyed bicycling and, through a series of coincidences, became a Bicycle Industry Consultant and Product Tester. I test prototype products for companies and have published only off the shelf production products on biketestreviews.com.

