A REVIEW OF WHAT’S THE CORRECT PEDAL STROKE?
From time to time, we have to step back from our daily habits and analyze one thing – in this case, it’s all about pedaling. On the surface, it seems pretty basic, just turn the cranks around with your legs, push as hard as you can for as long as you can. Deep diving into this simple issue brings many complexities. Knowing how these complexities work hand-in-hand with each other can actually make you faster on the bicycle by being more efficient.
So let’s get started;
Ric H is concerned about his pedal stroke, leg alignments and foot position and writes;
“I’ve noticed over the 14 years that I’ve been riding a road bike that I’ve changed the alignment of my legs from splayed out to in toward the top tube and my feet from heels up to heels down. Please take some time to explain the advantages of certain leg alignments and foot positions and how this impacts my pedal stroke.”
A good bike fit is essential!
First off, getting a great bike fit is absolutely essential before we can start talking about correct pedaling style, pedaling efficiency and power. The reason is that it will put you in the right position for maximum power while minimizing a chance for injury.
I believe it’s important to get a bike fit from someone who looks at bike fitting from a kinesiology point of view. I work with several physical therapists and can relate our process.
Cleat placement is where I like to start.
Correct cleat placement addresses toe-in/heel-in issues, Valgus/Varus foot angles, knee alignment (knees going straight up and down) and maximizing pedaling efficiency via knee placement directly over each pedals spindle.
Saddle placement is next.
This is also important since it helps to maximize power while minimizing the stresses on your knees. You want the correct height so that you are not over-flexing or over-extending your knees. You will want the correct fore/aft placement so that, again, your knees are lined up straight and directly over the pedal spindles when you’re pressing down hard on the pedals.
Since your feet are locked into the pedals, they don’t move much. Neither do your hips. So the only part of the legs that are left free to take up any ‘slack’ are the knees. When your knees go out at the top, you are applying a compression force on the inside of the knees (not a good thing). At the same time, you are also applying a distraction (separation) force on the outside of the knee (also not a good thing). In other words, correct vertical alignment of the knees is absolutely essential for continued knee health.
Saddle tilt is also important.
If the saddle is pointed down too much (nose down), you end up sliding off the front. If it’s tilted up too much you end up putting too much pressure on the soft tissue causing other issues such as pain, possible erectile dysfunction, crushing of pudendal artery and/or nerves, etc. Saddle shape and saddle size is also important, in that you don’t want a saddle that is too narrow or too wide for you either.
Cockpit placement is the next area to address.
You want the right extension via the stem. Beware of fitters who determine that your bars are too far away from you and try to compensate by moving your saddle forward. Saddle placement is all about knee alignment and knee angle and NOT to compensate for a stem that is too long or too short or a frame that is too large or too small.
K.O.P.S. for road bikes.
I know there are people that don’t like Knee-Over-Pedal-Spindle, but I do and here’s why. It places your knees directly over the  pedal spindles so that you are pushing tangential at that point of the circle. This is the point at which you are applying the most force to the pedals. You want your knees to be pushing straight down at this point, not pushing forward or pushing backwards.
The most efficient pedaling style is pedaling in a circle, just like a motor that applies the same force tangent to every point along the circumference of the circle. You want to do the same or at least strive to do the same. So, for each leg, you want to push down along the entire front part of the pedal stroke (roughly 12 o’clock to 6 o’clock), then pull back and up along the entire rear part of the pedal stroke (roughly from 6 o’clock to 12 o’clock). You want your knees tracking straight up and down, not moving in or out at the top.
Foot position.
Assuming that you have had a bike fit from a fitter that knows what they are doing, the correct saddle height should leave you pedaling a little flatter footed than ‘tippy’ toe-down. The reason is that a majority of cyclists’ saddles that I have done bike fits for are too HIGH in the saddle. Being too high in the saddle forces you to ‘reach’ for the pedals, i.e., tippy toe-down. Cycling on a bike where the saddle’s height is perfect for you will flatten out your foot and also allows you to “ankle” (use your ankle to add a bit of force to the pedal stroke).
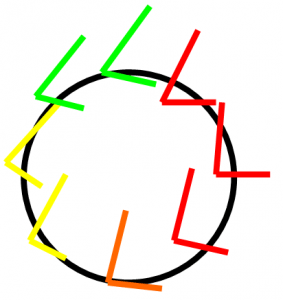
So here’s a perfect pedal stroke;
For this example we will be showing the right leg. See diagram below.
- Power/Pushing phase – from about 12 o’clock to 4 o’clock. This is where you are engaging all of your pushing muscles; glutes/hip extensors, quadriceps, etc. The pushing phase is divided between the hip extensors (glutes) and the knee extensors (quadriceps). The Glutes are used from about 12 o’clock to about 3 o’clock where, at this point, the quadriceps take over and are in use from about 3 o’clock to almost 6 o’clock.
- Transition (BDC) = bottom dead center – after pushing but not yet pulling. This is where you are ankling. You use your ankles, which are fired by the calf muscles, to get you through this ‘dead spot’ where neither the pushing muscles or pulling muscles are engaged.
- Recovery/Pulling phase – through the bottom of the pedal stroke, i.e., entering the pulling phase. You are now engaging some ankle dorsiflexors but primarily the hamstrings (knee flexors).
- Transition (TDC) = top dead center – after pulling but not yet pushing. This is where you are ankling in order to place your heel down so that you can generate leverage early / as soon as you enter the power phase. The primary muscle group you are using during this phase is the ILIOPSOAS (PSOAS, aka hip flexors). This muscle group is used through the entire TDC transition phase.
I hope this helps with the understanding of the dynamics of a pedal stroke. Lots of different muscle groups are activated and de-activated during 1 revolution of the crankset. Now that you know what muscle groups are in use, it’s time to stretch and strengthen them.
Rick Schultz
Bikefitnesscoaching.com
[email protected]
USAC coach, CPBT, CSI
Graphic Source: A qualitative analysis of the biomechanics of the proper pedal stroke, Grant Bullock, Davon Cabraloff, Jessica Hickman, Mark Mico, Laura Nethcher and Dan Ward, March 9, 2009.

I have always enjoyed bicycling and, through a series of coincidences, became a Bicycle Industry Consultant and Product Tester. I test prototype products for companies and have published only off the shelf production products on biketestreviews.com.

