Shimano Camera CM-1000 Long Term Use Review
-
Shimano Sport Camera
-
K-EDGE GO BIG Pro SPORT CAMERA HANDLEBAR Mount
-
K-EDGE GO BIG Pro SPORT CAMERA SADDLE RAIL Mount
Summary
Shimano Sport Camera
Summary: Lightweight yet high quality rugged camera. Waterproof up to 10m (33 feet)
Tested: CM-1000
Source: Bike Shops
Made in: Japan
Features: HD video, Stills
How obtained: Sample from Company
K-EDGE GO BIG Pro SPORT CAMERA HANDLEBAR Mount
Summary: Lightweight (46gm) and sturdy construction fits Shimano camera mount perfectly
Tested: K13-420-RED
Source: Bike Shops, Websites
Made in: USA
Features: High-quality machined aluminum construction, precision fabrication, fit and finish
How obtained: Sample from Company
K-EDGE GO BIG Pro SPORT CAMERA SADDLE RAIL Mount
Summary: Lightweight (45gm) and sturdy construction fits Shimano camera mount perfectly
Tested: K13-430-RED
Source: Bike Shops, Websites
Made in: USA
Features: High-quality machined aluminum construction, precision fabrication, fit and finish.
How obtained: Sample from Company
Pros
Shimano Sport Camera
- Image capture as well as HD video
- Tight integration to smart phones via application and built in WiFi
- Easy to use Settings menu (on smart phone app)
- Built in integration to ANT and ANT+ devices
- Dual angle modes (135° & 180°)
- Auto image rotation using ‘Angle Free’ setting
- 3 video modes up to full 1080p HD!
- Standard “GoPro” Mounting
K-EDGE GO BIG Pro SPORT CAMERA HANDLEBAR Mount
- Lightweight, sturdy high-quality machined 6061 T6 aluminum construction compatible with 31.8
mm diameter handlebars. - Machined relief fabrication will NOT hurt carbon bars
- Two position design – above or below handlebar.
- No-vibration construction.
- Fits all GoPro HERO, HERO2, HERO3 and Shimano CM-1000 cameras.
K-EDGE GO BIG Pro SPORT CAMERA SADDLE RAIL Mount
- Lightweight, sturdy high-quality machined 6061 T6 aluminum construction compatible with all standard two-rail bicycle saddles, including over sized carbon rails.
- No-vibration construction.
- Fits all GoPro HERO, HERO2, HERO3 and Shimano CM-1000 cameras.
Cons
Shimano Sport Camera
- Nothing included to mount camera on handlebars or seatpost.
- Need to purchase K-EDGE products separately.
- No memory card included.
K-EDGE GO BIG Pro SPORT CAMERA HANDLEBAR Mount
- Some might find this a little pricey
K-EDGE GO BIG Pro SPORT CAMERA SADDLE RAIL Mount
- Can use either saddle bag or camera mount, but not both at the same time.
- Some might find this a little pricey
User Review
( votes)Shimano CM-1000 Sport Camera Review
 After unpacking the shipping box and laying out all of the bits and pieces, I read through the User’s Manual as well as downloaded the 1-page instruction sheet. And even though you might be tempted to just start playing with the camera, I highly recommend spending 5 minutes to go through the User’s Manual and Instruction sheet.
The camera’s operations are very easy to understand and are listed here: http://shimano-sportcamera.com/en/index.php.
Prepping The Camera
Unlocking the rear cover reveals 2 slots, one for the supplied USB charging cable, the other for a Micro SD/SDHC card. When you purchase your card, make sure is states at lease class 6. Most are class 10 now. Your card can be 8GB, 16GB or 32GB.
I recommend going with 32GB since it will hold an entire 2 hour Full HD video. A 16GB card will fall short. After installing the memory, plug the camera into your PC, Laptop, or an existing 5VDC wall mount (cell phone) charger for about 4 hours to fully charge.
While the camera is charging, it’s time to download the camera APP onto your smartphone. Both Android and Apple versions are available – just type ‘Shimano Sport Camera’ into Google Play or Apple’s App Store.
At this point, you have a fully charged camera and the Shimano Sport Camera installed onto your smartphone.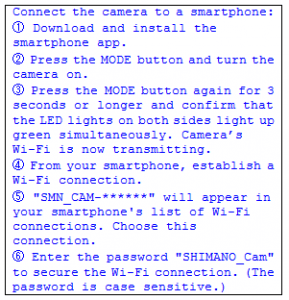
Now it’s time to connect/pair these two devices. But, first, make sure to read the user manual and know the differences between turning on the camera, turning on the camera’s WiFi and how to Start/Stop a recording.
Once the camera is powered up and its WiFi is transmitting, you will need to go to the network settings of your smartphone. You will notice a new network SSID called ‘SMN_CAM-xxxx’.
Select this network then type in ‘SHIMANO_Cam’ for the password. Remember, the password is case-sensitive so type it in exactly like it is listed here.
Lastly, open the Shimano Sport Camera app on your smartphone and these 2 devices should automatically connect/pair with each other. After pairing, you will now be able to control the camera from your smartphone by any of the 3 main menus (1) LIVEVIEW, (2) FILE LIST, (3) SETTINGS.
In the App
First, go into SETTINGS to select items such as RECORDING MODE (video or still image quality, interval shooting), ANGLE SETTING (180°, 135°), ANGLE FREE (ON/OFF), HIGH SENSITIVITY (AUDIO) ON/OFF, etc., and, most importantly, PAIRING SENSOR SETTING for pairing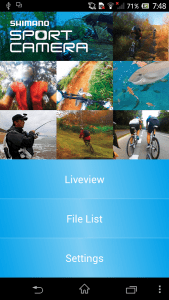 to other ANT+ devices such as speed, cadence, power, heart rate, Di2.
Next, go to LIVEVIEW that shows exactly where the camera is pointing. This feature is used when mounting the camera on your handlebars or saddle and is extremely helpful ensuring that the camera isn’t pointed too high, or too low. This is a very useful feature.
Lastly, use FILE LIST to manage (i.e., delete) movies. A discussion on video editing follows.
Your First Ride With The Camera
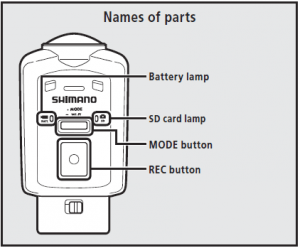
Now that the camera is setup, you don’t need to run WiFi when recording. Instead, just click the REC button once to start a recording and click the REC button again to stop a recording.
Having WiFi turned off greatly increases the battery life to over 2 hours per ride recording.
You will notice that I have also included the K-EDGE mounts in this test. Currently, Shimano only supplies a basic helmet mount.
If you look at Shimano’s website, you will notice that Shimano chose K-EDGE mounts for their cameras at the 2014 Tour of California. The mounts are designed and machined at a very high level and are optimized to not damage carbon bars in any way.
For further information, see the K-EDGE website at http://www.acecosportgroup.com.
K-EDGE was nice enough to sent me two of their units to test the camera. The only drawback to using the rear-facing saddle mount is that you need you remove your saddle bag since direct access to the rails is needed.
Someone needs to build an integrated saddlebag+camera mount. When finished riding, hold down the REC button for 4 seconds to turn the camera off.
Disconnect the camera from the mount using the quick release and download the movie(s) to a home computer. The camera creates a ‘.MOV’ video file which can be edited on either a PC or MAC.
Editing Your First Video
For the PC enthusiasts, Microsoft supplies a free video editing application called Movie Maker. This is a great basic editing application that allows you to create movie snippets or highlights of a movie.
For the MAC enthusiast, iMovie is included with your MAC and is also a basic editing application.
Many other, including professional level video editing applications exist for either platform, but these are enough to get you started. Heck, you can even try the free GoPro Studio!
A Quick Word On DI2 Integration
The CM-1000 is compatible with Shimano’s private ANT protocol so it can connect with the new D-Fly wireless Di2 transmitter EWW01 (reviewed here) allowing speed, cadence, power, heart rate and Di2 data to be displayed over the video.
When paired to your ANT+ devices, the camera creates 2 separate files (see below), one is the video file (.MOV) and the other is an accompanying CSV (Comma Separated Values) spreadsheet text file that keeps track of available data from your ANT+ devices recorded every second.
Shimano is working on an application that will combine or overlay the spreadsheet data onto the video, but as of 11/2014, this is not yet available. In the meantime, there is an application called DASHWARE that can overlay these two files.
Full purchase price is around $50, but there is a free trial available so check it out.
So, back to the camera. Once its all setup and ready to go, all you need to do is tap the REC button to start recording and tap again to stop recording. It really is as easy as that to use!
So What Does The Video Quality Look Like?
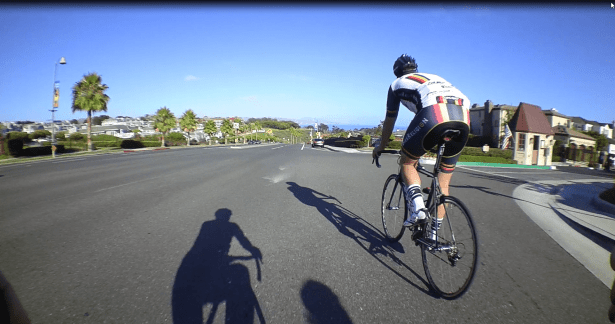
Following is a single video frame from our Wed night ride – Dana Point to Camp Pendleton and back. Viewing this through a browser doesn’t do the picture justice. The video quality of Full HD is phenomenal!
Quick Overview Of Specifications:
 Micro SD/SDHC (not included but required) up to and including 32GB
- MOV file output for video
- JPG file output for image mode
- CSV file output for ANT+ device capture
- Weight: 86g
- Smartphone Requirements
- iOS 6.0 and above
- Android 4.2 and above
- Desktop Computer Requirements
- Mac OS X v10.7 lion and above
- Windows 7 and above
Scoring
- CAMERA – 4.8/5.0. No bicycle mounting accessories are included. No memory card included
- K-EDGE FRONT MOUNT – 4.75/5.0. At $50 MSRP, a little pricey
- K-EDGE REAR MOUNT – 4.5/5.0. Can use either saddle bag or camera mount but not both at the same time.
Summary
 Shimano has succeeded in coming up with a high quality camera that is lightweight, compact and easy to use, takes up to Full HD movies as well as still shots, and can be used up to 10m (or about 30 feet) underwater. The camera has performed rock-solid in all types of conditions and recorded video perfectly even when riding into the sun and/or low light conditions.
Lightweight, compact and versatile design, this is indeed a true multi-sport camera that can be used in any activity that the GoPro can – bicycle racing, auto racing, motorcycle racing, surfing, etc. I am sure that you will be very happy with this camera.
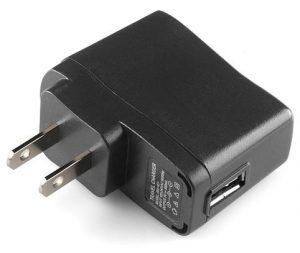
One last note: I found out it is easier and quicker to charge when plugged into a USB cell phone wall charger.

I have always enjoyed bicycling and, through a series of coincidences, became a Bicycle Industry Consultant and Product Tester. I test prototype products for companies and have published only off the shelf production products on biketestreviews.com.


