NOKON – WHATS IN THE PACKAGE:
NOKON cables, which I heard were one of the best, were the first to arrive, so, let’s give them a try…
Even though each box contains both stainless steel shift cables AND stainless steel brake cables, you will still need 2 sets in order to have enough ‘Konkavex’ pieces and end caps to be able to install both shift cables and brake cables onto your frame. Konkavex, I believe means concave-convex, since each piece has a concave end and a convex end which fit together end-to-end.
Each ‘Shimano road’ package contains
- 2 Nokon cords (PTFE liners that come pre-built with konkavex-parts)
- One cord has 2 pre-built sections for REAR BRAKE AND/OR REAR DERAILLEUR
- The other cord has a single pre-built section of konkavex parts for FRONT BRAKE AND/OR FRONT DERAILLEUR
- 2 stainless steel Brake cables
- 2 stainless steel Derailleur/Shift cables
- Extra konkavex parts, misc. round beads and end caps
- Larger cable liners
INSTALLATION OBSERVATIONS:
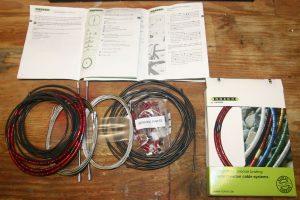
When separating and laying out all of the parts, I noticed there were 2 prebuilt sections of cable, a ‘single-housing’ piece and a ‘double-housing’ prebuilt piece. What I finally figured out was that NOKON prebuilt these pieces to help get the customer started.
One section is meant for the front brake, the other for the rear brake. This is nice since it helps in speeding up the installation process.
Taking my time, I pieced the NOKON system together by comparing it side-by-side to the OEM cables that I was removing from the bike. Since my OEM cables were a tad too short, I needed to add a little extra cable/housing length to each derailleur and brake section. I could always shorten this later if needed.
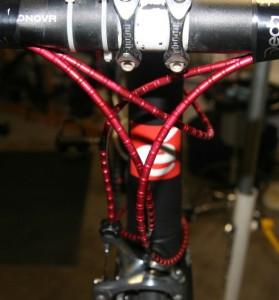
After building up these sections on the workbench, I test fit them on the bike, utilizing the fully sealed housing sections where I could (i.e., rear brake lever to rear brake caliper).
Extra round ‘pearls’ are included as you always want to assemble the Konkavex housing pieces with a rounded (convex) end against a rounded (convex) end, or a convex end against a concave, NEVER a concave end against a concave end.
So, basically what you need to do is to ‘thread’ the aluminum Konkavex compression-less housing pieces onto the PTFE liner, then, after this is sized and assembled onto the bicycle, thread the stainless steel cable through the PTFE cable liner.
The Konkavex pieces thread fairly tight onto the cable liner which is what hold these sections together. I used a SHARP razor blade to cut the liners. This prevented crushing the ends of the liners that housing.
Also, when installing the stainless steel cables into the PTFE liners, give the cables a light coat of oil or grease. I used the TPS SBG-32 full synthetic lightweight grease from ThePartsShoppe. Best lightweight fully-synthetic grease out there!
 | ADVANTAGES OF NOKON:
|
PUTTING IT ALL TOGETHER:
Opening the package, I laid everything out on the workbench, and then located the Assembly Instructions. The manual shows a couple of high-level steps and then COMPLETE. What?!? In my opinion, it is a giant leap going from the manual to actually having these new cables installed on your frame. So, taking my time, I was able to figure it out, and looking back on it, it wasn’t all that difficult.
HOW DO THEY PERFORM?
First ride was a fast 50 miler. During the last 10 miles of this ride, these brand new cables had stretched to the point where I could barely shift the rear derailleur. I had to get off the bike and readjust/increase the cable tension on the rear derailleur cable twice.
Back at the workshop, I gave the bike a thorough tune up and readjustment of all cables back to spec. The next several rides were uneventful and the bike shifted perfectly; crisply and precisely.
If you want to speed up the cable stretch/break in period, once they are installed on your bike, grab the cables mid-way along the down tube and pull down hard a few times. This will give them an initial stretch.
A Loud Creaking/Crinkling sound issue (which is further amplified by a hollow carbon frame!): After several months of riding in all types of weather, a LOUD “crinkling” noise developed in the shifter housings – specifically, between where they exit the handlebar and the head tube cable guides. Searching the Internet, this seems to be a fairly common complaint, and solutions range from oiling the ferrules to purchasing something else.
I don’t recommend the latter since (1) this is a high quality cable set system, (2) this is a fairly pricey system and (3) the Nokon cable housing ferrules should last for as long as you own your bike. A call into Nokon USA resulted in an explanation of the issue and that this happens to maybe 50% of the units.
So what causes this creaking sound?
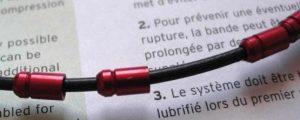
- Dust and Dirt works its way in-between the ferrules. One end of a ferrule is like a ball, the other end a socket. Dirt causes this grinding sound which seems to be amplified into a creaking/crinkling sound, especially on cables which are under the most tension (i.e., shifter cables).
- NOKON’s Recommended Fix is to loosen both derailleur cable clamps and pull enough cable loose to unhook the ferrules from the guides. Next, slide the ferrules slightly apart and use compressed air to blow the dirt out, then reassemble. The problem to me is that it seems like a lot of extra work to perform every several months?
- Nokon added “NEVER use oil to solve this issue, since oil will just attract even more dirt and dust.”
To me, the sound is not that big of a deal since, when you are riding, you really don’t hear it. You hear it mainly when stopped and you turn the handlebars. But, on several bicycle forums, some members said this was a show stopper. In my opinion, this is still a very high quality system and worth considering.
HITS:
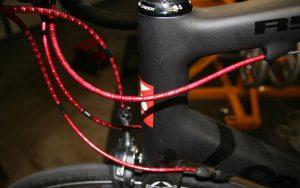
So far, I am very impressed as to how easy it is to pull the brake levers and shift the derailleurs, especially since there is no PTFE (Teflon) coating on these premium quality stainless steel cables. Comparing to GORE RideOn, I have had GORE RideOn installed on two of my bikes so I feel I can compare NOKON and GORE head-to-head.
The results are that even though the GORE system initially operates very smoothly, it starts deteriorating quickly. The PTFE coating on the GORE RideOn cables starts to unravel and then bunches up inside of the housing causing slow shifting. A second problem area is under the bottom bracket shell.
Due to cable friction against the bottom bracket cable guide, the GORE RideOn PTFE coating is quickly abraded away causing the bare cables to rust quickly. These two problem areas have caused both of my bikes to stop shifting all together!
With that being said, I have noticed that the NOKON system has an even easier and smoother feel and has less resistance than even a new GORE RideOn system!
MISSES:
Two ‘misses’ are identified.
- The initial setup is a little more complicated than it needs to be and I fault the German to English translation in the installation manual, i.e., ‘Pull of the not needed konkovex ferrules and insert the 6mm end piece, thenPull of the liner a 6 mm end piece and a pearl.’ WHAT ???!!!?!? This is why you need to go slowly and lay everything out on the workbench prior to cutting housing and installing the NOKON cable set. This is where the additional time was spent during installation.
- As discussed above, the other miss is the creaking/crinkling noise due to dirt in between the ferrules.
OVERALL SUMMARY:
Except for the ‘crinkling’ sound, I am very satisfied with the fit, finish, high quality and high performance of this system. The NOKON system continues to shift and brake very smoothly which gives you more modulation than stock OEM for a safer and more enjoyable ride…Plus, it just looks so COOL!
RATING: 4.5/5
Although the performance of the system is among the best, a half-point was deducted due to the 2 ‘misses’ as described above. Neither hurts the performance, but the noise might be a detractor to some customers.
Next time: YOKOZUNA cableset tested

I have always enjoyed bicycling and, through a series of coincidences, became a Bicycle Industry Consultant and Product Tester. I test prototype products for companies and have published only off the shelf production products on biketestreviews.com.

