Summer is on its way in the Northern hemisphere, so you’ll be thinking about bringing your good bike out of winter hibernation.
In order to do so, you’ll probably need to give your bike a little bit of TLC. To make this easier, you’ll more than likely want a bike repair stand.
A bike work stand is always going to be better than leaning your bike against a wall to work on it.
It is also definitely better than turning your bike upside down and resting it on its saddle and handlebar (and hoods if you’re a roadie).
You’ll find every task gets a little bit easier when the bike is in a sturdy and stable stand.
Tips for your new repair stand
A couple of tips to begin our article on repair stands. All the stands will tell you that they grip both the top tube and the seat post. Always try and use the seat post.
That may mean raising the post or changing the seat post from a carbon one. Clamping the top tube is the easiest way to ruin your bike accidentally.
Many people accidentally over tighten their stands bike clamp. Aluminum and carbon fiber don’t like that. Steel is a little more resilient.
The other way to damage your top tube is to yank the bike in the stand. I’ve seen people dent their top tubes by accidentally doing this or knocking their bikes.
The other thing that sometimes happens when you clamp your top tube is that you clamp the brake cable. Admittedly this can really only happen to kid’s bikes and road bikes with external cables.
There is nothing quite like watching someone work on a brake they can’t set up, and all along it is because they clamped the cable to the top tube.
The 3 main characteristics of a repair stand
There are 3 main things to look for when you’re buying a new bike repair stand.
- That it is stable
- That it is durable
- That it is reliable
These three areas are important for the home mechanic. The presumption I have made is that you’ll not always have the stand-up and it will be folded and put away when not in use.
The other assumption I made is that you may want to take it to events with you, just in case.
These three features then need to work with each other for you to be able to trust your stand. A stand that is not stable by default can’t be seen as being reliable — the same with a stand that is not durable.
You need the bike clamp to be easy to use. It would ideally be intuitive to use as well. When you’re putting your bike on you’ll be balancing it with one hand, and you might not be looking at the clamp.
It then needs to be easily operated without your full attention.
You want the pieces that your stand is made from to be easily replaceable. As you’ll accidentally lose or damage parts over time.
You don’t want to be buying a whole new stand as a quick release has worn out.
Your stand also has to be stable. A stable stand is simply the most important requirement. You don’t want it to topple with your bike when you’re working on it.
Otherwise, you’re just as well leaning your bike against a wall. The best stands will be easy to set up and stable on nearly any surface.
Our Top 4 Bike Repair Stands
Feedback Sports Pro Elite Bicycle Repair Stand
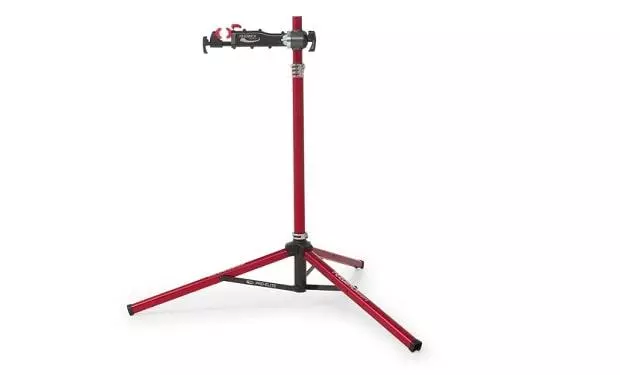
Many people imagine that most bike shops/ trade guys use Park Tool stands, and many do. The real industry favorite though is the Feedback Sports Pro Elite bike repair stand.
You’ll find this stand in the pits at races, you’ll see it in workshops, and it will feature in most mechanics home workshops.
The reason is these stands are tough and sturdy. When you work on a variety of different bike sizes, and with mechanics of varying heights, stands will get moved around a lot.
You will have to raise and lower them, spin them around, move them and generally they won’t have an easy life.
All of this moving and changing very quickly destroys lower quality stands. Their construction methods are found to be lacking.
Feedback Sports stands laugh at this and just work. They are bombproof. If you want a stand to last years, this is the one to pick.
Feedback’s tripod design also means that this is one of the most stable stands to use. You won’t accidentally knock it and your bike over.
The stands even stay up on some uneven ground, that’s why you see them in the pits.
Despite all this sturdiness, you’ll still find that the Feedback Sports stand can be folded away at the end of its shift.
You can even pick up spares if you finally wear parts out. I’ve used these in some of the busiest workshops, and they just don’t fail. Give one a shot, and you’ll be impressed.
Park Tool Home Mechanic Repair Stand – PCS-9

The PCS-9 is the go-to for many home mechanics. It is a name they have heard of, it is a reasonable price, and it has that lovely blue Park Tool color. The stand is robust, it’ll take knocks, and it’ll hold pretty much any bike.
It does though have a few failings compared to the Feedback, these failings are why it’s cheaper and may also not be an issue for you.
The first one is that this stand is off the two base leg variety. It tends not to be stable as the Feedback Sports stand. It can be easy to knock it over if you hit a bike the wrong way.
It also then doesn’t take as kindly to less even surfaces. It needs the ground to be flat if you want stability.
If you’re using it in the house or out in your garage, this will hopefully not be an issue.
The next one is to set the height for working on you’ll need to do so with an Allan key. Doing so is easy when you don’t have a bike in the stand if you do it’s a pain.
The Feedback comes with heavy duty quick release clamps that allow you to do this easily.
Clamping the bike is also a little more fiddly. On the Feedback stand you push the clamp in and then tighten with the large dial. On the PCS-9 you have a small Allan key like lever to tighten your bike using.
All of these problems are easy to deal with if your only fixing your bike. If you have to work on multiple bikes, it starts to get time-consuming and a little bit annoying if you’re just using the stand for one bike on a Saturday none of these issues should be too huge.
The PCS-9 can be folded up, well it more comes apart. It is a little fiddlier than others but in the end, will take up a very small place. Which is ideal if you have to share living space with other people.
Feedback Sports Sprint Repair Stand

Okay, so this is the second Feedback Sports stand, but the Feedback Sports Sprint repair stand is a very different beast from the Pro Elite stand.
Above we mentioned you would want to avoid clamping your top tube and if you have a dropper post you probably want to avoid clamping it.
The Sprint stand allows you to do so. You’ll need to remove your front wheel as you use your fork to clamp the bike in place.
The stand is compatible with QR style forks and 15mm thru-axle forks. The other good news is that you can spin your bike through 360° when it is on the stand, making it easy to work on either side.
You still get all the same big and robust clamps for setting the height of the stand, and you still get the super stable tripod base design.
The Sprint is an excellent choice if you don’t want to damage your bike frame by accident.
Eclypse Repair Stand

The Eclypse Repair Stand is a cost-effective solution for the home mechanic. It even comes with a nice little feature that is an extra on most other repair stands.
It comes with a tool tray, allowing you to keep your tools exactly where you need them for when you need them.
Like the Feedback Sports stands, the Eclypse comes with a tripod base to make sure that you can keep your bike nice and stable as you work on it.
It uses quick release clamps to allow you to set the stand-up quickly and has a very chunky adjustable lever for clamping your bike with.
Things to consider when buying a work stand
- Clamp adjustment. Look for clamps that are easy to adjust. The bigger the better, it makes it easier while you’re balancing the bike as you tighten the clamp.
- Stand clamps. If you have a work stand you have to unfold you’ll want to make sure that the clamps or connectors here are as robust as possible. Small and fiddly will quickly fail.
- Height adjustment. Can you quickly and easily change the height? If your working on your headset and then the bottom bracket you won’t want to leave the bike at the same height.
- Maximum weight. Bikes are getting lighter but the maximum weight the stand can take will give you an idea on how robust it will be.
If you have any useful repair stand tips, please leave them below.
I’ve spent way more time in the bike trade than anyone should reasonably want to. In that time I’ve wanted to make cycling jargon and marketing easier to cut through to help people get the bike of their dreams.
When I’m not writing about bikes, I can be seen out bikepacking on single speed bikes or teaching kids how to ride.
")
