You don’t always need to be outdoors to enjoy the benefits of cycling. You can do it indoors, just stationary instead. What a lot of people struggle with is understanding how to set your bike up to do it.
In this article, we’ll be telling you how to set your bike up indoors. We will run through all the necessary equipment and how to set it up. By the end of this article, bad weather will be no excuse for not getting the miles in.
To complete this job, you are going to need the following;
- Turbo Trainer or Rollers
- Riser Block
- Bike
- Turbo Trainer Axle or Adaptors
- Turbo Trainer Mat
Step One: Get a Trainer
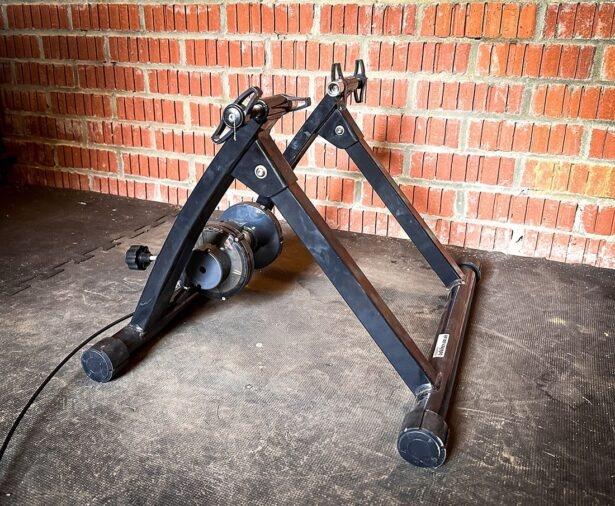
There’s actually not a huge amount of goods you will need to get training inside. One thing you will definitely need is a turbo trainer. These are what’s going to let you pedal without the bike having to move.
A turbo trainer comes in two different styles. You have a wheel on turbo trainer and a direct drive turbo trainer. A wheel on trainer is where you put the bike into a small stand with the rear wheel still on, and then it stabilizes the bike and can create resistance.
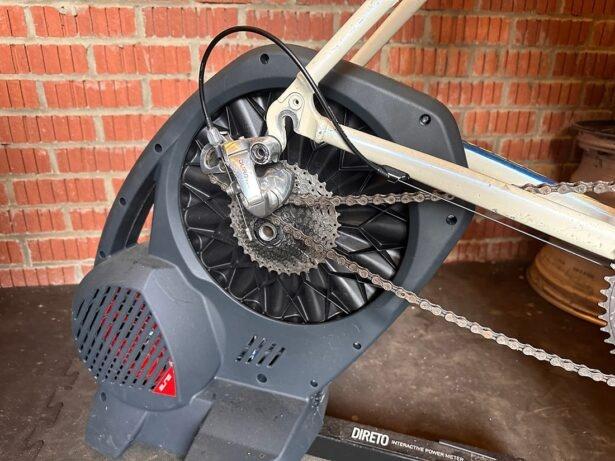
A direct drive turbo trainer takes the whole rear wheel off the bike and replaces it with the trainer. You will get a better experience from a direct drive trainer, and they have smart capabilities for more interactive training.
Step Two: Prepare Your Bike and Trainer
Bike
Now you’ll need to get your bike ready to be stationary. The first thing you will need to do is get it clean.
Training on a dirty bike will not only throw mud everywhere, but it makes the bike noisier and can damage your trainer. You will also need to replace the original skewer with a turbo trainer skewer or axle adaptor.
Wheel On
If you’re using a wheel on trainer, it’s a good idea to use a turbo trainer tire. These tires are much quieter, much more durable, and dissipate heat much better.
If you have a spare wheel and cassette, this can make for easy changes if you are still using your bike outdoors.
Direct Drive
If you have gone with a direct drive turbo trainer, then you will need to remove your rear wheel. Take the cassette off and put this on the turbo trainer. Ensure the correct adaptors are right for your bike’s axle while doing this.
Step Three: Bring it all together
Now you will need to attach the bike to the turbo trainer. We recommend laying the turbo trainer mat down first so it can soak up any sweat you might have when training.
Place it somewhere safe we recommend out of the way as much as possible from pets and children.
Wheel on
Pop the bike into the wheel on the trainer, ensuring the skewer keeps the bike safe and tight. Adjust the rear roller to securely sit on the wheel, not too tight or loose.
If you have a turbo trainer with resistance levels, attach the band on the handlebars so you can get to it easily. Once the bike is secure, put the riser under the front wheel.
Direct Drive
With the direct drive trainer, you need to release the rear wheel from the bike and take it across to the turbo trainer.
This can be a little fiddly, but when you get it across, tighten up the axle and ensure it’s secure. Once It’s all set and secure, lift the front and set the riser block under the front wheel.
Step Four: Test it
Now it is time to get your cycling kit on and give it a test. If you have a smart trainer, get it linked to your device.
Ensure the trainer or bike doesn’t make any awful noises and it works as it should. Now you have a stationary bike and are ready to start your indoor training.
A Final Note
Having the option of a stationary bike at home can really help towards those fitness goals. No longer do you have to wait for the correct weather, you can train all year round.
We hope you enjoyed our article and now feel confident enough to build that stationary bike.

Robbie Ferri has spent years working in a bike shop, has worked with industry leading brands on product creation, has been a semi pro athlete, and is a fully qualified strength and conditioning coach. He has broken World Records, bikepacked all over the World and raced ultra distance at a top-level.


