THE BEST CYCLING SPECIFIC INSOLE? PART II
Please note: Reviews and Product Scoring are based on how each of these insoles fit my feet. I have high arches with a fairly non-flexible foot. Your results may differ. Also, the shoes used in this test were Shimano SH-R321 (size 45 Wide).
Every insole was of the highest quality. No corners were cut, nor did anyone skimp on the materials used. Each of the insoles were actually made as cycling specific, and not, as mentioned in Part I, made by taking a runners’ insole and slapping a different label on the box.
As compared to an insole for running, cycling specific insoles have (a) arches that are moved slightly back, (b) metatarsal bumps that are (usually) added, (c) deeper heel cups which all go towards providing better support for the cyclists’ feet – resulting in more comfort and a more efficient power transfer from the heels to the forefoot and to the pedals.
| COMPANY (Alphabetical Order) | PRODUCT FAMILY | PRODUCT(S) | WHERE DID THEY PLACE? | HEAT MOLDABLE | Metatarsal Pad Height | FOOTBED THICKNESS (forefoot) | WEIGHT (ounces / gram) | MSRP (USD) | RATING (out of 5.0) | WEBSITE |
|---|---|---|---|---|---|---|---|---|---|---|
| A|LINE | GURU | RTG | #5 | No | Medium | 3mm | 8.25 (233.88 g) | $90.00 | 4.5 | aline.com |
| CURREX SOLE | BIKEPRO | LOW MED HIGH | #4 | No No No | Small Small Small | 4mm 4mm 4mm | 3.625 (102.77 g) 3.625 (102.77 g) 3.625 (102.77 g) | $50.00 | 4.6 | currexsole.com |
| FOOTBALANCE | SPORTS SPORTS | PERFORMANCE RACE | #3 #4 | Yes Yes | *Small *Small | 3.2mm 3.1mm | 4.35 (132.32 g) 4.35 (132.32 g) | $80.00 $80.00 | 4.7 4.6 | footbalance.com |
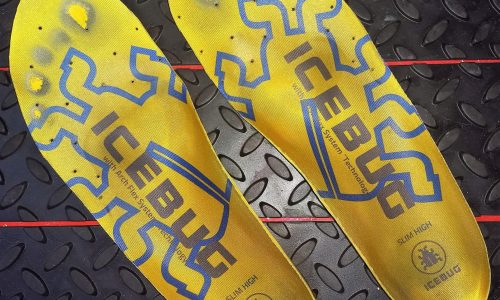
| ICEBUG | ICEBUG SLIM ICEBUG SLIM ICEBUG SLIM | Slim LOW Slim MEDIUM Slim HIGH | #1 | No No No | Large Large Large | 2mm 2mm 2mm | 3.625 (102.77 g) 3.625 (102.77 g) 3.625 (102.77 g) | $47.00 $47.00 $47.00 | 4.9 | icebug.com |
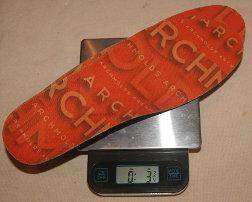
| POWERSTEPS | ARCMOLDS ARCMOLDS | LEAN MULTISPORT | #6 | Yes Yes | *None *None | 2.5mm 3.5mm | 3.75 (106.31 g) 4.00 (113.40 g) | $41.00 $41.00 | 4.3 | powersteps.com |
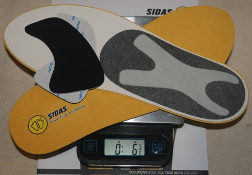
| SIDAS | CUSTOM | BIKE + | #3 | Yes | Medium | 3.6mm | 4.875 (113.39 g) | $90.00 | 4.7 | sidas.com |
| SIDAS | CUSTOM | BIKE C | --- | Yes | *Medium | 2.7mm | 6.625 (187.82 g) | $95.00 | **N/R | sidas.com |
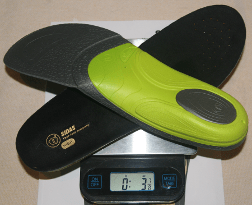
| SIDAS | 3FEET 3FEET 3FEET | Low insoles Mid insoles High insoles | #6 | No No No | None None None | 2.2mm 2.2mm 2.2mm | 3.875 (109.85 g) 3.875 (109.85 g) 3.875 (109.85 g) | $50.00 $50.00 $50.00 | 4.3 | sidas.com sidassport.com |
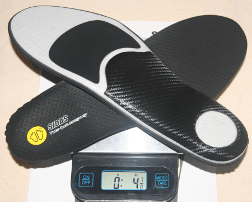
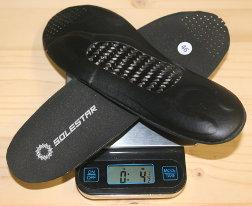
| SOLESTAR | KONTROL | BLK | #5 | No | Med/Large | 3.7mm | 4.50 (127.57 g) | $149.00 | 4.5 | solestar.de/en |
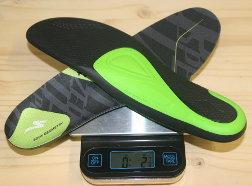
| SPECIALIZED | BG-FIT BG-FIT BG-FIT | SL LOW SL MED SL HIGH | #2 | No No No | Small Small Small | 4.5mm 4.5mm 4.5mm | 2.875 (81.51 g) 2.875 (81.51 g) 2.875 (81.51 g) | $30.00 $30.00 $30.00 | 4.8 | specialized.com |
*For heat molded insoles, Foot Balance, Archmolds, Sidas Bike C, if you need a larger/higher Met Arch, while the insole is hot, you can cut a piece of thin plastic and stick it to the bottom of the insoles when placing them inside your shoes. Then, slide your feet in and ride around the block while seated and standing. This plastic will cause the top of insole to be raised in the shape of the plastic. Remove the plastic when the insole has cooled. Most insoles can be heated several times so that if you need a taller Met bump, then, repeat the above process, but this time add 2 pieces of plastic under the insole.
**N/R (Not Rates) due to needing ovens and molding pillows.
Note:
POWERSTEPS ARCHMOLDS & SIDAS CUSTOM BIKE+ are wearable out of the box. Both can be heat molded to get you that perfect custom fit. FOOT BALANCE and SIDAS CUSTOM C – come flat from the factory and require custom fitting via an oven and molding pillows prior to use.
HOW I TESTED
| COMPANY (Alphabetical Order) | PRODUCT FAMILY | PRODUCT(S) |
|---|---|---|
| A|LINE | GURU | RTG |
| CURREX SOLE | BIKEPRO | HIGH |
| FOOTBALANCE | SPORTS SPORTS | PERFORMANCE RACE |
| ICEBUG | ICEBUG SLIM | Slim HIGH |
| POWERSTEPS | ARCMOLDS ARCMOLDS | LEAN MULTISPORT |
| SIDAS | CUSTOM | BIKE + |
| SIDAS | 3FEET | High insoles |
| SOLESTAR | KONTROL | BLK |
| SPECIALIZED | BG-FIT | SL HIGH |
- Round #1 – I started with the first one and rode with them in my shoes for 100 miles. I then swapped them out for the second pair. Another 100 miles, then the third, etc.
- 1,100 total miles ridden for Round #1
- Round #2 – I started over with the first pair for another 100 miles, then the second, etc.
- 1,100 total miles ridden for Round #2
- Round #3 – Same as above but only 60 miles per pair
- 660 total miles ridden for Round #3
- Round #4 – 45 miles each again.
- 495 total miles ridden for Round #4
- TOTAL TESTING MILEAGE = 3,355

HOW TO QUICKLY FIND OUT WHICH INSOLE HEIGHT YOU NEED
- Remove shoes and socks
- Place a wet dish towel on the ground. Note: The towel should be large enough so that both feet easily fit completely on the towel and just wet enough so that it is not dripping.
- Place either a dry piece of newspaper on the ground or you can use the smooth dry cement.
- Wet your feet then step onto the newspaper or cement so that you leave a print.
- Step back off and then compare the footprint left behind with the picture(s) below.
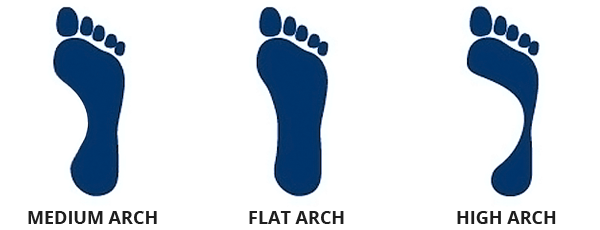
Since a given rating for arch height is not the same between manufacturers, I like to add a double-check test.
- Place insoles on the ground
- Step onto insoles
- Have someone try and place their fingers between the insole and the arch of each foot. If there is too much of a gap, you will want to move to a higher arch insole. Ultimately, you want the insole to lightly contact the arch of your foot so as to provide support.
WHAT I NOTICED
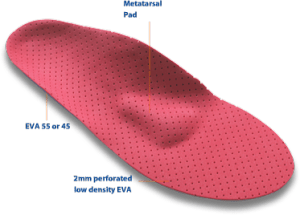
Note: The heat moldable insoles use a denser foam, the non-heat moldable use more of a gel-type foam. So given the same thickness of foam padding, the gel will be more comfortable than the heat moldables’ dense foam.
- One size fits all
- Heat molded
- 3 separate arch models in Low, Medium, High
The picture to the right shows the bottom of a right foot looking upward. The area in Green shows 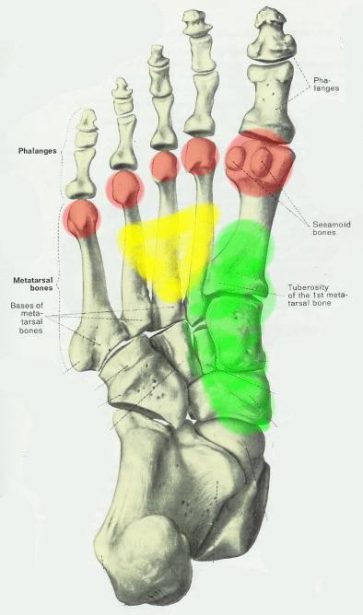 where a good arch support contacts the foot. The area in Yellow shows where a good metatarsal pad supports the center of the Metatarsals. Together, these act to support the foot and alleviate over pressure of the Metatarsals and sesamoid bones.
The areas in red show where over pressure occurs when cycling. This over pressure can be even greater/more concentrated along the 1st Metatarsal head/sesamoid bones if the cyclist’s feet pronate (arches pointing towards the ground), or more concentrated along the 5th Metatarsal head if the cyclists foot supinates (outside of foot is lower than the arches).
Adding the correct amount of arch support along with the use of a Metatarsal pad will greatly decrease the concentrated over pressure by more evenly distributing the pressure forces along a wider surface area.
In addition, the addition of cleat wedges during a professional bike fit can add more pronation or supination to the foot which will also allow more even pressure along the metatarsal heads. Make sure you see a qualified bike fitter who is certified and specializes in cleat adjustments.
To summarize my experience, at 90 rpm, I am rotating the cranks 5,400 strokes per hour. When I cycle with an insole without a Metatarsal Pad, my 1st Metatarsal Heads and sesamoid bones start hurting after only 20 miles. On the other hand, I have no pain when using a quality insole with a high arch support and Metatarsal pad.
So, looking for an insole with (a) the correct arch height for your feet and (b) a metatarsal pad of the correct height might be the best thing you can do for your cycling feet.
A NOTE ON INSOLE THICKNESS
A NOTE ON INSOLE WEIGHT
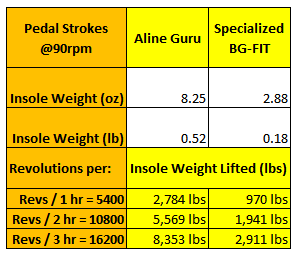 really be felt. Once their weight goes over 5 oz., and especially over 6, I can definitely feel the added weight. Therefore, I recommend choosing a pair of insoles at or below 5 ounces. Remember, pedaling at 90 rpm, you are pedaling at 5,400 revolutions per hour and 13,500 revolutions for a typical 2.5-hour ride. As can be seen by the chart to the right, that’s a lot of additional weight during the backstroke pulling and lifting of your feet. A quick comparison of the lightest vs heaviest insoles tested shows that on a 3-hour ride, using the BG-FIT insoles, you are lifting about the same weight as you would be on a 1-hour ride using the A|LINE Gurus.
RELATED READINGS
- Influence of Carbon Fiber Foot Orthoses on Plantar Pressure Distribution in Cycling
- The Effects of Cycling Shoe Outsole Material on Plantar Stress
- In-Shoe Pressure Distributions for Cycling
- Many on-line studies and articles on these manufacturers websites.
A|Line
GURU Insole
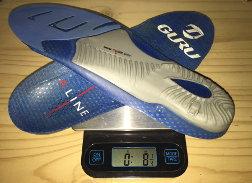
SUMMARY: A|Line has invented a most comfortable insole with great support. They have designed this insole with several layers of different densities of foam and plastic allowing for a ‘cycling-specific tuned’ level of comfort, support and functionality. As can be seen in the photo, the arch support extends forward and to the outside creating a unique combination of both arch support and metatarsal pad.
This hard plastic base support layer is coupled to the main footbed which is comprised of medium soft rubber with a thin ventilated top layer. Also included is a softer gel-infused foam forefoot as well as a true ultra-soft gel heel cup. These are integrated to make this insole one of the most comfortable of those tested.
Sizing runs true and I needed to trim only about 1/8″ from the very front. These insoles easily snapped into the shoes and there was plenty of room for my feet.
1. Low volume insole that allows maximum room for the foot
2. Arch support that flows into a small/medium height metatarsal bump
3. Deep gel heel cup keeps heel secure in the shoe
4. Rubbery top layer ensures no sliding of feet
5. Small perforations in top layer material guarantees that feet will be cool and comfortable
6. Detachable heel wedges included allowing canting of heel
7. Very durable – showing no signs of wear
8. For those with small arch heights, this is a very comfortable insole
1. Weight – was the heaviest insole … almost double the weight of the next heaviest insole
2. Price – at $90/pair was the second most expensive insole behind Solestar
3. Small arch support…a one-size fits all design which didn’t support my feet like other insoles. Personally, I need a taller arch support and larger metatarsal bump.
Again, for those with small arch heights, this insole is one of the most comfortable and, although this insole has a well thought out multi-layer cushion design, points were subtracted for its hefty weight, high price and a ‘one-size-fits-all’ design.
currexSole
BIKEPRO Insole
• RUNPRO – best suited for running, triathlon, jogging, trail walking and running, Nordic running.
• RUNFREE – best suited for natural running
• ACTIVEPRO – best for active sports such as soccer, basketball, tennis, volleyball, baseball, football, cross-fit, etc.
• EDGEPRO – best suited for skiing, snowboard, hiking, golf, polo.
• WORKPRO – perfect for work shoes and boots. Offers EN ISO 20345 protection with certain shoes
• BIKEPRO – Specifically made for Road Cycling, MTB, Triathlon, BMX, Cyclo-Cross, and Track Cycling
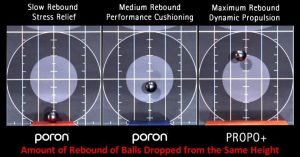
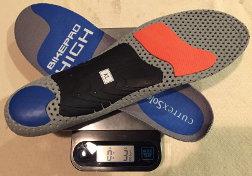
There is no metatarsal bump, but there is a rebounding pad that is integrated under the metatarsals. The picture above tries to illustrate that not only does this pad provide cushioning, but, provides rebounding at the same time. Why is this important?
Because if the insole incorporates only a foam-type cushioning pad, some of your pedaling power will get absorbed by the foam pad.
Kind of like why a cyclist shouldn’t wear running shoes when riding a bicycle. After the power phase of the pedal stroke, the PROPO+ material is deformed slightly, and when pressure is slightly backed-off, will help to rebound the cyclists’ foot. Theoretically, this assists with the dead-spot and initial pedaling back-stroke.
 comfortable as they could have been and secondly, my feet were sliding around quite a bit in the shoes. I think this was from a combination of a fairly slippery top layer material coupled with a shallow heel cup.
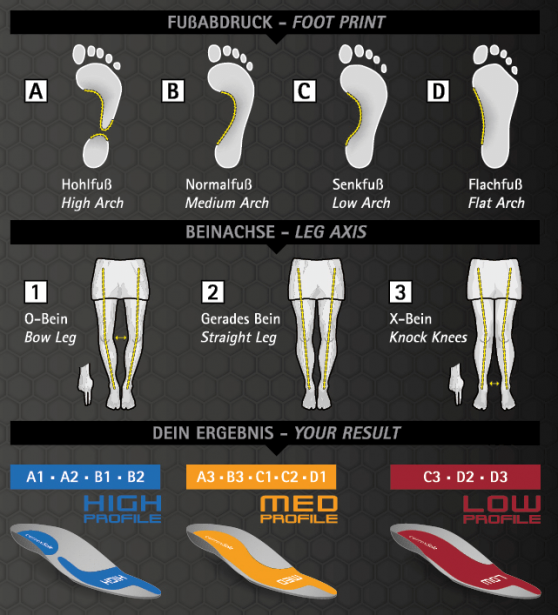
• Next, find your foot print. Do you have a high arch, normal, low or flat arch? Circle the letter. Using my feet as an example, I am between A & B.
• Then, determine your leg axis. Stand up straight and place ankles together. Can you place 2 fingers between knees? If so, 1. Choose 2 if your legs are straight, or choose 3 if you can’t touch your ankles together. In my case, I am a 2.
• Lastly, in my case, combine the letter in the footprint with the number of leg axis to come up with A2 or B2, both of which fall under HIGH PROFILE which is correct for me.
1. Low volume insole that allows maximum room for the foot.
2. Tall (hard plastic) arch support that is light weight and supports the arch perfectly.
3. Gel cushioning under the heel.
4. Rubbery top layer ensures no sliding of feet.
5. Breathes very well. Insole does not feel hot.
6. PROPO+ metatarsal cushioning pad (see orange colored material along metatarsals in top photo) is a dual-purpose metatarsal cushioning pad as well as a rebounding material – kind of like an anti-energy absorbing layer.
1. Shallow heel cup combined with a semi-slippery top cover allows my feet to move around quite a bit in the shoe.
2. No metatarsal bump. At the end of a 3-hour ride, my feet didn’t hurt, but I could tell they were getting close to hurting.
There were positives as well as a few detractors so I didn’t reduce the score as much as if there would have been a lesser number of positives. This insole ended up with a 4.6/5.0 overall rating.
FOOT BALANCE
PERFORMACE & RACE Insole
2. Low volume that fits very well
3. Very low weight
4. Cloth covering ensures that the feet stay in place
5. Large heel cup makes the feet feel very secure in the shoe
6. Custom fit arch support
7. Heat moldability that conforms perfectly to the feet
8. Very durable product
2. Metatarsal pad is very small
3. Requires a special oven to mold – additional cost for the fitter
4. Requires a special molding pillow – additional cost for the fitter
RACE 4.6
ICEBUG SLIM
(Low, Medium, High) Insole
SUMMARY: Icebug is a Swedish footwear manufacturer specializing in shoes and boots for the outdoors. They make trail shoes for walking as well as running, boots for snow and ice, as well as insoles. Their current insole line consists of two high-quality and well thought out products; FAT and SLIM.
Each of these two styles are available in three different arch shapes; low, medium, high. The FAT offers maximum cushioning and shock absorption ideal for hiking, running, walking, work boots, any other high-volume shoes and they work especially well for those who are on their feet all day.
The SLIM is recommended for low-volume shoes such as cycling, cleated sport shoes, minimalist running shoes and all other low volume shoes.
As shown in the picture, the main support for this insole comes from the pre-molded thin hard plastic base which supports the heel cup, arch support, outer foot support, forefoot support as well as a fairly large embedded metatarsal bump.
The arch support is ribbed for additional strength and, with respect to the SLIM/FAT HIGH, Icebug claims to have the tallest arch support of the out of the box insoles. So, unless you have very high arches like I do, the LOW, or MEDIUM should work perfectly for you. But if you do have tall arches, then this is your insole.
For the insole, Icebug uses a low friction nylon top cover which is coupled to a shock absorbing EVA foam base layer. This EVA foam layer is very similar to that used in the forefoot and under the toes of the A|LINE GURU and one of several main reasons why this insole is so comfortable.
The other main reason is their use and placement of a fairly large metatarsal bump. On the initial ride, the metatarsal bump felt like it was too big and too tall, but, after 30 seconds, it felt natural. Yes, this turned out to be an extremely comfortable insole.
2. Well thought out design
3. Nylon top layer is durable as well as prevents feet from slipping around
4. EVA foam later is comfortable without sacrificing performance
5. Deep heel cup ensures foot stays planted
6. Comes in 3 arch heights (low, med, tall)
7. Hard plastic foundation support supports heel, arch, outer foot and forefoot
8. Large metatarsal bump relieves overuse pressure from cycling
9. Second lightest insole
2. Initially, some might find the Metatarsal bump too intrusive, but, give it a few seconds, it feels natural.
POWERSTEPS ARCHMOLD
LEAN & MULTISPORT Insole
I first tried the LEAN and it felt like there was no padding at all. After 20 miles, the balls of my feet  started hurting. It was as if I was pushing down directly on the hard Carbon Fiber of the bottom of the shoe. I tried the MULTISPORT next.
With 1mm of extra padding, this insole should feel similar to Foot Balance’s PERFORMANCE. In reality, this insole was still too hard for my liking. I pulled the insoles out of the shoes and started comparing them to the Foot Balance. Only one major difference I could find is that there is no metatarsal bump in these where there is in the Foot Balance insoles.
And that is what appears to make all of the difference for me. The solution is that I could make my own metatarsal bump by (a) heating the insoles then (b) taping a small piece of plastic to the bottom of the insole then (c) place back in the shoes and stand up on each shoe one at a time. Theoretically, this should produce a bump in just the right place and should solve the problem of 1st metatarsal soreness.
I am guessing that for most cyclists, this will not be an issue. These have the same cloth top layer as Foot Balance and look to be a very durable insole. They look to be made of the same heat moldable materials as Foot Balance.
They come pre-shaped and can be worn right out of the box. They have a low weight and are very reasonably priced. I’m not knocking this fine product; they just didn’t fit ME very well.
2. Second lowest priced insole tested
3. High quality materials throughout
4. Very durable
5. Large heel cup makes the feet feel very secure in the shoe
6. Can be heat molded in your home oven or worn as is
2. No metatarsal bump, requires major work if you want to add one yourself
SIDAS CUSTOM BIKE+
SIDAS CUSTOM BIKE C Insoles
2. Very comfortable
3. Fairly deep heel cup with a gel bottom
4. Well thought out design
5. Carbon fiber arch support
6. Top layer is durable nylon/rubber material that prevents ALL slipping
7. Deep heel cup ensures foot stays planted
8. Small metatarsal bump relieves some overuse pressure from cycling
2. One arch height fits all
3. Fitter must invest an additional $2,000 minimum for oven, fitting pads and stand
4. Price is well over what most cyclists are willing to spend
SIDAS CUSTOM BIKE C Insole
SIDAS 3FEET Insole
2. Light weight
3. Great footbed material offered firm grip of the feet
2. Small heel cup allowed feet to feel unsecured
3. No metatarsal support
4. No forefoot cushioning
5. High price for a ‘standard’ insole
SOLESTAR KONTROL
BLK & ROAD Insole
b) MTB – similar to ROAD but with additional padding.
c) BLK – high quality super-stiff carbon fiber core provides lightest weight and stiffest insole. Out of the box product for competitive road cycling, XC and triathlons.
d) CUSTOM – same core as the BLK, but custom manufactured individually for each rider.
e) ALPINE – for skiers and use in ski boots.
In researching their website, I decided to test either the BLK or the ROAD. On each insoles’ detailed product page, I noticed their corresponding Sizing Chart.
This is great for the customer since it tells you which size insole to purchase based on your shoe brand. For example, if you wear Specialized shoes, choose the insole that is identical to your shoe size. If you wear Fizik shoes, choose an insole one size larger than your shoe size.
If you have Shimano SH-R320 or SH-R321, then … they don’t fit? What!?!How can that be? So I emailed them directly and the next morning a reply came stating that “over the past couple of years, Shimano has been changing the shape of the front of their high-end shoes by putting in more of a curve as well as giving them a wider toe box.”
Solestar continued “based on the shoe size and insole size chosen, there might be a slight gap between the insole and shoe. Some shoe/insole combinations won’t have it, others will, some might notice it, others won’t”, so, they elected for now just to say don’t use these insoles for the SH-R320 or SH-R321 shoes. I also asked about trimming a slightly larger insole and their reply was “we use very tough materials in our insoles, [i.e., a lot of carbon fiber] so you can’t easily trim but you can grind them”. I opted to see if I could make them fit.
The bottom/base layer appears to be a heat moldable material and is pre-shaped to include a generous arch, metatarsal bump and small heel cup (this insole has the shallowest heel cup in the  group and was so small that several times, my heel felt like it might pop out the back. I definitely would like to see a much larger heel cup). The bottom of the heel cup does have 2 ‘wings’ which give a lot of support to the rear of the insole keeping it from moving around in the shoe.
The next layer is a large carbon fiber anatomical formed piece that runs from the heel all the way to the toe area giving unparalleled rigidity – in fact, none of the other insoles were even close to being as rigid. The next higher layer is the upper that the foot rests on and appears to be an EVA-type foam that is very comfortable, but, for cycling in SoCal, is also very hot. There are some cooling vents underneath the tips of the toes, but that’s it. These insoles felt VERY HOT.
I placed the trimmed insoles into my Shimano SH-R321 shoes and they fit perfectly. Even though they measure 3.7mm in the forefoot, I could tell that they took up a lot of the real estate in the shoes, so much that I had to loosen the Velcro straps so my feet would fit comfortably.
They felt very stiff yet, there was the perfect amount of padding on the foot. A small metatarsal pad was just high enough to remove any pressure on my forefoot. Doing several high-wattage pulls at the front, I again noticed that the shallow heel cup made the back of my foot feel like it might slip out. The Solestar has the shallowest heel cup of all those tested.
2. Carbon Fiber makes insoles stiffest of the bunch
3. Good Metatarsal bump
4. Great arch support
2. Shallow heel cup makes the feet feel like they might come out the back
3. During summer riding, these insoles feel HOT
4. Price is way over what most ‘roadies’ will pay
5. Might not fit every shoe
a. Price – at $149.00, these are way over what road cyclists will spend
b. Shallow heel cup
c. They run HOT
SPECIALIZED BG-FIT SL
(Low, Medium, High) Insole
They have great support along the arch and metatarsal pad. But they didn’t feel right. After spending 3 hours with them, I got back and took them out of my shoes, placed them on the ground and stood on them. Even though these were the Green+++, I could easily run a couple fingers between the arch of the insole and the arch of my foot.
Again, I need an insole with more of an arch than these have to offer. But, I believe the 3 heights offered by Specialized are perfect for 90% of the cyclists out there.
The other thing I had noticed was the material chosen for the arch and metatarsal support. Instead of being a piece of rigid formed plastic, it is a dense foam. It will give under pressure where a piece of plastic will not.
For crit racing, I believe these will be too spongy, but, for long days in the saddle of grand tour racing, touring long hours over many days or for those who are looking for pure comfort, these are the ones for you … no and’s, if’s or but’s.
2. The least expensive insole as well!
3. Low volume that fits shoes very well
4. Although not the deepest heel cup, it’s perfectly adequate and held my heel securely
5. Different arch and metatarsal contours with Red+, Blue++ and Green+++
6. Perfect for L O N G days in the saddle
2. Arch material is too ‘spongy’ for crit racers

I have always enjoyed bicycling and, through a series of coincidences, became a Bicycle Industry Consultant and Product Tester. I test prototype products for companies and have published only off the shelf production products on biketestreviews.com.

