OUTBOUND LIGHTING FOCAL SERIES ROAD LIGHT
-
Rating
Summary
Unique design that illuminates like a cars headlight.
Source: Bike Shops, Websites
Supplied by: Outbound Lighting
Pros
- High Powered (110LUX, 1,800 equivalent lumens)
- Focused 100° wide beam pattern, 15° center hotspot
- Easy to install
- High quality parts
- Separate Battery Pack
- Battery stays cool while charging
- Pricing is well under comparable NR light(s)
- 5 steady modes plus a pulse mode
Cons
- Light is larger, so it takes up valuable space on the handlebars. Mine interferes with the BRYTON GPS head unit.
- CAUTION – This is a high-performance lamp, as a result, it will get very hot when in
User Review
( votes)NOW THAT SUMMER IS COMING TO A CLOSE, IT’S TIME TO LOOK INTO GETTING A NEW BIKE LIGHT
OUTBOUND LIGHTING LED BIKE LIGHT
There are two types of headlights for (road) bicycles; (a) to-be-seen and (b) to-see. Those under the to-be-seen category usually carry their own battery such as a single AA or several AAA’s.
Lights under the to-see category are usually powered by an external battery. By drawing power from a larger (external) battery, higher lumen LED’s can be used.
The Outbound Lighting Focal Series Road headlight is a to-see light consisting of a headlight, plug-in wall charger and battery pack.
UNIQUE CAR-STYLE HEADLIGHT
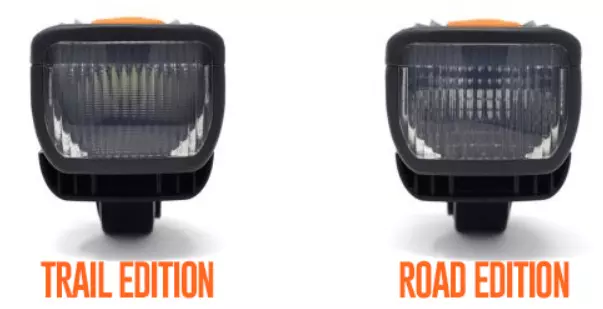
New to the market, Outbound Lighting has designed a headlight that spreads the beam horizontally instead of shining a circular beam (see photo 1 below). This concept allows a cyclist to see the road better left-to-right.
The other main advantage of this ‘ROAD’ light is the ability to aim the light higher than a typical bike head light without blinding oncoming traffic (cars and other bicyclists) thanks to the cutoff line. Figures 4, 5 below show the cutoff line.
Figure 4 shows the light pointed high so what’s behind the fence is illuminated while figure 5 shows the light set level and the cutoff line is now at the top of the fence, i.e., nothing is illuminated above this line.

Fig 1. LEFT (A) OUTBOUND LIGHTING : RIGHT (B) TYPICAL ROUND HEADLIGHT
WHAT’S IN THE BOX
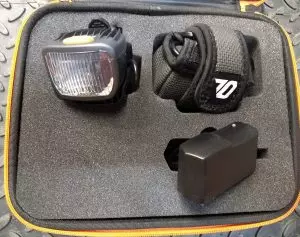
Opening the cardboard shipping box revealed a high-quality semi-hard-shelled case containing the headlight, charger and battery. Packed in a custom cut foam, each part was in its own little compartment ensuring there would be no damage when being shipped from their MADE IN THE USA St. Louis office. This case was totally unexpected and a nice addition.
Removing the battery and charger, I immediately plugged it into the wall outlet to charge. This gave me time to look at the headlight and read through the instructions. One thing I am very happy about is that there was absolutely no heat coming from the battery pack while recharging. This means that you don’t need to pull the batteries out of the battery pouch when recharging.
INSTALLING
Not really much needed from the user guide instructions. Recharge, strap headlight onto handlebars, strap battery onto frame, press and hold button to turn on. That’s it.
On my road bike, there is limited room to mount a bunch of stuff, especially if you don’t want to interfere with the rear brake cable (under the top tube), nor with the shifter cables (along the down tube). I did experiment a little and I did find that I can mount the battery pack in either of 2 installations.
- On top of the top tube. I just had to make sure to insert the Velcro-backed strap under the rear brake cable and housing – figure 2 below
- On top of the stem. This worked OK as well – figure 3 below

HOW DID IT WORK?
Batteries fully charged – check. Light and battery mounted – check. Let’s give it a try before we go on a ride (see figures 4, 5, below).
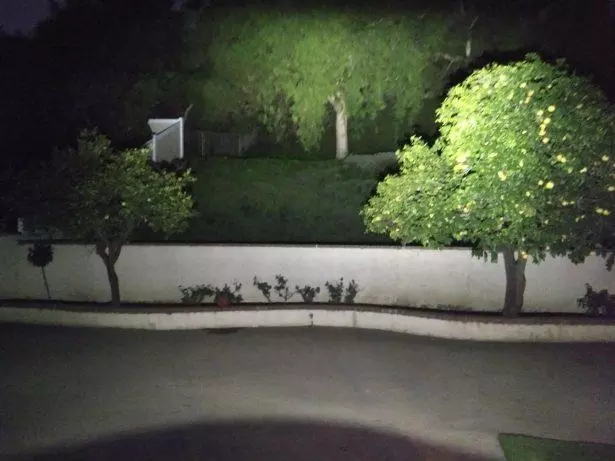
Fig 4. OUTBOUNDLIGHTING HEADLIGHT TILTED UPWARD
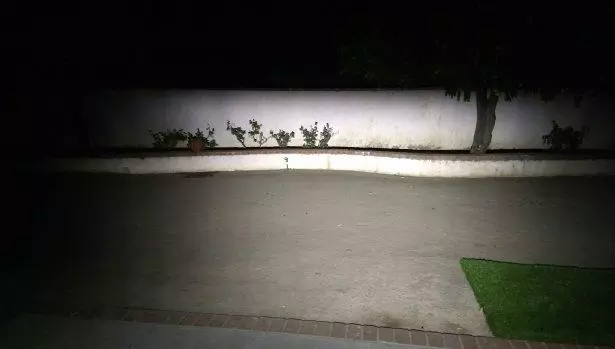
Fig 5. OUTBOUNDLIGHTING HEADLIGHT TILTED DOWN AND LEVEL. NOTICE CUTOFF LINE.
As you can see, this unit puts out PLENTY of light! I can actually tell the difference with its WIDER beam.
There are 5 ‘POWER’ or ‘BRIGHTNESS’ levels and the 2 photos above were taken on the brightest mode. Even on the brightest mode, you still have almost 4 hours of run time – EXCELLENT!
On the lowest setting there is an unbelievable 12 hours of run time. These status lights also double as the battery level indicator.
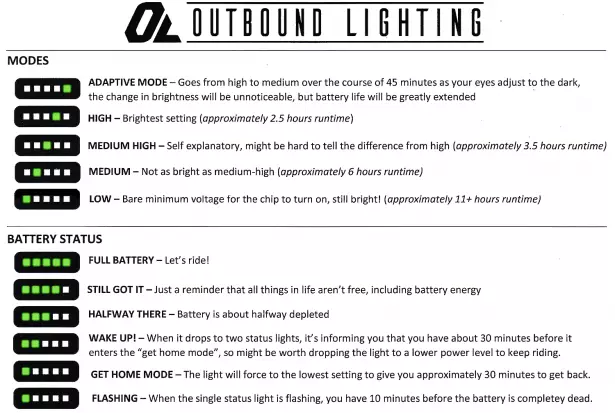
Fig 6. LIGHT INDICATORS
The unit performed flawlessly. It is simple to use and maintain. If you are training with a GPS head unit, you will probably need to put your head unit in your jersey pocket…that’s really the only negative to this unit.
It is priced below its competitors’ comparable units and is a great value. It’s also lightweight at 100g (3.53 oz.) headlight or 416g (14.67 oz.) for the complete system. This latest entry into the headlight arena deserves a full 5/5 stars from us!
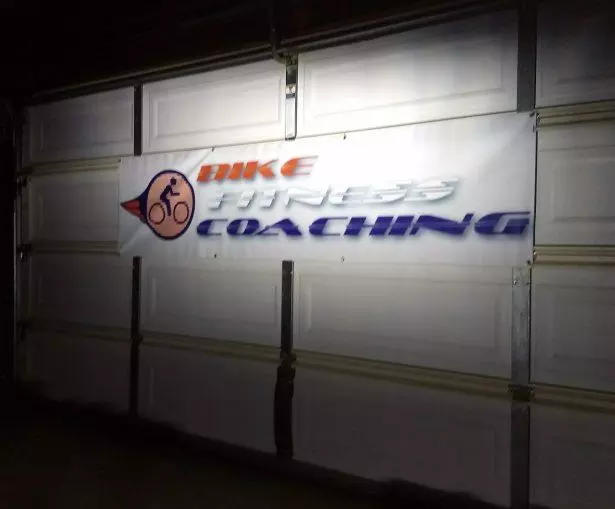
Fig 7. MEDIUM SETTING

I have always enjoyed bicycling and, through a series of coincidences, became a Bicycle Industry Consultant and Product Tester. I test prototype products for companies and have published only off the shelf production products on biketestreviews.com.

