G8 PERFORMANCE 2600 PRO Orthotics
-
Rating
Summary
Fully customized via ARCHTECH allows customizable support for the entire foot allowing a very comfortable and secure feel!
Product Tested: 2600 PRO Orthotics
Price (US): $$ (view here)
Source: Bike shops, websites
Made in: Australia
Features: Fully custom, ultra supportive, and comfortable. On your feet all day or exploring the back country. IGNITE is the best of the best.
How obtained: Sample from company
Pros
- Specifically for Cycling! But can be used for other sports as well.
- Reduced heel box locks foot into place for complete control
- Strong construction, stabilizing and lightweight (weighs 44g/1.48oz)
- Numerous air vents for cooling circulation and breathability
- Built-in metatarsal pad promotes blood flow
Cons
- If cycling in a low-volume shoe. you will need thin socks, especially using the larger ARCHTECH ‘snap-in’ inserts
User Review
( votes)
G8 PERFORMANCE 2600 PRO OVERVIEW
I was still looking for that perfect Podiatry-grade Orthotic at an off-the-shelf price. I was hoping to find that “perfect –for high arches” Orthotic that would relieve the Sesamoiditis I sometimes feel on a high mileage day. I have high arches and, what the Podiatrists say is that the higher the arch of the foot, the more pressure there is on the Sesamoid bones. This is what causes the pain around the balls of the feet.
Cycling shoes are, by definition, low-volume shoes and some are even very-low-volume. For men, most cycling shoes  come in a standard narrow ‘D’ width. Only a very few come in a ‘Wide’ version being an E or 2E so I am limited as to what shoes I can wear. Most of these wider shoes I have tried and most of these have little to no arch support.
Introducing the Best-of-the-Best… the 2600 PRO from G8 Performance.
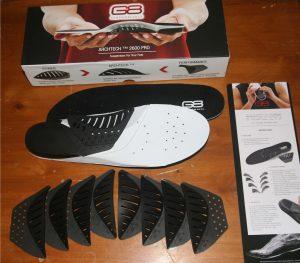
Opening the box, they looked like any other orthotic, until I looked closer. Underneath the 2600 PROs were 5 sets of arch supports (ARCHTECH™) in various heights ranging from 18mm-34mm tall.
At $99, it’s a breath of fresh air to be able to use a reasonable priced, high quality, fully customizable orthotic that actually works better than advertised. Compare this to Podiatric grade custom orthotics which can be over $600.
HOW THEY WORK
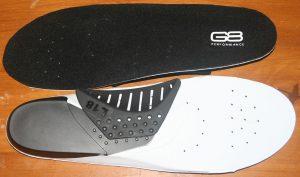
Any one of five (5) different arch supports can be snapped onto the bottom of the orthotic, giving great support to the

entire foot. Each ARCHTECH™ can be moved forward or backwards and/or side-to-side allowing for a truly customized fit.
The 2600 PRO works by completely supporting the entire foot, including the arch. Your feet will feel as though they are filling the entire space inside of your cycling shoes. No more slipping and sliding around…which is a huge positive difference from the thin pieces of noodle insoles more cycling shoe manufactures include.
The only drawback is for people with extremely high arches who need to fit any ARCHTECH™ over 30mm into their ultra-low volume cycling shoe. It will be a real-tight fit when trying to get your foot into the shoe. One solution to this is to use a shoe stretcher and increase the shoe’s volume a little.
FITTING
Following the simple provided instructions, I first cut the 2600 PRO’s to length using the original insole as a template. The next step is the most critical – the correct arch support (ARCHTECH™) selection.
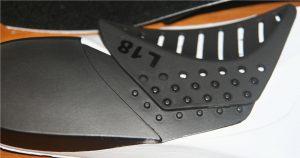
The arch supports are labeled L (Left arch support) and R (Right arch support) and numbered 18, 22, 26, 30 and 34 indicating their height in millimeters. After selecting the correct arch (see below), easily snap it into place on the bottom of the insole.
WHICH SIZE DO I USE?

- While seated, place the ARCHTECH™ on the floor and place your arch over the ARCHTECH™
- Select the ARCHTECH™ that barely touches the arch of your foot
- Snap the ARCHTECH™ onto the 2600 PRO insole. Note: the ARCHTECH™ can be moved forward or back and side to side for a more perfect fit.
- Place 2600 PRO insoles into cycling shoes
- For the ideal fit, you will want to feel the ARCHTECH™ a little forward of center. This will raise the ball of the foot slightly. You should feel supportive pressure on your arch without any pain
- As for side-to-side fit, if you have a wider foot, 2 rows will be snapped in, for narrower feet, 3 rows will be snapped in.
- If you feel pain or any discomfort, go to a lower arch support and play with the forward/rear positioning as well as the side-to-side positioning until it feels comfortable.
HOW DID THEY PERFORM?

I placed the 2600 PRO’s in my cycling shoes and went out for a ride. When following the fitting process, sizing for me was a 30. But, wanting to play it safe, I backed it off a size and placed the 26’s in my shoes. I highly recommend this process since it lets your feet get accustomed to a highly supportive arch that these orthotics will give you. Give the ‘-1’ size several rides before moving to your recommended ARCHTECH™.
The first ride was fantastic. My feet felt fully supported in my shoes. I felt that I had more power to the pedals since (a) my feet felt fully supported; (b) my feet weren’t moving around in the shoes; and (c) I felt no pain on the balls of my feet.
With the 2600 PRO’s, your feet will be very comfortable by being completely cradled in your shoes. The outcome will be more comfort, longer saddle time and more efficient pedaling. The 2600 PRO’s are highly recommended and get a 5 star rating!
An instructional video can be seen at www.g8performance.com/products/amas-2600-pro (currently offline).
SUMMARY
David Lee summarizes “The aim of the 269PRO is to support the front portion of the arch close to the big toe joint, and, a number of factors come into play when selecting the right arch and correct position.”
David continues “Let comfort be your guide. They should not be intrusive. They should sit under where your foot splays which will help distribute energy more effectively. The shoe can have an effect on the arch as well. In addition, your arch flexibility will gauge how high of an arch you can handle in the initial stages. If you cycle LONG distances, you may have weak and/or inflexible arches, so I suggest that you start low and work higher.” Continuing, “Keep in mind that a foot is designed to pronate or roll inward to a certain degree. One of the common mistakes we are seeing is people putting in an arch which is way too high for them and the result is applying force to the outside of the foot and not allowing for the foot to roll in = very painful!”
The General rule is to push the arch as forward as it will go and work from there one click at a time. Experiment with different heights for example a 26 mm arch two clicks back can feel like a 22 mm arch pushed all the way forward. Over time, as your foot strengthens, the set up will need to be changed to accommodate.
Go easy when first using this orthotic. If you there is any pain in the arch give it a rest for a few days. David suggests initially using for a maximum of an hour a day and increasing an hour every couple of days.
These are the 2600 PRO’s and we highly recommend them!

I have always enjoyed bicycling and, through a series of coincidences, became a Bicycle Industry Consultant and Product Tester. I test prototype products for companies and have published only off the shelf production products on biketestreviews.com.


