Introduction
The rear derailleur has come a long way since its invention over a century ago. We now have derailleurs that will shift rapidly and smoothly through wide-ratio drivetrains, equipped with chain retention mechanisms and even some that shift wirelessly. Despite the technological leaps in rear derailleur design, the most vulnerable point is where it attaches to the bike frame: the derailleur hanger.
Even a slightly bent derailleur hanger will result in all sorts of issues with the quality of your shifting. If you speak to seasoned bike mechanics they will tell you that some bikes even arrive with a bent hanger from the factory.
We wrote before on how to diagnose and repair a broken derailleur hanger. In this article, we focus on the main thing that you’ll need if you are going to repair a bent hanger yourself: a reliable derailleur hanger alignment tool. We have a look at some of the best available right now, and end with some notes on getting your bent hanger perfectly straight.
Top of the bunch: The best derailleur hanger alignment tools available on the market right now
1. Park Tool DAG-3 Derailleur Hanger Alignment Gauge
![]()
Park Tool is perhaps one of the most recognized names in the bicycle tool world. Their tool catalogue caters to every conceivable repair on pretty much any bike. While DAG 3 is a simple and easy to use alignment tool, it is also a design that has seen incremental improvement in terms of accuracy and bike compatibility (it can be used on wheels 16-29in in diameter).
Like most tools in Park Tool’s offerings, the DAG 3 is also built to be used on a day to day basis in a professional workshop environment, so you know it is built to last.
2. Shimano TL-RD11 Derailleur Hanger Alignment Tool

Bicycle industry giant Shimano is known best for drivetrain components, but they also offer a range of premium tools, including the TL-RD11. There is plenty to love about this tool: it has a compact, telescoping design that makes it great to carry in a travel tool kit.
The indicator rod is actually a steel ruler placed on pivot with detent stops, and this combination of the ruler scale and the detent pivot makes for a high-accuracy alignment tool.
One little improvement I would like to see on this tool is a a non-scratch cap or soft coating to the end of the indicator rod to prevent marring the surface finish of rims while using the tool.
3. Wolftooth Components Hanger Alignment Tool
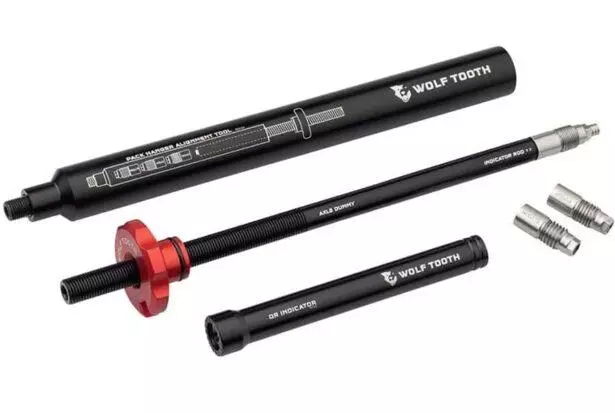
This little tool from the American premium components manufacturer is probably the best of the bunch in terms of portability. While most hanger alignment tools have an indicator which uses the rim as a reference point, Wolftooth’s tool uses a narrow rod that directly attaches to the hub.
The hanger is aligned by using a separate handle that threads into it. The method is to bend the hanger until the handle is parallel to the indicator rod. This portability comes at the expense of accuracy, though, as the single reference point of the indicator rod will not be as accurate as multiple readings taken using the rim-based alignment tools. It will, however, be the perfect tool to put into your pack on long rides or when traveling with your bike.
4. Bikehand Derailleur Alignment Tool

The Bikehand derailleur alignment tool is like a cross between Park Tool DAG 3 and Shimano TL-RD11: the handle and main body resemble that of the DAG 3, while the scaled rule indicator rod is similar to the one used on the TL-RD11.
The Bikehand alignment tool seems well made with good welds and no excessive play (which is critical for accuracy). In terms of value, this is one of the most affordable derailleur alignment tools in this list.
5. Abbey Bike Tools Hanger Alignment Gauge (HAG)
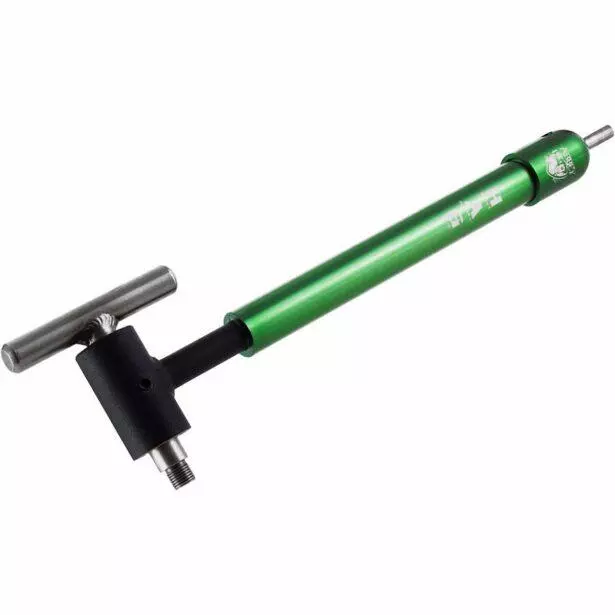
Abbey Bike tools are known to create some of the most sought-after premium bike tools on the market. Their offerings are not only made with great attention to quality and precision, but also are very aesthetically pleasing (I am a fan of the anodized green finish!).
Like the Shimano TL-RD11, the HAG has a telescoping handle, which makes it appropriate as a portable mechanic’s shop-quality tool (which is why you will often see it in pictures of pro mechanic tool boxes). In terms of accuracy, the Abbey Tools HAG has probably become the gold standard among hanger alignment tools.
With a locking handle, there is virtually no play and the reference readings can be taken with greater precision that similar tools on the market. This is a pricey tool, but it comes with the build quality and precision to justify the expense.
How to use a derailleur hanger alignment tool
As you have probably already noticed, the basic design of all hanger alignment tools is very similar. The tool consists of a long handle with a threaded insert at the head and an indicator used to take readings using the rear rim as a reference.
To use, you do the following:
- Remove the rear derailleur form the hanger and thread the tool in its place.
- Start with the valve at the 12 o’clock position and take an indicator reading there.
- Repeat for the 9 o’clock and 6 o’clock positions.
- Bend the handle as needed to bring the indicator rod to equal distance from the rim at the three positions.
- When the indicator gauge is at the same distance from the rim at the three positions. The hanger is straight.
Some tips to keep in mind when using hanger alignment tools
- Ensure that the wheel is squarely seated in the dropouts before starting the alignment procedure.
- Ensure that the hanger itself is tight against its attachment point to the frame. Symptoms of loose hanger can be the same as a bent hanger.
- It is best to use a perfectly true rim, but not absolutely necessary to successful hanger alignment. You can simply use the valve as the sole reference point (by rotating the valve to the 12, 9 and 6 o’clock positions prior to taking a reading) to ensure there is no measurement error due to a rim that is not laterally true.
- Don’t get too excited with the bending. Using too much force can easily snap the soft alloy of the hanger (or even damage the frame)
- If the hanger is severely bent it might be a good idea to replace it with a new one anyway as the alloy is already too stressed to tolerate repeated bending without compromising its structural integrity.
Conclusion
A good derailleur hanger tool is a worthwhile addition to any home mechanic’s toolbox. The straightness of a derailleur hanger is a critical element to the shifting quality of any drivetrain, and once you’ve learned how to use a hanger alignment tool you will be surprised at how often it comes in handy.
There is a wide range of hanger alignment tools on the market, and the most important feature of these tools is their accuracy. Hangers that can seem perfectly straight to your eyes can often be bent to the point of resulting in suboptimal shifts, so invest in a hanger alignment tool you can rely on.

Hani Morsi is a seasoned multi-discipline cyclist with a particular liking for mountain and gravel bikes. Hani is also a mountain bike coach, trail builder and experienced bike mechanic.

![19 Lightest Mountain Bike Pedals [Extensive Buying Guide]](/wp/wp-content/uploads/jch-optimize/ng/wp_wp-content_uploads_2023_12_bike-pedal-500x300.webp "19 Lightest Mountain Bike Pedals [Extensive Buying Guide]")