GPS HEAD UNIT ROUNDUP – PART II 01/2016
A QUICK & DIRTY WAY TO GET YOUR FTP
Functional Threshold Power is defined as “your ability to sustain the highest possible power output over 60 minutes.” Since it’s hard to find a road that has no traffic lights, stop signs, traffic, etc., a more popular definition is defined as “your ability to sustain the highest possible power output over 20 minutes, then multiply that number by 0.95”.
Once calculated, it is easy to determine your training zones as %FTP. A training plan is then created based on the athlete’s goals and each workout is based on the %FTP value. For a more detailed description, see
http://home.trainingpeaks.com/blog/article/what-is-threshold-power , and https://trainingbible.com/joesblog/2009/09/functional-threshold.html
For those interested in working with a coach to help you train, please contact [email protected] where we will work with you to help you achieve your goals!
It hasn’t been until recently that you have had to use one of the higher-end, higher-cost, full-mapping capability GPS head units to obtain your FTP. Most of the GPS head-units tested in this roundup include a data field called AVERAGE POWER. This test is easier to setup and run using a GPS head-unit that has multiple pages. For this example, I would program a spare page with the following data fields; (a) run-time or stopwatch, etc., (b) current power, (c) average power, and if you have any data fields remaining add (d) HR and (e) cadence.
After a good warm up, get yourself mentally ready, take a few deep breaths and get yourself up to speed. Click START on the GPS head unit and ride hard for 20 minutes. When the timer gets to 20 minutes, take a note of your AVERAGE POWER. Since this was a full-out maximum run, your AVERAGE POWER will actually be AVERAGE MAXIMUM POWER. Take this number and multiply by 0.95 and that will be your FTP. I recommend doing the FTP test 3 times since most cyclists go out too hard and blow up half-way through. Their second test they end up going a little too easy and by the time they do it for the third time, they get it right. From this point on, you will be training as a % of FTP. But, not to worry because in 6 weeks you get to do this test all over again!
A note on Scoring – to be fair, I included 2 categories in scoring.
• How well the GPS head unit worked as a training tool for cycling
• How well it worked overall as a general purpose cycling computer.
Since this roundup review is geared towards the training tool aspect, I gave that score twice the weight compared to the general cycling computer category. The formula I used was ((Training x 2) + (General x 1)) x (2/3).
Therefore, the scores given are out of 10 possible points.
The complete breakdown of points is at the end of this article.
WHY THIS ROUNDUP?
This roundup looks at the new-breed of GPS head units. Lighter and less expensive with just enough functionality to hopefully make these useful coaching/training tools. I hope that the manufacturers will read these reviews with the thought of fine-tuning their firmware to include just a little more functionality to make these units the perfect training tools. Currently, Bryton is the closest to achieving this goal while the others are a little behind. Lezyne shows a lot of promise by listening to the testers and adding functionality as they go forward (reference recently added Di2 integration). Cateye has made a very good first cut and both units show a lot of promise. Sigma Sport currently offers the most functionality, and it would be my guess that, since the ROX 10.0 has been out for a while, the next unit will be more of a training tool. Sigma Sport has a good foundation and just needs to add a little more functionality. As the manufacturers read through this roundup, they will know what to add.
I want to thank all of the manufacturers for sending these test units along. The reliability and usability was fantastic in these devices. Each User’s Manual was spot on and, if I ever needed to reference something, all I had to do was open my downloaded copy. The manuals were well written and were very accurate.
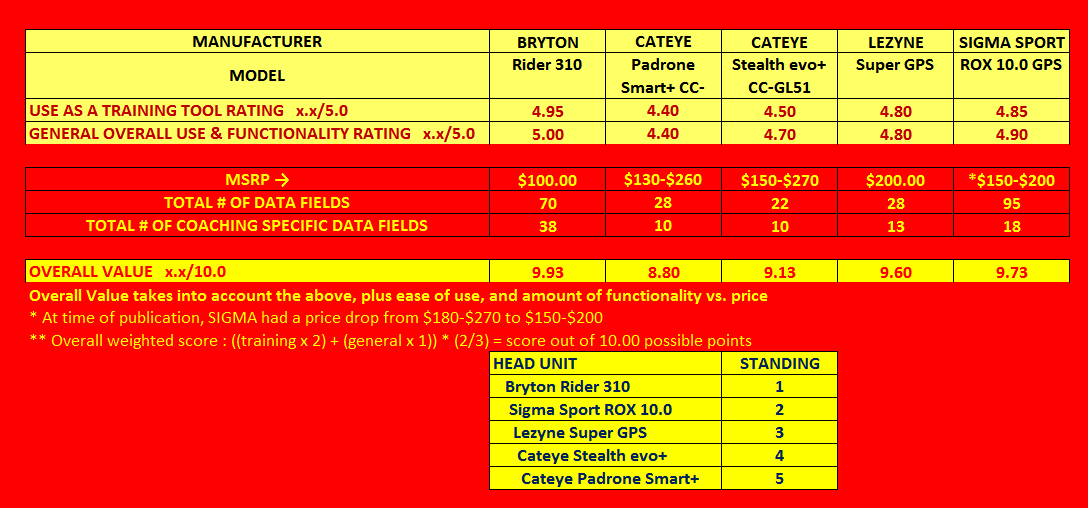
UPDATED GPS HEAD-UNIT COMPARISON CHART
(click here or on picture above for full size chart)
![]()
GPS HEAD UNIT ROUNDUP!
BRYTON RIDER 310T
This was a late comer to the test. The reason being that Bryton was in the middle of finishing up their first production run of the brand new Rider 310. Usually, I save the best for last, but, I promised earlier that I would report on these GPS head units in alphabetical order.
So what makes this the BEST sub $200 GPS head unit on the market today? Two important aspects come to mind … Price and Functionality. The basic Rider 310 lists for $ (check latest price) and this includes around 70 total functions and 38 training specific functions. That’s less than ½ of several of the other units! The Bryton Rider 310 has more training specific functions that most of the other GPS head units have as their number of total functions!
The Rider 310 comes in 4 versions. They are basically the same unit except for the following;

Bryton sent me the Rider 310T to test. This is basically a complete self-contained unit which includes a mount, recharger and both the ANT+ HRM and Cadence sensors. Once unpacked, I plugged it in to charge. In the meantime, I downloaded their user manual and noticed that they recommend performing a firmware check and firmware upgrade if applicable. I downloaded their Bryton Update Tool and after the unit finished charging, I plugged it into my computers’ USB 2.0 port and did a firmware check. Sure enough, I was one version behind. Less than a minute later, the update completed. Looking through the manual, I was pleasantly surprised to see how easy they have made it to complete the initial setup. An easy but basic 5-step process.
- Charge the Rider 310 – check
- Turn on the Rider 310 – check
- Initial setup
- Select language = English – check
- Select Unit of Measurement = Imperial – check
- If sensors, the Rider 310 will try and automatically pair with them, if not, you can manually enter the sensors ID. Mine paired the first time – check
- Acquire Satellites – 15 seconds outside – check
- Ride the Bike – check
- Select the mode
- Free Ride mode
- Exercise and record mode
- Training plan mode
- Select the mode
DATA PAGE(S)
This is what I call a ‘basic’ setup. From here, you will want to go into the Rider 310 and program several screens or Data Pages, each for a specific purpose. For example, you can program Data Page #1 with basic ride data fields. Data Page #2 could be training specific such as %ftp, cadence, heart rate, etc. Data Page #3 could house your climbing data. Not to worry, you have up to 8 Data Pages to play with.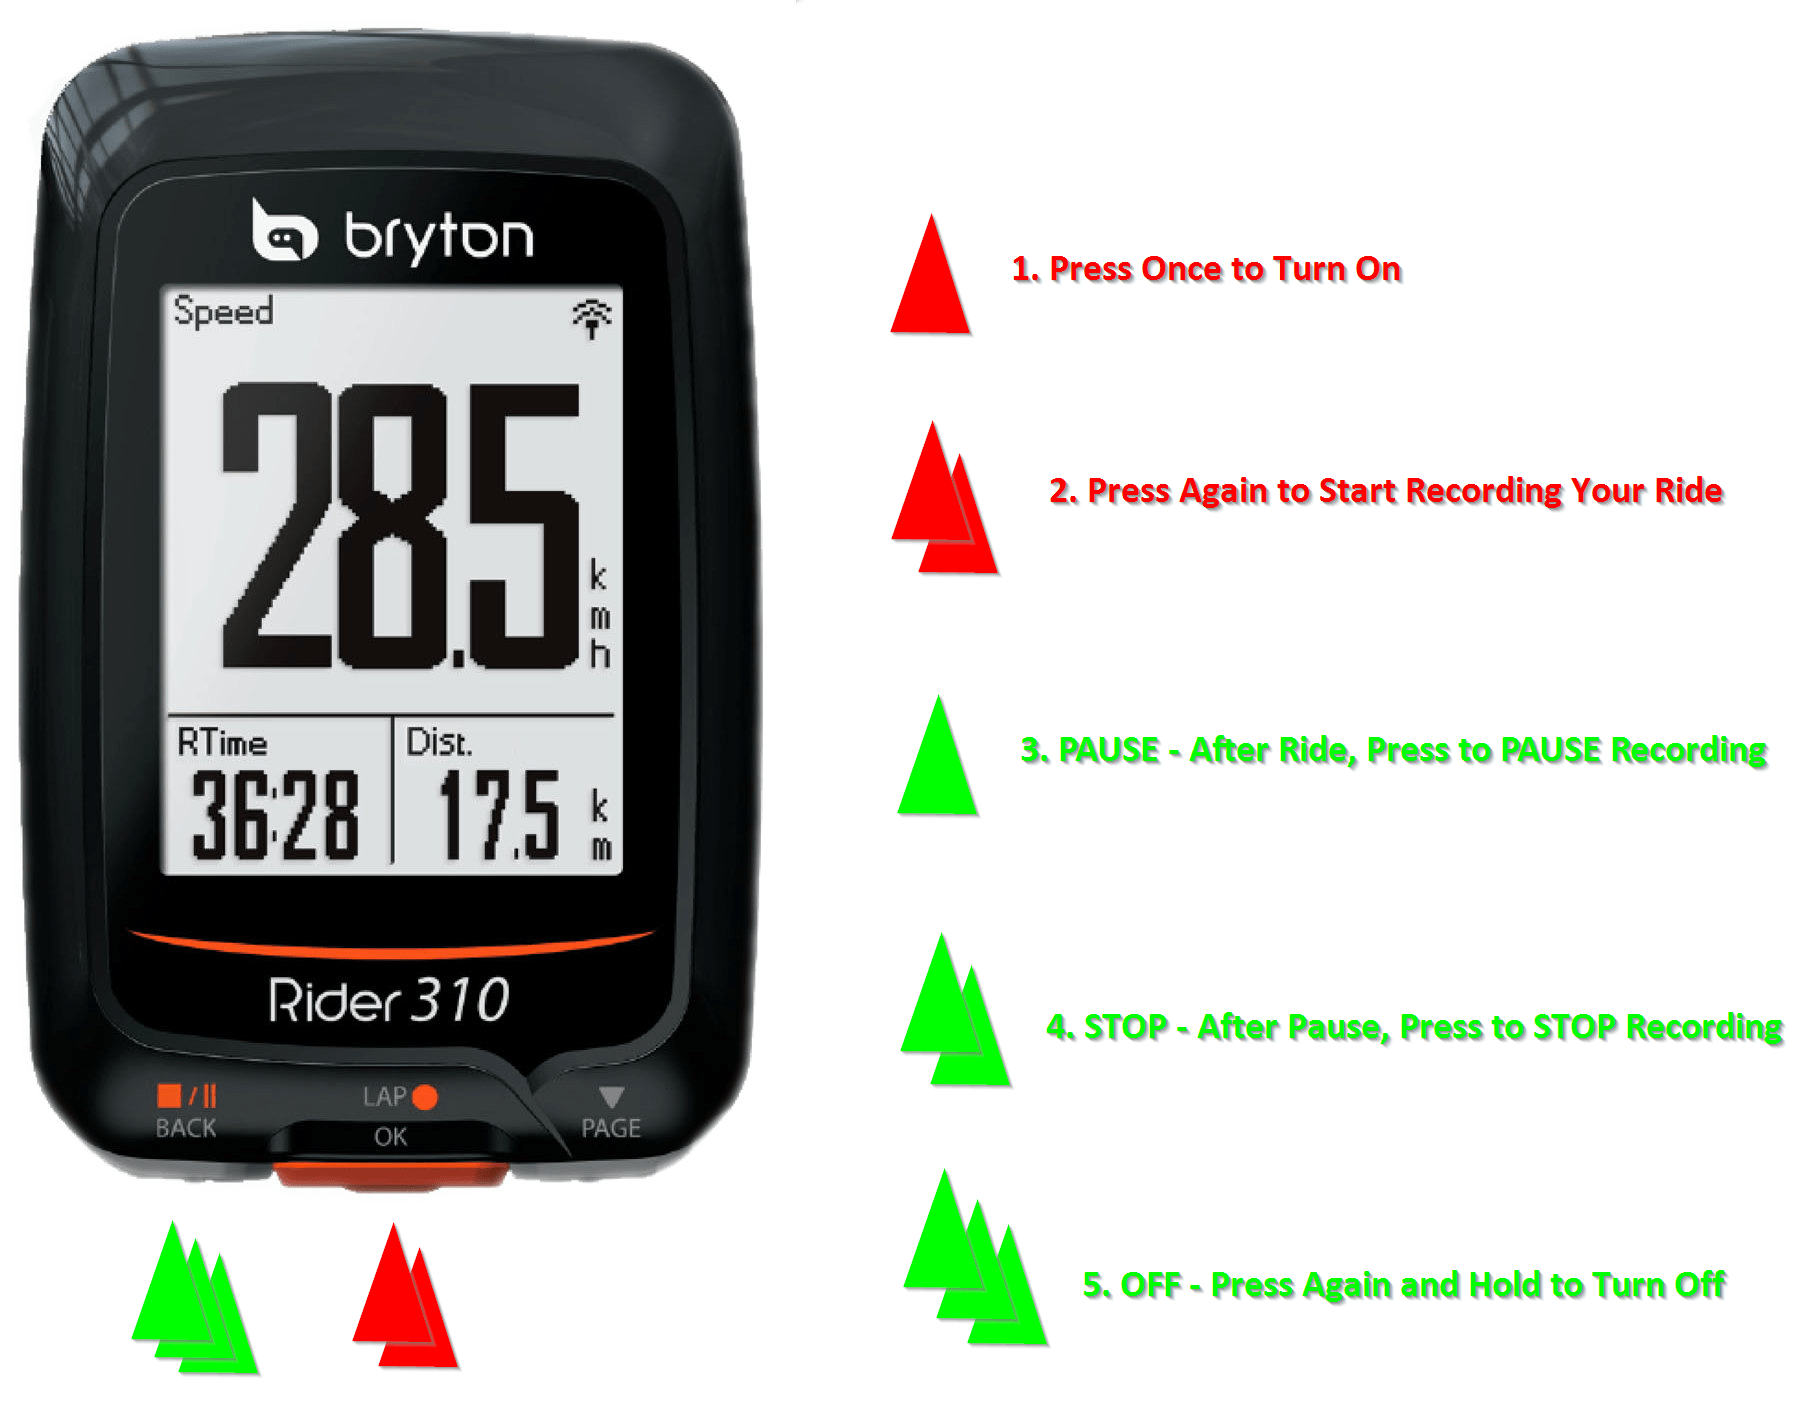
Since only one Data Page is initially enabled, you will need to manually enable any new Data Page you want to display. Next, you will tell the Rider 310 how many data fields you want to display followed by clicking on a field then selecting from a fairly large list which data you want to see in that field. Click save and you are done.
USING THE RIDER 310
The Rider 310 has 3 buttons along the bottom. The LEFT button is used as the BACK button when programming the screens. It’s also used as a system button to PAUSE recording, STOP recording and to turn the unit OFF. The MIDDLE button is used as a LAP timer, SELECT/OK with programming screens as well as ON and RECORD. The button on the right changes the screens when you have more than one defined. You also use it to cycle through the main screen options.
So, to get the unit started, click the middle button once, then again to start recording. When your training ride is complete, click the left button once to pause, again to stop recording and again to turn the unit off. After that, plug the Rider 310 into your PC and download your data into any number of PC based training tools, and/or upload to Strava, Training Peaks, endomondo, MapMyRide, or any number of on-line training tools. There’s even a Bryton website for your data.
TRAIN & TEST
Using this feature, you can (a) setup simple general workouts via time or distance goals, (b) create more complex workouts (c) setup interval workouts using the Rider 310 to track your training progress, (d) measure your MHR and LTHR by using the pre-loaded ‘Bryton Test’. After the workout, you can easily view your exercise and training records.
OTHER FEATURES
This unit is feature rich! There are almost too many features to list! In addition to training modes and helping with your workouts, the Rider 310 also includes LAP functions, an ALTITUDE set function, ALERTS, SMART PAUSING (auto start/stop), RECORDING MODE settings, USER and BIKE PROFILE pages, GPS, BLUETOOTH, ANT+, AUTOSCROLL pages, SENSOR settings for Heart Rate, Speed, Cadence, Speed/Cadence and Power Meter.
The Rider 310 boasts up to 36 hours of battery life, up to 300 hours of log data, lap pages, training modes, 1 second recording mode, customizable workouts. This device is also IPX7 waterproof rated.
USER MANUAL
The user manual can be easily downloaded from the BrytonSport.com website and is logically layed out and easy to use. In just a few minutes, you will become proficient at using the Bryton Rider 310.
STABILITY
This unit never lost a signal and has been running rock-solid for many months. It will alert me when the battery is low but I never get to this point since I am always plugging it into my PC to download the data.
When plugging it into the PC (via supplied USB cable), it automatically brings up File Explorer and takes me right to where the data files are where I can upload to a web-based application or download into Golden Cheetah. Using Windows File Explorer, I can also delete the files from the Rider 310.
HOT
• Easy to program,
• Easy to Start/Stop
• Easy to use and operate
• Includes MANY of the data fields required by coaches
• Acquires GPS signal(s) immediately
• Includes several recording functions
NOT SO HOT
• Rubber USB port cover sometimes doesn’t stay in place – pops out.
RATING
The Rider 310 scored the highest in both categories; 4.95 as a training tool and 5.00 as a cycling computer giving it an overall score of 9.93 / 10.00. The reasons it scored so high are
- price/functionality – with a base price of
$$(check here), this is almost 1/3 of the cost of several of the other units when fully configured. The Rider 310 also boasts 70 total data fields and 38 coaching specific data fields. 5 screens/pages can be utilized with up to 8 data fields per screen. That’s 40 data fields that can be tracked! In addition, there are also 2 lap pages, giving the Rider 310 the best price/performance. - performance/reliability – quick start, 1 second resolution and it never missed a beat!
CATEYE PADRONE SMART+ (CC-SC100B)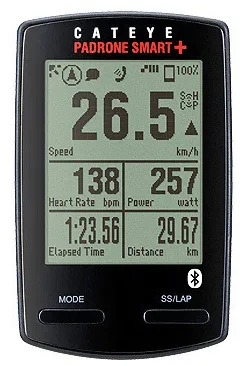
For those who have ever used the wired or wireless Cateye Cycle Computer, the setup for the new PADRONE SMART+ is different and is more like one of the many existing GPS head units on the market today. For the PADRONE SMART+, the Cateye.com website has a very detailed 154-page user’s manual, as well as a 2-page quick-start guide to take you through the initial setup and how-to for each of the functions, making light work for the initial setup. In fact, I used the on-line manuals and had no problems or issues in programming all of the functions and was completely setup and ready to run in no time.
To thoroughly test the PADRONE SMART+, I programmed it to run in each of its three possible modes, Mirror Mode 1, Mirror Mode 2, and Sensor Direct (see below). I was very impressed with how easy it was to reconfigure the unit for each test. When in doubt, the users’ manual was referenced and it spelled out in great detail what I needed to do. I give Cateye a lot of credit for the amount of work and effort they put into their users’ manuals.
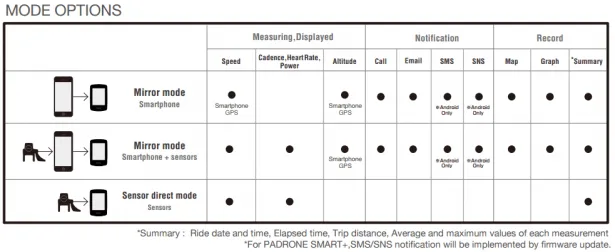
The PADRONE SMART+ can operate in any of three modes.
In Mirror Mode 1, data from your Smartphone and Bluetooth-enabled fitness app is sent to the PADRONE SMART+ where you can view it. The GPS signal from a satellite to your phone measures Speed & Altitude.
In Mirror Mode 2, in addition to the above, Bluetooth-enabled HR, Cadence and Power Meter sensors are added to the bicycle which will display this data as well.
Sensor Direct Mode is sensors only, no Smartphone required. Data from the HR strap, Speed, Cadence and Power Meter displays training data. No altitude is displayed since this is a GPS function.
What you will notice reading through these reviews is that the PADRONE SMART+ is the only head unit that is different than the others. The PADRONE SMART+ does NOT use ANT+ but uses Bluetooth instead. This also requires that all of your sensors be Bluetooth as well. All of the other head units have embedded GPS while the PADRONE SMART+ uses the GPS from your Smartphone so, for full functionality, you will need to be running a fitness app like Wahoo Fitness or the Cateye Cycling app on your Smartphone.
COMPUTER, DATA FIELDS and SCREENS
While unpacking the Padrone Smart +, make sure to download and install the Cateye Cycling app onto your Smartphone. Once unpacked, I placed it on the workbench. I quickly noticed one obvious 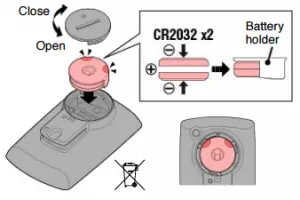 difference, the Padrone Smart + uses non-rechargeable lithium batteries (2xCR 2032), while all of the other units are rechargeable. But, not to worry, the battery life of the Padrone Smart + is remarkably long. I used it for over a month and the two supplied batteries were still going strong. It was ready to run right out of the box – no initial charge required. Cateye – “the CR2032 batteries should last approximately 4 months when paired to sensors and in use 1-hour/day.”
Since my Padrone Smart+ came with all necessary sensors, i.e., speed/cadence, Bluetooth HRM, I was able to perform pairing quickly. Since this unit, like all of the others that come as a head-unit only, you will need to purchase separately any required accessory sensors – speed/cadence and HRM, then pair.
By choosing SETTINGS in the Smartphone app, I brought up the online manual which walked me through the rest of the setup process. Once the Padrone Smart + is setup, it’s time to activate the screens and add the data fields. Please note, you will need to purchase the following Cateye sensors. The speed & cadence sensor has part number ISC-12, the Bluetooth HRM is HR-12. Cateye – “these sensor batteries should last approximately 5 months when in use for 1-hour/day.”
A note of caution. To minimize the draining of both the Padrone Smart + and Smartphones’ batteries, it is recommended to disconnect it from the Smartphone and to also turn the unit off when not performing measurements and/or downloading data to the Smartphone.
All of this programming was very easily since it’s all done from the Smartphone. The Padrone Smart+ supports up to 5 screens with up to 8 data fields per screen. Switching between the screens is as easy as hitting the MODE button. The main screen has 5 data fields which 4 are user configurable. The other screens are all user configurable and I quickly programmed 5, 6, 7, and 8 data fields on the remaining 4 screens.
HOW DID IT WORK?
In two words… Rock Solid! I really like these two Cateye units. However, they lack functionality compared to what everyone else has.
This unit easily connected with numerous Apple iPhone 6 smartphone fitness apps as well as multiple configurations of sensors and sensor modes. The Padrone Smart+ contains approximately 28 total functions and all but 10 are applicable to training. Six out of these 10 display current, average and maximum cadence and heart rate leaving only 4 to display power. For power, this unit displays current, average, maximum and L/R power balance which is useless if you are running a single sided power meter like Stages.
Although this unit ran solid and never missed a beat, at $130-$260 (depending on how many accessories you purchase), there are several other units with more functionality that are currently available.
I do give Cateye a lot of credit for designing and building their first generation training computers. Given that these tested are their first ones, Cateye has done a great job! I would categorize this as a ‘Super Cateye Cycle Computer’, but, compared to the other units currently available, this is more of a general cycle computer than a real training device. With a little added functionality, both Cateye computers could be at the top of my list.
HOT
• Fairly easy to use and operate
• Includes several data fields required by coaches
• Indicates the Smartphone’s remaining battery life
• Indicates battery life of paired Cateye sensors
• Acquires GPS signal(s) immediately
• Includes several recording functions
• Can turn on the following notifications (received through smartphone) – Call, Email, SMS (Android only at this point in time)
• Can setup and operate on any one of three modes – Mirror (smartphone only), Mirror (smartphone + sensors), Sensor Direct (sensors only).
NOT SO HOT
• Bluetooth only
• Required to purchase additional Bluetooth sensors like the HRM strap.
• Requires a fitness app – another learning curve.
• Missing many of the required data fields that can benefit an athlete while training
RATING:
Given the high price (Bluetooth sensors needed) vs how little coaching/training functionality this unit has, I was forced to deduct quite a bit and give this unit a 4.40 / 5.00 for both use as a pure training tool as well as a general purpose bike computer. I just didn’t like the idea of having to carry my smartphone around with me, nor did I like the idea of having to go out and buy Bluetooth specific sensors when I already have ANT+ sensors. It performed flawlessly and provided a lot of data via my Smartphone which I could easily upload to the Cateye website. The Cateye Padrone Smart+ scored a combined rating of 8.80 / 10.00 which isn’t really that bad for a first time ‘real’ training computer from Cateye.
![]()
CATEYE STEALTH EVO+ (CC-GL51)
The setup for the Cateye Stealth Evo+ is very much like the standard Cateye cycle computers, much more so than the Padrone Smart+. I first downloaded the 47-page User’s Manual and quickly skimmed through it. Most everything you need to know to get the Evo+ up and running is shown on pages 6-14. I really recommend reading through the entire User’s Manual since this unit will display different data fields based on which sensors and modes you are in. For example, if you don’t have a power meter, the middle screen (blue area) will display the clock, while for those with a power meter, this area will display power.
The picture to the right is how I have my Stealth Evo+ configured. SPEED on top, POWER in the middle and the bottom fields are shared with HR and CADENCE. The middle data field and bottom are somewhat user configurable depending on what sensors you have installed on the bike.
To get the Evo+ started, click the ON/OFF button on the back and the unit will start searching for satellites. This goes much easier and quicker if you have open sky above. Then, usually, in just a few seconds, the full complement of satellites is found and you are ready to ride. Click the ON/OFF button again and the Evo+ starts recording.
While riding, if you come to a stop, the Evo+ stops measuring, then automatically resumes once you start rolling again. Nice feature auto start/stop.
Pressing the ON/OFF button will stop/pause the unit and holding it for 2 seconds turns the unit off.
How much easier can it be than that!
DATA FIELDS and SCREENS – THE MODE BUTTON IS YOUR FRIEND
There are 2 ways to program the Evo+: on the unit itself or with the Cateye Sync application which you can easily download to your PC. For the initial setup, I recommend Cateye Sync. After docking the Evo+ to its cradle, run Cateye Sync and click Settings, then Read, which uploads the current settings of the Evo+ into Cateye Sync. From here, you can easily change the time zone, DST, speed unit, tire circumference and ODO. You can also change the sampling rate by choosing 1, 2, or 5 seconds, clock display and middle (blue area) data field display. Using Cateye Sync, you can completely setup and program the Evo+ in less than a minute. Programming directly on the Evo+ can take 15-30 minutes.
The middle (blue) data fields’ have a very limited set of options. If you have a power meter, the options are power or average power or maximum power.
To my surprise, this unit is very similar to the Lezyne Super GPS where you can change the bottom data field(s) on the fly. Just press the MODE button to toggle through the lower data fields. You can switch the lower display to show HeartRate:Cadence, power balance (if you have separate left/right power sensors), distance, average/maximum speed, altitude, ODO and clock.
HOW DID IT WORK?
Like all Cateye products … Rock Solid! I really like this unit, but, just like the Padrone Smart+, this unit lacks basic functionality. It also has the fewest total number of data fields/functions compared to what the others in this roundup offer. Only 22 total data options and far fewer (10) coaching specific functions.
Unlike the Padrone Smart+, the Evo+ is an ANT+ device. It also includes its own GPS like most others so you do not need to rely on your Smartphone, unless you want to. Again, Wahoo fitness works great!
This unit started up and acquired the necessary satellites very quickly. I set the recording interval to 1 second, since most of my rides are under 4 hours. Setting the recording mode to 1 second gives the user up to 12 hours of recording time per a single trip and/or up to 35 hours of total recording time. Setting the recording interval to 2 seconds doubles this time. I don’t recommend setting to the third option, 5 seconds, since this is not enough granularity for training. I recommend setting this to 1 second.
The unit recorded what I had asked it to and, after the ride, it easily cradled into its special USB holder. Golden Cheetah found the ‘.fit’ files and was able to analyze them. When complete, I manually deleted the files and left it in the cradle to charge.
Optional accessories are available and include an ANT+ Speed sensor Kit, an ANT+ HR sensor Kit, miscellaneous bracket mounts, wheel magnets, cadence magnets, spare cradle and HR strap.
Just like the Padrone Smart+, this unit ran solid and never missed a beat, but, at $150-$270 (depending on how many accessories you purchase), there are other units that are priced lower with more functionality than are currently available with the Evo+. I give Cateye a lot of credit for designing and building this new generation of training computers. Given that these are their first ones, Cateye has done a great job! I would categorize this as a ‘Super Cateye Cycle Computer’, but, compared to the other units currently available, this is more of a general cycle computer than a real training device. With a little added functionality, these Cateye computers will be at the top of my list.
HOT
• Easy to use
• Small & compact – but can still easily read the data fields
• Straight forward logical operation
• Includes several data fields required by coaches
• Acquires GPS signal(s) immediately
• Long battery life even when using 1 second recording interval
NOT SO HOT
• Missing many of the required data fields that can benefit an athlete while training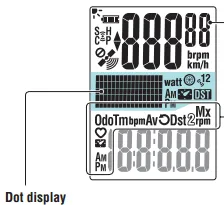
• Blue ‘power’ background is a little dark and sometimes hard to see this data field
• The blue field for this area of the screen is in ‘Dot-matrix Display’ format and data is hard to read
• Fairly high price for limited functionality
RATING:
Neither Cateye has anywhere near the amount of functionality of the other units. I love the simplicity and I believe this could be the ultimate training computer if it had the functionality of the Bryton Rider 310.
Given the fairly high price ($150-$270) and limited functionality, I was forced to deduct quite a few points and give this unit a 4.50 / 5.00 as a training tool and 4.70 / 5.00 as a general purpose bike computer. With additional functionality, this would make a great little unit. The Cateye Stealth Evo+ scored a combined rating of 9.13 / 10.00 which is a pretty good score for a new first time training computer from Cateye.
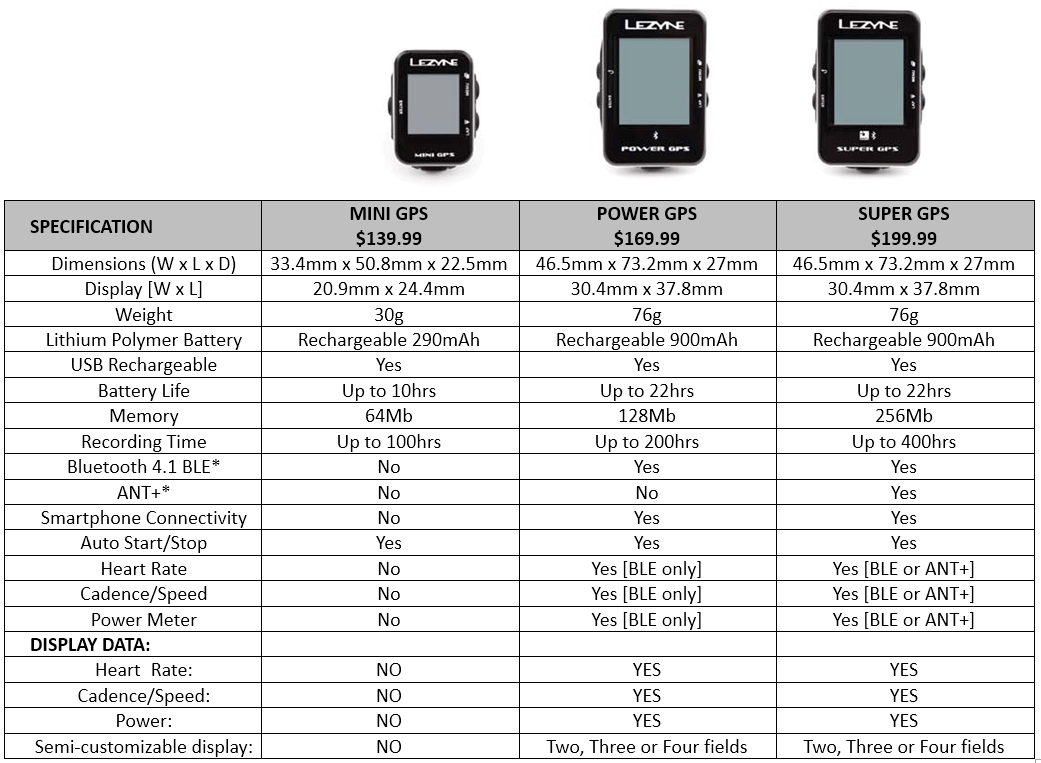
LEZYNE SUPER GPS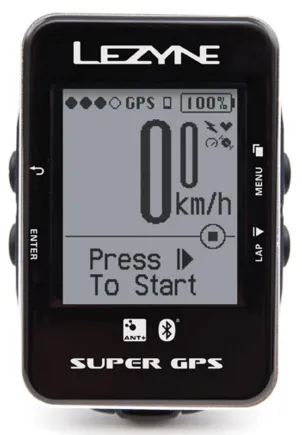
Lezyne’s (pronounced like Design) Super GPS was the first unit to arrive. Therefore, I have spent the most time with the Super GPS and like it more and more each time I use it. Setup was very easy, it just took several tries before I got the hang of which buttons to press to scroll, select, then enter. This unit has only one screen that can be setup with 2, 3, or 4 vertically oriented fields. The top field is hard-coded as speed (km/h or mi/h), although I have recommended to Lezyne to make this user configurable so that any of the data functions can be displayed. Like the others, the GPS satellites are acquired immediately and this unit is ready to go in seconds. A stem mount is included but an out-front handlebar mount is available as an option.
Lezyne currently makes 3 GPS computers priced from $140 – $200.
• Mini GPS – for the cycling minimalist
• Power GPS – Bluetooth Only, much like Cateye Padrone Smart+
• Super GPS – Bluetooth & ANT+. Has the most functionality of Lezyne’s new computers.
I believe that the only real choice for the Lezyne units is the Super GPS. It will do most everything you will need from a training device…and, you can even get notifications of incoming phone calls as well as texts, and emails (with actual message text) are displayed (pop-up box) on the screen. The Super GPS uses 4 buttons for setup and navigation of the screens. Once you get the hang of which button does what, it’s very easy and intuitive to operate. The Super GPS saves the ride data as a ‘.fit’ file which is compatible with all of the analytical training tools on the market. Lezyne also has their own complete analytical website called GPS ROOT.
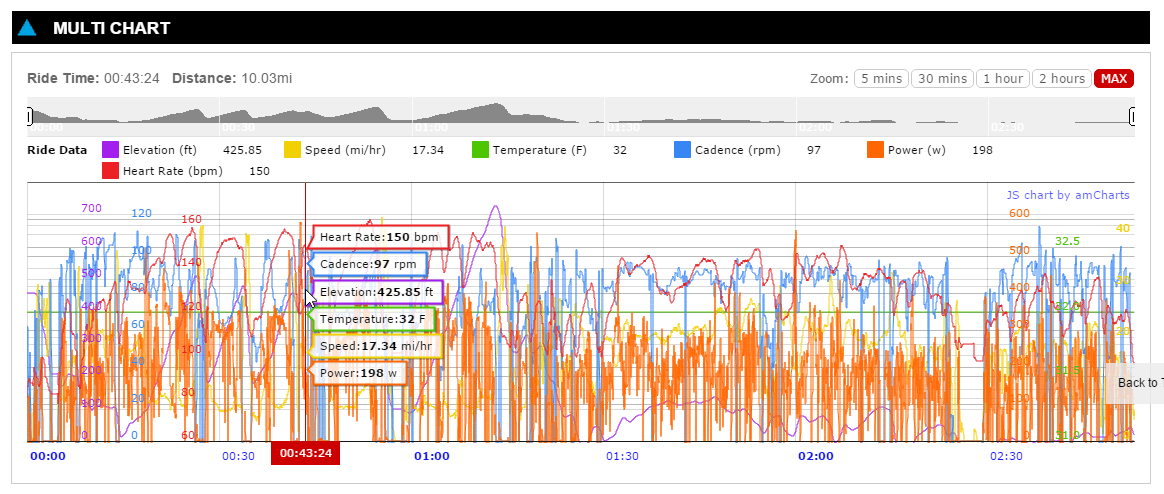
GPS root is a free site and offers very extensive data analysis. I am very impressed by how much data there is to look at on this website. Data can be viewed and analyzed all together (multi-chart) or as individual channels. Max and mins are also displayed along with a map of your route. Very impressive.
COMPUTER, DATA FIELDS and SCREENS
I setup my Super GPS in 4-line (4 data-field) mode. MPH on the top, POWER on line 2, HEART RATE on line 3 and CADENCE on line 4. Lezyne calls the 4th line a ‘ticker’, like the news tickers 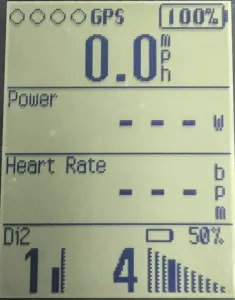 you see on TV, but, instead of automatically scrolling, your selected fields can be scrolled through with the click of a button. You first go to Settings and then select which fields you want activated and these will be the only ones that will show up when you scroll through the data fields. A different data field will be displayed each time you click the external button. The user-selectable data fields that are user configurable are;
• Heart Rate: Current, Average, Max.
• Cadence: Current, Average
• Power: Power, Power 3s, Power 10s, Power Balance, Left/Right Smoothness, Left/Right Torque Efficiency
• Speed: Current, Average, Max
• Distance: Current, Trip Total, Trip 1, Trip 2, Odometer
• Time: Ride Time, Clock
• Laps
• Time
• Clock
• Elevation: Ascent, Descent, Current
• Calories
• GPS signal strength
• Battery life indicator
• Di2 gear data
The Super GPS also boasts simultaneous ANT+™ and Bluetooth® Smart (BLE) connectivity, long runtime (up to 22 hours), micro USB connection for downloading data and recharging, auto start/stop, custom alerts and an advanced low power chip that combines GPS and Glonass which reads both USA and Russian satellites for ultra-reliable data collection.
The Super GPS is really feature packed and has a well thought out design!
HOW DID IT WORK?
Like all of the other units… Rock Solid! I have gone on several 3 hour rides and the battery indicator still showed 100%, even at 1 second interval sampling rates.
Lezyne recently updated the firmware which now adds Di2 as a data field. It currently reports on gearing and adds aDi2 battery level indicator as well. The only item you will need to obtain is the Shimano D-Fly wireless transmitter-EWW01. As you can see from the picture above, it works well, AND, they are also reporting the gearing correctly (1..n – Left to Right).
Initial pairing was extremely easy and the Super GPS has never lost a signal.
As mentioned before, I use the 4-line setup. I have found it very easy to add/change what I need to see on the bottom line.
Everything records as it should and after the training ride, it’s just a couple button presses to stop and power down the unit. When back at the shop, I plug it into the computer and power it up where I can easily upload the data into Golden Cheetah. I also upload the data into the Lezyne GPS Root application before deleting it.
HOT
• Easy to use and easy to operate
• Rock solid performance and reliability
• Includes several data fields required by coaches
• 1, 2, 3 or 4 lines of data
• Lines 2-4 are user configurable.
• Lines 2-3 are defined and static, line 4 is a scrolling ticker
• Acquires GPS signal(s) immediately
• Pair easily to Bluetooth or ANT+ devices
• Shimano Di2 integration
• L O N G Battery Life
NOT SO HOT
• Missing several required data fields that can benefit an athlete while training
• Some might view $200 as a little high compared to other competitor’s units
RATING:
Given the rock solid performance, high reliability, long battery life, BLE & ANT+ sensor support, immediate pairing of new sensors, re-pairing of existing sensors, I gave this unit a 4.80 /5.00 for both a pure training tool as well as a general purpose bike computer yielding a 9.60 / 10.00. I would like to see several additional functions but, they did listen to my suggestion of adding Di2 integration so I have a strong belief that this unit will get better as time goes on.
![]()
SIGMA SPORT ROX 10.0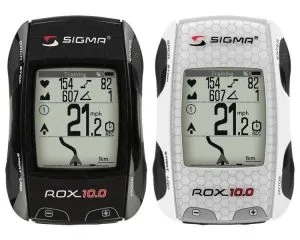
Even though this unit has been out for a while, no one has reviewed it as a coaching/training tool.
Two models are available in either black or white. The GPS SET includes the ROX 10.0 head unit, HRM, HRM strap, Speed sensor, Cadence sensor, micro-USB cable, Stem Mount and Recharging power supply. The ROX 10.0 BASIC SET includes the head unit, micro-USB cable, recharger and Stem mount. MSRP pricing is $270 and $180 respectively.
The Sigma ROX 10.0 has a 60-page User’s Manual that I recommend should be read entirely – start to finish. The ROX 10.0 includes around 95 total functions where only about 14 are useful for coaching/training. The ROX 10.0 was also the most involved unit to get up and running. See Menu Tree to the right.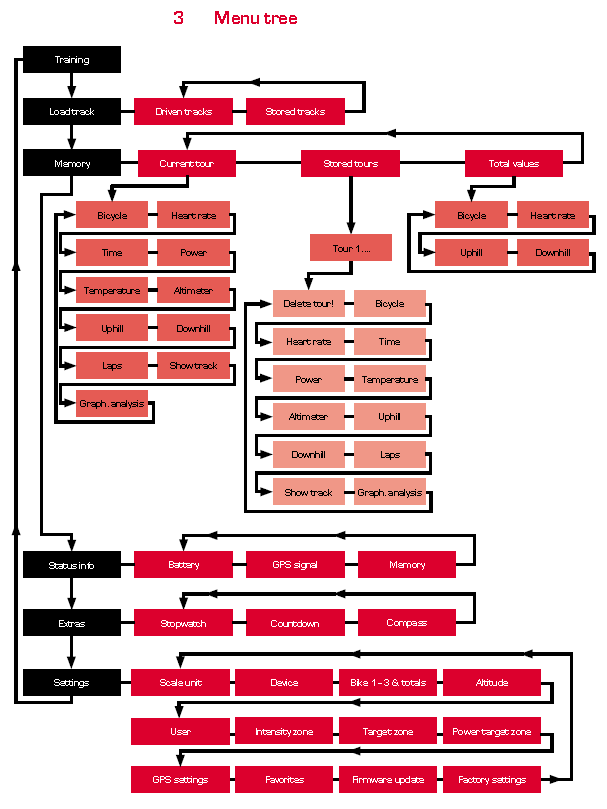
The Sigma ROX 10.0 also has 6 buttons that are needed to operate the unit while the Bryton has only 3, the Cateye Padrone Smart+ 3, the Stealth Evo+ 2 and the Lezyne Super GPS has 4.
What sets this unit apart from ALL others in this roundup? It does GPS tracks! Just like with the Magellan Cyclo 505, you can download tracks to the ROX 10.0 and it will navigate for you turn-by-turn. This is a great feature that is worth the additional cost of this unit.
COMPUTER, DATA FIELDS and SCREENS
This unit supports over 95 total functions, and since they have to reside somewhere, this is what took the most amount of time to sort out. Hopefully this overview will help make sense of this head units’ basic functionality and will help lessen the learning curve.
BASIC NAVIGATION
For both initial setup and navigation, you use 4 main buttons. ENTER (top right) button to enter a menu and select an option, BACK (top left) button to back out one level, and ‘+’ or ‘-‘ to scroll up and down through menu list items.
The main Navigation page will display TRAINING, LOAD TRACK, MEMORY, STATUS INFO, EXTRAS, SETTINGS. Use the ‘+’ button to scroll through these top level options. When you are ready to ride, select TRAINING and click the ENTER button. This brings you to the main screen as shown below.
There are 3 display segments on the main screen of the ROX 10.0. Top, Middle and Bottom display  segments. After programming the settings, this is where you will spend the majority of your time with this unit. In the description below, I will list the data displays along with the actual data (see picture to the right).
TOP display segment is divided into 2 areas. The first line displays the battery status, battery charging and GPS signal strength. Below this, up to four data fields are displayed; Current Heart Rate (154), Current Cadence (82), Current Altitude (607) and Current Incline % grade (1).
MIDDLE display segment is the Current Speed data field. Other data is displayed as well depending on the state of the ride. These are Bike Icon (1), Current to Average speed comparison (^), Speed Units (mph), GPS active icon indicating speed is coming from GPS vs Speed Sensor – shows up above mph, Exercise Time (REC) and Training countdown active -stopwatch icon symbol shows up above REC icon.
BOTTOM display segment displays up to 10 programmable values selected from your ‘favorites’ list. Press the + or – buttons to select the next/previous value.
And that’s just the tip of the iceberg. There’s a Track View mode, Altitude Mode, Lap Mode and several more.
HOW DID IT WORK?
First off, you will need to install Sigma Data Center (SDC) from the supplied DVD. Current Version is 4.0.10. This is the main communication dashboard with the ROX 10.0. After installing SDC, turn on the ROX 10.0 and plug it into the USB port of your PC, then do a firmware upgrade. Sigma Sport is always adding capability to this unit, so check for firmware updates once per week. SDC provides a shortcut to many of the settings, and it’s much easier to use the PC than to scroll through the setup menus on the device itself. So, save yourself a lot of time and use SDC. With SDC, you can easily program your custom / favorite settings and upload them to the ROX 10.0, upload to Strava, Training Peaks, Facebook, Twitter, etc. The main navigation is along the left column and is intended to be used in conjunction with the MENU button in the upper right hand side of the application. One thing that wasn’t clear, which I found out later is that the MENU items change depending on which main navigation tab you select.
As you can see, it’s pretty involved to get this head unit up and running by programming directly on the device so I highly recommend to use SDC.
Setting up my unit, I again mainly use HR, CAD, PWR. I also used Track View mode as well as several of the zone training functions. These are all set as my favorites and I can scroll through them at the bottom of the screen.
TRACK VIEW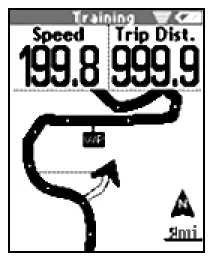
Once you upload all of your track (. gpx) files from your PC to the ROX 10.0, navigate to the LOAD TRACK menu and click ENTER. After selecting your track, the screen will change to graphically display the route segment(s). From here you can start the route, do a reverse route, show altitude profile, show details, etc. Lots of functionality in this device.
REGULAR TRAINING RIDE
To start a training ride, turn on the ROX 10.0, select Training then start pedaling.
HOT
• A little complicated to initially figure out, but, use the tech support line if you get stuck. They are very helpful and will walk you through how to set it up and use this device. I give their tech support an A+
• Once you go through the unit and play with it a little, it will make more sense
• This unit has lots and lots and lots and lots of features
• Includes several of the data fields required by coaches
• You can customize the bottom field like the Lezyne and Cateye Evo+
• Acquires GPS signal(s) immediately
• Pairing is quick and easy
• Full Zones defined (HR, PWR) and available for zone training
NOT SO HOT
• A little complicated to initially figure out, but, use the tech support line if you get stuck.
• Missing required coaching and training data fields
• Their user manual is pretty overwhelming. In the user manual’s subsections, I would remind the users how to get into a specific menu instead of just describing what to do once you are there. Finding the menu is sometimes half the battle.
RATING:
This was the most surprising. Packed with 95 functions, there’s only 18 that are suitable for training.
But, there’s lots and lots and lots of other features. I gave this unit 4.85 / 5.00 for use as a coaching/training tool and 4.90 / 5.00 as a general overall bike computer. With a combined score of 9.73 / 10.00, this puts it in second place behind the Bryton.
Bottom line, this is a real solid unit!
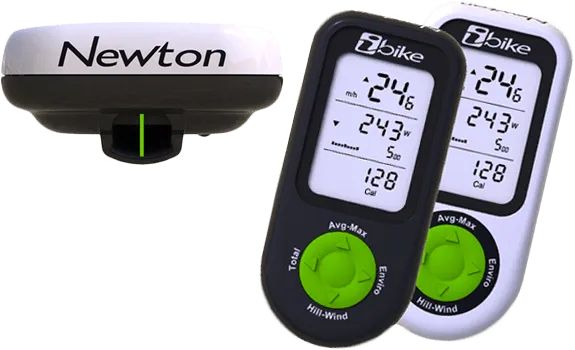
iBIKE NEWTON POWER METER – Mini Review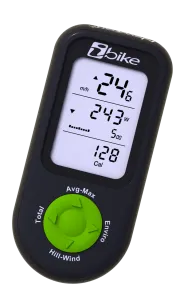
2015 ushered in a plethora of Power Meters. One of the ones that has been around the longest is the iBike Newton. This is an algorithmic power meter vs being a direct force power meter. This means that there are mathematical calculations being done to provide the athlete with data vs physically ‘flexing’ a strain gauge via the crankarm or pedals such as Stages, Rotor, Garmin, etc.
I have included this mini-review since, when testing all of the different head units, I was able to also directly compare the power numbers between the Stages and the Newton.
DATA FIELDS and SCREENS
Instead of calling it a green button, it actually works more like a toggle switch.
• CENTER position gets the user back to the main screen and toggles between Power and Distance
• LEFT position get you the totals
• UP position lets you see the average and maximum values
• RIGHT position shows you the environment, temperature, clock, feet climbed, etc.
• DOWN position shows the hill and wind, wind speed, direction, % grade, etc.
You can toggle between any of these data fields at any time during the ride.
PRICE
The pricing for power meters has come way down. In fact, the basic iBike Newton carries an MSRP of just $ (check price here)! WOW – Great Price for a real Power Meter!
There are several upgrades…Newton 6 Pro, Newton Power Stroke, Newton Tracker GPS. There are also several new models that are of interest! INTRODUCING:
a) The Newton+ 6 has just been announced which adds memory and a few other features. MSRP=$499
b) The Newton PowerPod has also just been introduced and uses your ANT+ GPS Head Unit device to display its output. Check it out here….
WHATS IN THE BOX?
The $349 iBike Newton Basic package includes:
• Newton 6 Power Cycling Computer with built-in rechargeable battery
• Dual Mount for attaching the Newton 5 to your bicycle (optional mounts available)
• Combined ANT+ Speed/Cadence Sensor
• if your bike already has an ANT+ sensor, you can delete this to save $
• USB Cable
• requires user-supplied PC/Mac or USB charger for recharging the Newton’s battery
• Isaac Ride Analysis Software for Mac/PC
• Quick Start Instructions (Additional instructions and videos are also included in the Help menu of Isaac)
iBike Newton Basic also includes the following functionality
• User Configurable Screens
• Dynamic Power Smoothing
• Automatic Profile Selection
• Simplified Setup and Calibration
• Planned “Non-Obsolescence”
• New wind port design for superior performance, rain or shine
For an additional $111 ($460 total), you can upgrade to the Newton 6 Pro Package which also gets you
• Indoor Trainer Capability
• Power Fitness (FTP) Test
• Training Stress Score (TSS) display
• Normalized Power (NP) display
• Intensity Factor (IF) display
• Pre-programmed Cardiovascular Power Interval Workouts
• Pre-programmed Strength Power Interval Workouts
• Pre-programmed Fat-burning Power Interval Workouts
• User-Programmed Power Interval Workouts
• Recording and display of direct force power meter (DFPM) data
For an additional $222 ($571 total), you can upgrade from the BASIC to the Power Stroke Package which gets you ALL of Newton 6 Pro, PLUS the following.
• Left-right, front-back, and side-to-side Power Stroke pedaling measurement
• Wind tunnel “CdA” measurement
• Coast-down measurement of CdA and Crr
• 4x ride memory
• Button control of Newton 5 setup
ISAAC SOFTWARE:
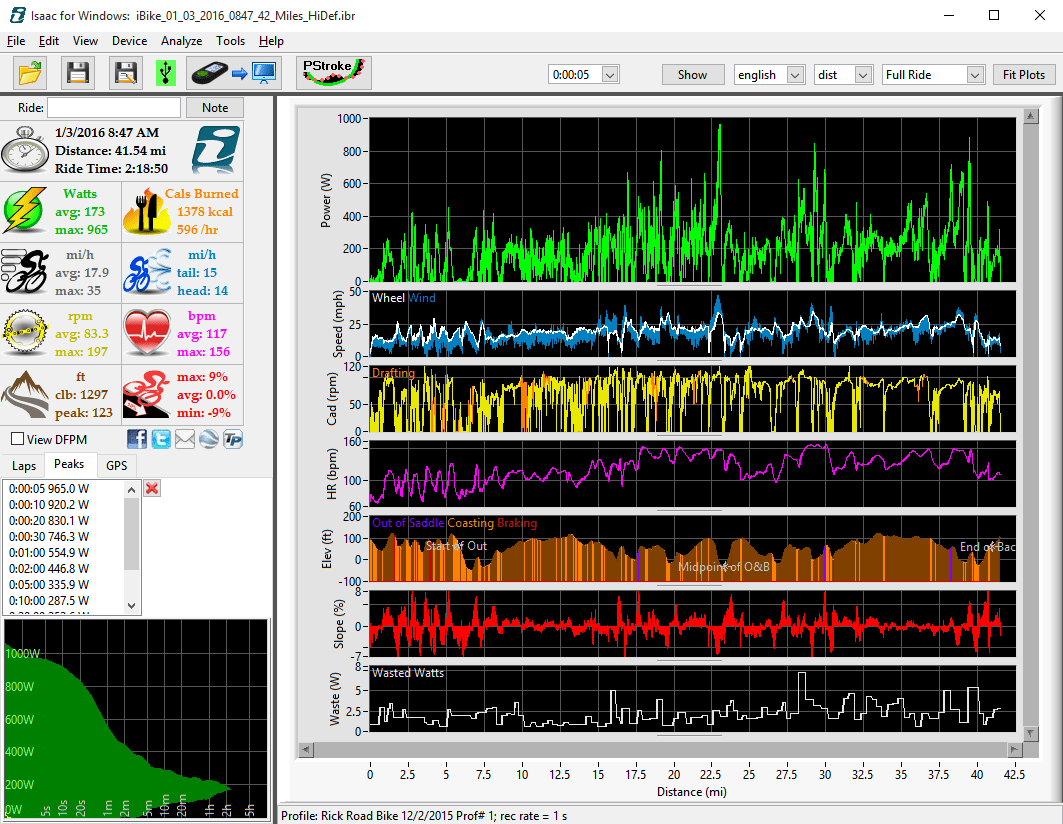
The Isaac software is the ‘brains’ behind the Newton. It gives very detailed information and insights about ride information that is layed out in a logical manner and very easy to read and comprehend.
Isaac also lets you manage your Newton by helping you easily upgrade the firmware.
And best yet, its Free! It runs on both Windows and Macintosh.
Newton generates ‘.ibr’ files, not standard ‘.fit’ files. But, after uploading files from the Newton to the PC, you can convert the ‘.ibr’ files to a format that Training Peaks, Strava, MapMyRide, etc. can understand.
The ibr file extension is associated with the Thin Client computers developed by Hewlett-Packard company that used HP ThinPro or Windows Embedded operating systems. The ibr file stores image of operating system installed in the Thin Client.
HOW DID THE NEWTON ‘POWER’ COMPARE TO THE STAGES?
First, it really didn’t take that long to get used to it. It’s one click of a button and it starts recording. 2 clicks and its powered off.
Comparing to the Stages is difficult. One calculates dual-sided algorithmically, the other is a single-sided DFPM (Direct Force Power Meter). The Newton reads higher highs and lower lows than the Stages, but, over a 2 to 3-hour ride, there is only 10-30 average watt difference. Max watts can be off by over 100 with the Newton being the higher number. But, this seems to be a consistent difference so either power meter would be fine for training.
For those looking to get into TRAINING WITH POWER, look no further than the Newton for a cost effective POWER METER solution!
FINAL RESULTS
Most of these units are manufacturers samples. Every unit has proven to have rock solid performance and extremely high reliability. As with any modern electronic device, it will eventually get stuck. Stuck on a screen, mode, function, etc. All units have a bail-out sequence that will usually power down and unfreeze it. I tested this where I could and no data or settings were ever lost.
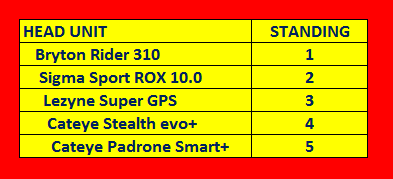
Again, all units have proven to be highly reliable and are great value for the money. I believe that I am the first to test these as coaching/training tools so hopefully the manufacturers will put in a few more functions to make them function in this capacity. The closest head unit to meet this goal is the Bryton Rider 310. This can easily be seen on the GPS HEAD UNIT COMPARISON CHART above.
AND THE WINNER IS …
The Bryton Rider 310 !
takes the crown and has proven to be the best head unit comparing price/performance and functionality/applicability for use as a coaching/training tool.

I have always enjoyed bicycling and, through a series of coincidences, became a Bicycle Industry Consultant and Product Tester. I test prototype products for companies and have published only off the shelf production products on biketestreviews.com.
 Trainer Review")

)