JoeBlow™ Booster Pump Rating
-
Overall rating
Summary

![]() PRICE MSRP: check here
PRICE MSRP: check here
SOURCE: Bike shops, Websites
OBTAINED: Manufacturer Sample
BEST FEATURES:
1) SmartHead pimp head
2) Easy Tubeless Inflation
3) Easy to read gauge
SmartHead automatically adjusts to fit both Presta and Schrader valves. Charge up the large storage cylinder, release the pressurized air and tubeless tires easily inflate.
Pros
- Easy-on-easy-off SmartHead pump head automatically adjusts to either Presta or Schrader valves
- Bezem on Gauge can be switched between standard tire inflation or charge to inflate tubeless tires
- Large, highly accurate and easy to read 2” gauge, 3” including bezel on top of cylinder
- Maximum pressure up to 160 psi/11 Bar
- Push Button Air Release
Cons
- the price might be a little high for some. But, consider the alternatives of (a) taking bike or wheelset to your LBS to have them pump up your tubeless tires, (b) buy an air compressor plus accessories, (c) burn through a CO2 each time you mount a tubeless tire
User Review
( votes)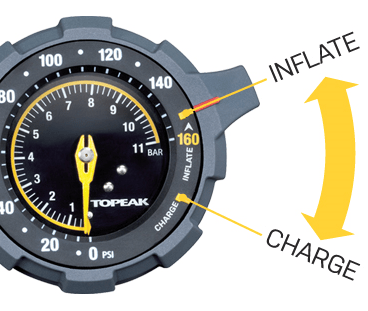
JOEBLOW™ BOOSTER PUMP – 9 POUND BEAST!

That’s right. Before opening the pump and packaging, I weighted it. A full 9 pounds! This is one HEAVY DUTY BEAST of a pump – JoeBlow™ BOOSTER Pump.
So why is it so heavy?
There are 2 separate air chambers. One is for standard pumping of a tire, the other is a ‘charging’ chamber that stores ‘compressed’ air. When you open the chambers valve, a burst of 160 psi air rushes into a tubeless tire quickly seating the beads. Works kind of like a manual air compressor.
I actually have 2 tubeless wheelsets that I test tires with. One wheelset is the Shimano Dura-Ace 9000 24mm clincher/tubeless wheelset (WH-9000-C24-TL), the other, Ultegra 6800 23mm clincher/tubeless wheelset (WH-6800). Both great training wheelsets and I do believe that they perform better with lightweight tubeless tires.
But, one of the BIGGEST issues cyclists have with a new tubeless tire is getting the bead to seat for the first time. To get the bead to seat, you have had 3 alternatives;
- Take your wheels and tires to your LBS to have them pump them up with their air compressor, but, unless you are a friend of the shop, they will more than likely charge you a nominal fee.
- You could buy your own air compressor, as well as
- an air hose, quick-disconnect couplers, tire inflator kit, Presta pump end, extra hose, clamps, or,
- buy an integrated $140 Park shop inflator
- Lastly, blow through a CO2 and hope that the bead catches the first time.
Maybe I should take a step back for those that have never used tubeless tires. Tubeless tires are advertised to be lighter and have a much more tubular-type feel. They are also easier to fix when they flat since you can use a tubeless tire sealant or you can patch the tire from the inside. As a last resort, you can stuff in a tube.
Those are the good points. The bad points are (a) higher cost than a clincher, need to run a tire sealant (which negates the reduced weight since not running a tube), a much harder time getting the tire initially mounted onto the rim and impossible to inflate the first time using a standard pump. Hence the purpose of this test using the JoeBlow™ BOOSTER pump.
Before I received this pump, I used my own air compressor with a custom made Presta pump end attached to a standard pressure valve to get my road tubeless tires inflated (see pic below).
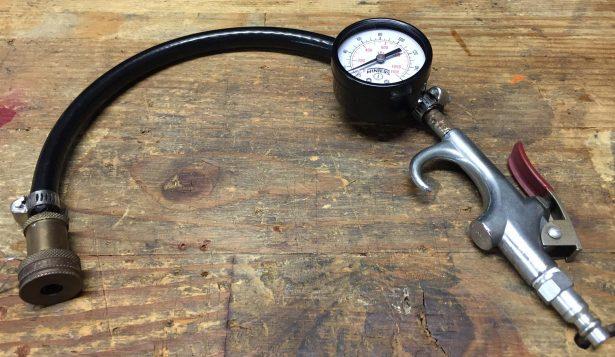
This was a time consuming effort. I had to first fire up the air compressor, then mount the quick-disconnect pump assembly then, after reaching 110psi, I let all the air into the Presta valve and 9 times out of 10 this would work the first time, but, for the 10th time, I had to “fiddle-with” the tire to get it to lay out just right.
PATH OF LEAST RESISTANCE –or—PREPPING FOR SUCCESS
 So what do I mean about ‘fiddle-with’? In order to guarantee success, here are several things I always have to do when mounting a new tubeless tire.
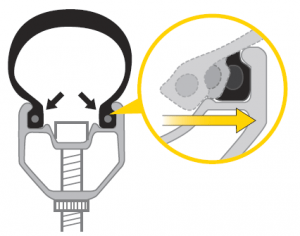
- Make sure that the tubeless tire beads lay flat against the outsides of the valve stem (i.e., none of the tire should cover the top of the valve stem or air will leak out at this point. See pictures to the left and right.
- I ensure that the valve stem is tightened securely via the lock nut otherwise air will leak out here as well.
- Trick #1 – before mounting your new tubeless tire, place it in the sun and let it warm up. This will make it supple so that it is easier to mount and seat the bead.

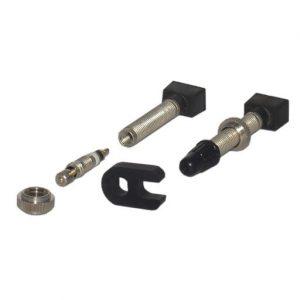
- Trick #2 – pictured to the right is a tubeless tire replacement valve kit. Several manufacturers use removable cores. Since your goal at this point is to only get the bead to seat, removing the core allows greater air-flow into the tire making for a more successful install. After the bead seats, screw the valve core back in then pump as usual.
EASY TO USE
I was pleasantly surprised when I saw this pump advertised. Just what I was looking for!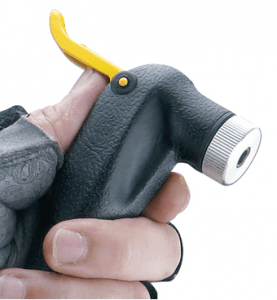
SmartHead™ – Due to the great design of the SmartHead™, all it takes is a light press of the pump head onto the Presta valve to start the process. Flipping the extra-large lever easily secures the SmartHead™ onto the Presta valve. Next step is to ‘CHARGE’ the pump.
TO CHARGE – Turn the Bezel to the ‘1b’ position (see picture below) which puts the pump into ‘CHARGE’ mode. This mode stores the pressurized air into the large cylinder as you pump. It takes about 45’ish pumps on the handle to reach 160 psi of compressed air (see ‘2’ in picture below).
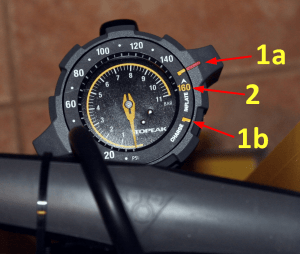 NEXT, SEAT THE BEAD – Turn the bezel counter-clockwise from ‘1b’ to ‘1a’ which allows all of the stored air to rush in through the valve stem. This is shown in the 3rd video below. If you listen closely to the video, you can hear several loud pops as the bead seats into the rim.
CONTINUE PUMPING – Completing the steps above will get you to around 80 psi. Leaving the pump on ‘1a’, continue pumping up the tire like you would with a regular pump. For my road wheels, I usually stop around 100-105 psi.
COMPLETE THE PROCESS – When the tire is full, depress the gold air release button on the front of the pump then remove the pump valve from the valve stem by popping the lever.
BUT WHAT IF I JUST WANT TO INFLATE? – You can also use the JoeBlow™ BOOSTER pump as your regular daily pump. Just leave the pumps’ bezel on the #1a position and pump to whatever pressure you feel most comfortable. The pump’s bezel displays pressure in PSI as well as BAR.
WHAT I REALLY LIKE
- The gauge is mounted HIGH and at the TOP of the pump so it is very easy to see, even in low light conditions, and even by us 60+ year olds. Gauges on most other pumps are mounted at the bottom which makes it just about impossible to clearly see the gauge. This pump uses a 2” gauge, 3” if you include the bezel. Nice and large and easy to see.
- Change easily between CHARGE and INFLATE with the twist of the bezel.
- To CHARGE – 1b->1a: From complete flat to 160 psi in about 45 pumps.
- To INFLATE – Leave on 1a to use as a normal pump.
- SMARTHEAD™ – same pump head is used for both Presta and Schrader. No, I’m not talking about flipping the valve over like other pumps, I’m talking about just pressing the SMARTHEAD™ onto any valve stem and the pump head will seal over it – either Presta or Schrader.
- Heavy Duty/Top quality Pump – everything on this pump is heavy duty and it works as advertised.
SUMMARY
The only slight negative I see is the MSRP of $$$ (check latest price) which might dissuade some potential customers. But, when considering the other options of buying your own compressor or taking the wheel to your LBS, and, since this pump can also be a regular pump, handles both Presta & Schrader and its built like a tank, I believe that this price is right in-line with its capabilities.
Please take a look at the videos below. These show the process of pumping up road tubeless tires.
DO I RECOMMEND IT?
Yes! Definitely! Highly Recommended.
This pump will last you for years and years, and more than likely, decades.
Click Pics below for YouTube Videos of Pump in action!
[video_lightbox_youtube video_id=”7BC92EfreZQ” width=”640″ height=”480″ anchor=”https://biketestreviews.com/wp/wp-content/uploads/2016/05/1-1.png” alt=”This video shows a newly mounted tubeless tire, no air, flat”]
[video_lightbox_youtube video_id=”Rn96WboGfgA” width=”640″ height=”480″ anchor=”https://biketestreviews.com/wp/wp-content/uploads/2016/05/2-1.png” alt=”Pumping up the tire shows air escaping”]
[video_lightbox_youtube video_id=”foV5NSCbv0o” width=”640″ height=”480″ anchor=”https://biketestreviews.com/wp/wp-content/uploads/2016/05/3-1.png” alt=”Place Pump in CHARGE mode, pump to 160psi, then inflate. Hear the popping of the bead being set”]

I have always enjoyed bicycling and, through a series of coincidences, became a Bicycle Industry Consultant and Product Tester. I test prototype products for companies and have published only off the shelf production products on biketestreviews.com.

